How to resize image in Adobe Express
“`html
In today’s digital world, the ability to optimize images for various platforms is a crucial skill, especially for marketers, designers, and content creators. Adobe Express is a versatile tool that allows users to resize images effortlessly. If you’re looking to enhance your visual content, this guide will walk you through the essential steps to resize images in Adobe Express effectively.
1. Understanding Adobe Express: A Brief Overview
Adobe Express, formerly known as Adobe Spark, is a web-based application that simplifies graphic design, enabling users to create stunning visuals with ease. Whether it’s for social media posts, presentations, or marketing materials, Adobe Express provides a user-friendly interface tailored for people who might not have extensive design training.
One of the standout features of Adobe Express is its image editing capabilities, allowing users to resize images without losing quality. This is particularly important in a world where different platforms require different image sizes to maintain professionalism and aesthetic appeal.
2. Why Image Resizing Matters
Resizing images is not just about changing dimensions; it plays a pivotal role in how content is perceived online. For instance, social media platforms like Instagram, Facebook, and Twitter each have specific image size requirements. Using properly sized images can help improve engagement rates and ensure that your content looks polished.
Additionally, large images can slow down website loading times, negatively impacting user experience and SEO rankings. By learning how to resize images efficiently in Adobe Express, you can enhance the speed and accessibility of your digital content.
3. Getting Started: Accessing Adobe Express
To begin resizing images in Adobe Express, you’ll first need to access the platform. Simply visit the Adobe Express website or download the mobile app from your device’s app store. Signing up requires an Adobe account, which can be created for free. Once logged in, you’ll find a dashboard filled with tools and templates to kickstart your design projects.
It’s advisable to familiarize yourself with the layout, as various features are neatly organized. This will make the process of finding the resizing tool more intuitive as you delve into your projects.
4. How to Resize an Image in Adobe Express
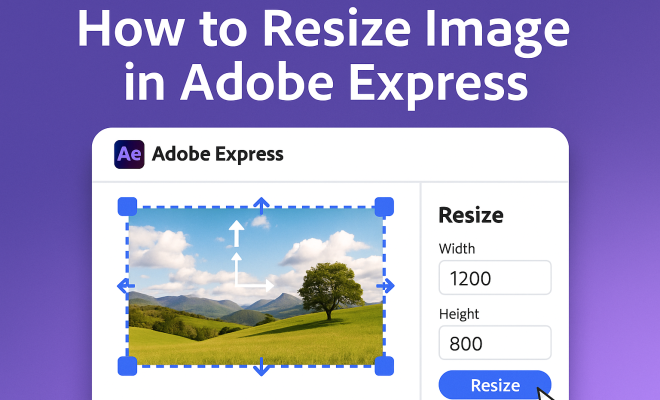
Resizing an image in Adobe Express is straightforward. Here’s a step-by-step guide to help you:
- Upload Your Image: Start by clicking on the ‘Upload’ button from your dashboard. You can choose images from your device or use stock images available within the application.
- Select Your Image: Once uploaded, click on your image to bring up the editing options.
- Adjust the Size: On the right sidebar, you’ll find options to resize your image. You can either input specific dimensions or use the preset sizes tailored for platforms like Instagram or Facebook.
- Maintain Aspect Ratio: To ensure your image doesn’t get distorted, make sure to check the aspect ratio lock. This ensures that your image scales uniformly.
- Download Your Resized Image: Once you’re satisfied with the size, click on the ‘Download’ button to save your resized image. You can choose the file format that fits your needs.
By following these steps, you’ll quickly learn to resize images like a pro in Adobe Express. (See: Importance of image quality in communication.)
5. Exploring Advanced Resizing Features
While basic resizing is essential, Adobe Express also offers advanced features that can enhance the resizing process. For instance, users can apply filters, adjust brightness, and use cropping tools to refine their images further.
Additionally, Adobe Express allows batch processing, enabling you to resize multiple images at the same time. This is a significant time-saver for projects requiring numerous visuals, such as campaigns or presentations. To utilize this feature, simply select multiple images before accessing the resizing tool.
6. Best Practices for Resizing Images
To get the most out of your image resizing experience in Adobe Express, keep in mind a few best practices:
- Know Your Platform’s Requirements: Before resizing, familiarize yourself with the recommended image sizes for the platform you’re using. This ensures that your visuals display correctly.
- Optimize for Quality: Always prioritize quality. While it’s tempting to reduce file size drastically, be cautious not to sacrifice image clarity.
- Experiment with Different Formats: Different image formats (JPEG, PNG, GIF) have various strengths. Use PNG for images with transparency and JPEG for photographs.
- Preview Before Finalizing: Take advantage of Adobe Express’s preview option to see how your resized image will look before downloading it. This helps catch any potential issues.
These practices will help you produce superior images that effectively communicate your message.
7. Common Issues and Solutions When Resizing Images
Even proficient users can sometimes encounter challenges while resizing images. Here are a few common issues and how to remedy them:
- Loss of Image Quality: If you notice pixelation or blurriness, make sure you’re starting with a high-resolution image. Always resize down instead of up whenever possible.
- Aspect Ratio Distortion: If your image appears stretched or squished, double-check that the aspect ratio lock is enabled during resizing.
- File Size Too Large: If a file is too large after resizing, consider compressing it within Adobe Express or using a separate file compression tool.
By addressing these issues proactively, you can streamline your image resizing process and achieve the results you desire.
8. Integrating Resized Images into Your Workflow
Once you’ve mastered how to resize images in Adobe Express, consider how to integrate this skill into your overall workflow. For content creators, it’s essential to have a consistent visual identity across platforms.
Establish a routine for resizing images whenever you create new content. Set specific dimensions for each platform, making it easier to produce cohesive visuals quickly. This not only saves time but also enhances brand recognition, as your audience will begin to associate your visuals with your brand.
9. Understanding Different Image Formats
Different image formats serve various purposes and can affect the outcome of your visuals. Here’s a breakdown of some common formats you might encounter: graphic design favorites offers useful background here.
- JPEG: Ideal for photographs and images with gradients. JPEG files can be compressed, making them smaller, but this can lead to loss of quality.
- PNG: Perfect for images that require transparency, such as logos and icons. PNG files maintain quality even after multiple edits but usually have larger file sizes.
- GIF: Best for simple animations and graphics. GIFs support transparency but have a limited color palette, making them unsuitable for complex images.
- SVG: Scalable Vector Graphics are perfect for logos and illustrations. SVGs maintain quality at any size, making them great for responsive design.
Understanding these formats helps you choose the right one when resizing images, ensuring that your visuals are optimized for their intended use.
10. Statistics on Image Engagement
When it comes to digital content, the statistics surrounding image engagement can be compelling. Numerous studies indicate that the use of high-quality images can significantly improve user engagement. For instance: (See: Tips for enhancing visual content.)
- Posts with images receive 94% more views than those without images.
- Content containing relevant images receives 650% more engagement than text-only content.
- Infographics are liked and shared three times more than any other type of content on social media.
These statistics underscore the importance of investing time in resizing and optimizing images, as they can directly impact your content’s effectiveness and reach.
11. Expert Perspectives on Image Resizing
Experts in digital marketing and graphic design emphasize the importance of image resizing in today’s visual-centric landscape. According to Cassie Lathen, a social media strategist, “Visual content is the heart of engagement on social media. If your images aren’t optimized, you’re missing out on potential interaction with your audience.”
Similarly, renowned graphic designer Sam Ritchie notes, “The right image dimensions can make or break your design. It’s not just about aesthetics; it’s about functionality and ensuring that your message is communicated effectively.”
These insights highlight how critical image resizing is for both engagement and effective communication in digital media.
12. Frequently Asked Questions (FAQ)
What is Adobe Express?
Adobe Express is a web-based graphic design tool that allows users to create and edit visuals easily. It is particularly favored for its user-friendly interface and extensive features for image editing.
Can I resize multiple images at once in Adobe Express?
Yes, Adobe Express allows users to resize multiple images simultaneously. Simply select the images you want to resize, and you can apply your desired dimensions to all of them at once.
Is resizing images in Adobe Express free?
Adobe Express offers a free tier with various features, including the ability to resize images. However, some advanced features may require a subscription. (social media strategies guide)
What types of images can I resize in Adobe Express?
You can resize various image formats in Adobe Express, including JPEG, PNG, and GIF. The platform supports a wide range of file types for flexibility in your projects.
How do I know what size to resize my images?
It’s important to check the recommended image sizes for each platform you intend to use your images on. Different platforms have specific dimensions for optimal display, so ensure you do your research or use the presets available in Adobe Express.
Will resizing an image always maintain its quality?
While resizing images in Adobe Express generally preserves quality, starting with a high-resolution image is crucial. Resizing down usually maintains quality better than resizing up, which can lead to pixelation.
13. Common Scenarios for Resizing Images
Understanding when and why to resize images can greatly enhance your workflow and output quality. Here are some common scenarios where resizing images is necessary:
- Social Media Posts: Each platform has specific image size requirements. For example, Instagram typically favors square images (1080 x 1080 pixels), while Facebook’s shared images are best at 1200 x 630 pixels. By resizing your images accordingly, you ensure they look their best on each platform.
- Email Campaigns: Images in email newsletters should be optimized for quick loading. Usually, a width of 600 pixels works well for most email clients. Resizing images can prevent your emails from appearing cluttered and slow to load.
- Website Thumbnails: Thumbnails for blog posts or galleries often need to be smaller, around 150 x 150 pixels. Properly resized thumbnails can help your website load faster and improve user experience.
- Print Media: When preparing images for print, you often need a higher resolution (300 DPI is standard). Resizing may involve increasing dimensions while maintaining print quality, which can be tricky if the original image isn’t high enough resolution.
14. Image Resizing for SEO Benefits
Image resizing isn’t just about aesthetics; it’s also an important factor in SEO. Search engines prioritize websites that load quickly, and large images can significantly slow down your site’s performance. Here’s how resizing images can enhance your SEO:
- Improved Page Load Speed: By reducing image file sizes through resizing, you can enhance your website’s load speed, leading to a better user experience and lower bounce rates.
- Better User Engagement: Images that are appropriately sized and optimized keep users engaged for longer. The longer users stay on your site, the more likely they are to convert, positively affecting your SEO rankings.
- Enhanced Mobile Experience: With more users accessing content on mobile devices, it’s crucial to have images that load quickly and display correctly on varied screen sizes. Resizing images for mobile optimization can improve accessibility and user satisfaction.
15. Tips for Beginners in Image Resizing
If you’re new to resizing images with Adobe Express, here are some handy tips to help you get started:
- Take Your Time: Don’t rush through the resizing process. Experiment with different sizes and formats, and see how they look on various platforms.
- Use the Templates: Adobe Express offers a variety of templates tailored for different platforms. Use these as a starting point to ensure your images are the right size.
- Keep Learning: Graphic design is a vast field. Take advantage of Adobe’s resources and tutorials to expand your skills.
- Seek Feedback: Share your resized images with peers or on social media to gather feedback. This can help you improve and develop your own style.
16. Conclusion: Elevating Your Design Skills
Learning how to resize images in Adobe Express is an invaluable skill that can greatly enhance your digital content. With its straightforward interface and powerful features, Adobe Express stands out as an excellent tool for both novice and seasoned designers alike.
As you continue to create and resize images, remember that quality and consistency are key. By adhering to best practices and utilizing the advanced features Adobe Express offers, you can produce stunning visuals that captivate your audience and elevate your brand’s presence online.
“`
Trending Now
Frequently Asked Questions
How do I resize an image in Adobe Express?
To resize an image in Adobe Express, upload your image to the platform, select it, and then use the resize tool to adjust the dimensions. You can enter specific pixel values or choose from preset sizes based on social media or print requirements.
What formats can I use in Adobe Express for image resizing?
Adobe Express supports various image formats, including JPEG, PNG, and GIF. When resizing, ensure your original image is in one of these formats for optimal compatibility and quality preservation.
Why is it important to resize images for social media?
Resizing images for social media is crucial as each platform has specific size requirements. Properly sized images enhance engagement, maintain visual appeal, and prevent cropping that can detract from your content's message.
Can I resize images without losing quality in Adobe Express?
Yes, Adobe Express allows users to resize images without losing quality. The platform uses advanced algorithms to ensure that your images maintain sharpness and clarity, making them suitable for various digital platforms.
Is there a mobile app for Adobe Express?
Yes, Adobe Express has a mobile app available for download on both iOS and Android devices. The app provides similar features to the web version, allowing you to resize images and create content on the go.
Agree or disagree? Drop a comment and tell us what you think.