How to export video from Premiere Pro
“`html
Adobe Premiere Pro stands as one of the most powerful video editing tools available, favored by professionals and enthusiasts alike. But once you’ve invested hours perfecting your video, how do you ensure it looks just as stunning upon export? Knowing how to export video Premiere Pro effectively is crucial for achieving the best quality without compromising on parameters like file size and format. In this guide, we’ll explore the essential steps for exporting your video projects seamlessly and efficiently.
1. Understanding the Export Process
The export process in Premiere Pro is your gateway to sharing your creative work with the world. Before diving into the export settings, it’s vital to grasp why this process is so important. When you finish editing your video, you need a format that best suits your intended platform—be it YouTube, Instagram, or broadcast. Each platform has specific requirements, and understanding these can make a significant difference in how your video is perceived.
Exporting involves converting your project into a single video file, which combines all your edits, transitions, effects, and audio adjustments into one cohesive product. This stage is where you’ll determine the resolution, frame rate, and file format, all of which can impact the final quality and compatibility of your video.
2. Choosing the Right Export Settings
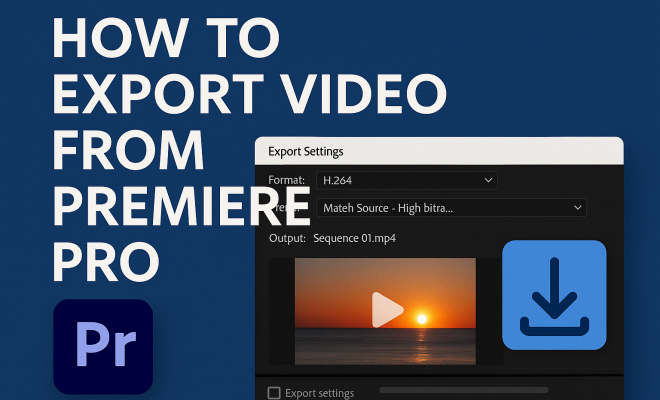
After completing your edit, the first step in the export process is to access the export settings. You can do this by navigating to File > Export > Media. Here, you’ll encounter a plethora of options ranging from format to preset. The most commonly used format is H.264, which compresses video while maintaining high quality, making it perfect for most web platforms.
When selecting a preset, consider where your video will be published. For instance, if you’re exporting for YouTube, you can select the YouTube 1080p HD preset. These presets simplify the process by providing optimal settings specific to the platform you choose, ensuring your video looks its best on various devices.
There are also presets for social media platforms like Facebook, Instagram, and TikTok, each designed to align with the recommended settings of those platforms. For instance, if you’re creating a story for Instagram, you might choose a vertical preset to fit the 9:16 aspect ratio.
3. Setting Resolution and Frame Rate
Resolution and frame rate are two critical factors that influence the quality of your exported video. The resolution determines how much detail is visible in your video. Common resolutions include 1920×1080 (Full HD) and 3840×2160 (4K). If your project is shot in 4K, you should export in 4K to retain that detail; otherwise, downscaling might lead to a loss in quality.
Frame rate, measured in frames per second (fps), is another vital aspect. Common frame rates include 24 fps for a cinematic look, 30 fps for standard video, and 60 fps for high-motion content. Selecting the right frame rate will depend on the type of video you’re producing. If you shot your video at a specific frame rate, ensure your export matches it to avoid motion blur or choppiness in playback.
It’s important to note that different frame rates can yield dramatically different viewing experiences. For example, a higher frame rate can make the action appear smoother and more lifelike, which is particularly useful for sports or fast-paced videos. Conversely, a lower frame rate can create a more artistic, cinematic feel, which is often preferred in narrative films.
4. Audio Settings: Ensuring Impeccable Sound
Video is only half the equation—audio plays a crucial role in audience engagement. When exporting your video from Premiere Pro, don’t overlook the audio settings. In the export settings window, you’ll find audio options that allow you to select the codec (AAC is standard), sample rate (48 kHz is preferred for video), and bitrate. (See: Video editing overview on Wikipedia.)
Choosing a higher bitrate for audio will enhance sound quality, but this also increases the file size. For most online platforms, a bitrate of 192 kbps is sufficient. However, if you’re producing music videos or content where audio quality is paramount, you might want to consider higher bitrates, such as 320 kbps.
In addition to bitrate, ensure your audio channels are correctly configured. Most online videos utilize stereo sound (two channels), but some may require surround sound (five or more channels) for a more immersive experience. Always listen to the exported audio to ensure it matches your expectations and the quality is up to standard.
5. Using Queue vs. Exporting Directly
Premiere Pro offers two primary methods for exporting: direct export and queuing in Adobe Media Encoder. Direct export is straightforward; you hit the export button, and Premiere Pro begins processing your video. However, this can tie up your editing workspace if you’re working on multiple projects.
Using the queue feature allows you to send your project to Adobe Media Encoder, freeing up Premiere Pro for additional edits. This is particularly beneficial for users who manage multiple videos, as it allows batch processing. Simply select Queue instead of Export, and Adobe Media Encoder will handle the rest.
One of the advantages of using Adobe Media Encoder is that it supports a wider range of codecs and formats, which can come in handy if you’re exporting for specific uses. Additionally, you can adjust settings for multiple projects in the queue, saving you time and effort once you’re ready to start exporting.
6. Monitoring the Export Process
As your video exports, it’s essential to monitor the process to ensure there are no issues. Premiere Pro provides a progress bar that indicates how long the export will take and the overall percentage complete. Keep an eye out for any error messages; if something goes wrong, it’s easier to troubleshoot while the export is still in progress.
Additionally, consider exporting a small section of your video first, especially if you’ve made significant changes to audio or effects. This test export can help you identify any issues before committing to exporting the entire project, saving you time and frustration.
If you’re working on a longer project, you can also use the “Render and Replace” feature for clips that have been heavily edited or are using effects. This can reduce the workload during export, as these clips will be pre-rendered, resulting in a smoother export process overall.
7. Final Checks and Quality Assurance
Once the export is complete, it’s time for the final review. Play back your video to check for any visual or audio issues. Look for things like sync problems, color discrepancies, or unexpected artifacts. This quality assurance step is crucial, especially if your video is intended for professional use or public distribution.
If you’re satisfied with the output, it’s time to share it! Depending on the platform, you might need to adjust the file name or format to meet specific upload requirements. Remember to include relevant metadata (like title, tags, and description) to enhance discoverability on platforms like YouTube.
Don’t forget to check the video on multiple devices as well, if possible. Sometimes, a video that looks great on a computer might not translate well to a mobile device or TV. Make sure to test it on different screens to confirm that your work retains its quality and appeal across platforms. (See: CDC's guide on video editing techniques.)
8. Common Export Issues and Troubleshooting
Even seasoned editors can run into issues during the export process. Here are some common problems and how to tackle them:
- Exporting Takes Too Long: If your export is taking longer than expected, check the complexity of your project. Heavy effects, high resolution, and audio editing can all lead to longer export times. Consider simplifying some elements or using proxies for smoother editing and shorter export durations.
- Exported Video Quality Is Poor: Double-check your export settings. Ensure you’re using the right codec, resolution, and bitrate. If the quality still doesn’t meet your expectations, consider exporting a higher-quality version, particularly for professional submissions.
- Audio Sync Issues: If you notice audio and video are out of sync, it may be due to the project’s frame rate not matching the export settings. Confirm both are aligned or consider adjusting your audio track to synchronize properly.
- Error Messages: If you receive an error during the export, take note of the error code or message. A quick search online can often lead to solutions; Adobe’s support forums and community pages can be invaluable.
9. Frequently Asked Questions (FAQ)
What format should I use to export my video?
The H.264 format is widely recommended as it provides a good balance between video quality and file size, making it suitable for most platforms.
How do I export for different social media platforms?
Premiere Pro offers presets for various platforms. When you access the export settings, look for the preset that matches your desired platform (YouTube, Facebook, Instagram, etc.) to ensure optimal settings.
Can I export in 4K if my footage was shot in a lower resolution?
Yes, but it’s generally not recommended. Exporting in a higher resolution than the original footage won’t add detail; it may result in a blurry or pixelated video. Stick to the highest resolution available from your source footage.
What is the best bitrate for exporting?
A bitrate of 10-20 Mbps is typically sufficient for 1080p video, while for 4K video, you might consider 40-60 Mbps. Higher bitrates will provide better quality but larger file sizes.
What should I do if my video has rendering issues during export?
If rendering issues arise, try rendering in smaller sections first. This can help isolate the problem. Also, check if any effects or transitions are causing the issue and try removing or adjusting them as necessary.
10. Advanced Export Techniques
For those looking to maximize the quality and efficiency of their exports, exploring advanced techniques can significantly enhance the final product. Techniques such as color grading and applying LUTs (Lookup Tables) can dramatically change the look of your video prior to export.
Color grading allows you to enhance or alter the colors and mood of your footage. This can involve adjusting the brightness, contrast, and hue of your video. By applying a LUT, you can achieve a specific look or feel that aligns with your creative vision or brand identity. Premiere Pro offers a range of built-in LUTs, or you can import your own.
Another advanced technique involves using the “Render at Maximum Depth” option. This setting ensures that Premiere Pro uses the highest bit depth possible during export, which is particularly beneficial for projects with heavy color grading or effects.
Lastly, using the “Use Previews” option can speed up the export process. If you’ve rendered your timeline, Premiere Pro can utilize those previews, reducing the rendering time during export. This is especially useful for lengthy projects where you’ve made significant edits. (See: New York Times article on Premiere Pro.)
11. Exporting for Different Platforms: A Detailed Comparison
Each platform has its own nuances when it comes to exporting video. Here’s a closer look at the unique requirements for a few popular platforms:
YouTube
YouTube is one of the most popular platforms for video sharing, and it accepts a wide variety of formats. The recommended export settings for YouTube are:
- Format: H.264
- Resolution: 1920×1080 (1080p) or higher
- Frame Rate: 24, 30, or 60 fps
- Bitrate: 8 Mbps for 1080p, 12-15 Mbps for 4K
Facebook videos perform best when they’re short and engage viewers quickly. Export settings should be:
- Format: H.264
- Resolution: 1280×720 (720p) or higher
- Frame Rate: 30 fps
- Bitrate: 4 Mbps for 720p
Instagram prioritizes vertical videos, especially for stories and reels. Key settings include:
- Format: H.264
- Resolution: 1080×1920 (vertical) for stories; 1080×1080 (square) for posts
- Frame Rate: 30 fps
- Bitrate: 3-5 Mbps for stories
TikTok
TikTok has rapidly grown as a video-sharing platform. To optimize your video for TikTok, consider these settings:
- Format: H.264
- Resolution: 1080×1920
- Frame Rate: 30 fps
- Bitrate: 5 Mbps
12. Tips for Speeding Up the Export Process
Sometimes, the export process can be painfully slow. Here are some tips to speed things up:
- Close Other Applications: Ensure that Adobe Premiere Pro has maximum resources available by closing other programs that might be hogging CPU and memory.
- Use Proxies: For high-resolution footage, consider using proxies, which are lower-resolution versions of your clips. This can significantly speed up your workflow in the editing process, and even during export.
- Optimize Your Sequence Settings: Make sure your sequence settings match your export settings closely. This minimizes the need for rendering, which can add time to the exporting process.
- Batch Exporting: If you have multiple videos to export, use the queue function in Adobe Media Encoder. This way, you can start the export and walk away, letting the software do its thing while you focus on other tasks.
Exporting video from Premiere Pro doesn’t have to be daunting. By following these steps, you can ensure that your final product is polished and ready to impress. Whether you’re a beginner or an experienced editor, understanding the intricacies of the export process is key to delivering high-quality videos that resonate with your audience.
“`
Trending Now
Frequently Asked Questions
How do I export video from Premiere Pro?
To export video from Premiere Pro, navigate to File > Export > Media. Here, you can select the desired format, such as H.264, and choose a preset based on your target platform, like YouTube or Instagram, to ensure optimal quality and compatibility.
What format should I use to export video in Premiere Pro?
The most commonly recommended format for exporting video in Premiere Pro is H.264. This format compresses the video while maintaining high quality, making it ideal for sharing on various web platforms.
What are the best export settings for YouTube in Premiere Pro?
For exporting videos for YouTube in Premiere Pro, use the YouTube 1080p HD preset. This preset optimizes the settings to ensure your video meets YouTube’s quality standards, allowing for a better viewing experience.
Can I export video in Premiere Pro without losing quality?
Yes, to export video in Premiere Pro without losing quality, choose the H.264 format and adjust the bitrate settings appropriately. This helps maintain high quality while keeping file sizes manageable for online sharing.
What should I consider before exporting a video in Premiere Pro?
Before exporting a video in Premiere Pro, consider the target platform, resolution, frame rate, and file format. Each platform has specific requirements, so understanding these can greatly affect your video’s final quality and compatibility.
Have you experienced this yourself? We’d love to hear your story in the comments.