How to stabilize video in Premiere Pro
“`html
Video production has revolutionized storytelling, but shaky footage can ruin even the most compelling narratives. Fortunately, Adobe Premiere Pro offers powerful tools that allow you to stabilize video in Premiere Pro, enhancing the visual quality of your projects. Whether you’re a seasoned editor or a beginner, understanding how to effectively stabilize your videos will elevate your work and keep your audience engaged.
1. Understanding Video Stabilization
Video stabilization is a technique used to reduce or eliminate unwanted camera shake from video footage. This is particularly important for handheld shots or footage captured under less-than-ideal conditions. When you stabilize video in Premiere Pro, you improve the overall viewing experience, making your content appear more professional.
There are generally two methods of stabilization: hardware-based, which involves using stabilizers or gimbals during filming, and software-based, which is what you’ll primarily use in Premiere Pro. Software stabilization works by analyzing the footage and compensating for any shake or jitter, resulting in a smoother playback experience.
Understanding the distinction between these methods is crucial as it informs your shooting techniques. Using a gimbal or stabilizer can significantly reduce post-production work. However, in many scenarios, the convenience of software stabilization allows flexibility in post-production, particularly for projects with limited resources.
2. The Tools You’ll Need
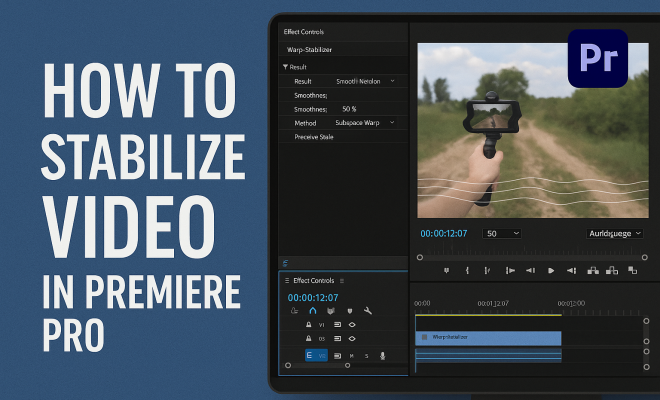
Before diving into the steps of stabilization, it’s essential to ensure you have the right tools available in Premiere Pro. The primary tool for stabilization is the Warp Stabilizer effect. This effect leverages advanced algorithms to analyze motion and apply the necessary adjustments to smooth out your footage.
You can find Warp Stabilizer in the Effects panel. Simply search for “Warp Stabilizer” and drag it onto your clip in the timeline. It’s worth noting that the effectiveness of this tool can depend on the quality of your original footage. Higher-resolution clips typically yield better stabilization results.
Additionally, consider having a powerful graphics card and sufficient RAM to speed up the stabilization process. Adobe Premiere Pro benefits from hardware acceleration, making it more efficient to render effects such as Warp Stabilizer.
3. How to Apply the Warp Stabilizer Effect
To stabilize video in Premiere Pro using Warp Stabilizer, follow these straightforward steps:
- Import your clip into the project and drag it onto the timeline.
- Select the clip you want to stabilize.
- In the Effects panel, locate Warp Stabilizer and apply it to your clip.
- Wait for Premiere Pro to analyze the footage. This process can take some time depending on the length and complexity of your video.
- Once the analysis is complete, review the stabilized footage and make any necessary adjustments.
This method is efficient and allows for real-time adjustments. You’ll notice a marked difference in the smoothness of your video after applying the effect. It’s also beneficial to play around with the settings after the initial stabilization to see how the footage can further improve.
4. Adjusting Warp Stabilizer Settings
Once you’ve applied Warp Stabilizer, you might want to fine-tune its settings for optimal results. The effect comes with several parameters that you can adjust: (See: Understanding video stabilization techniques.)
- Stabilization: This adjusts how much stabilization is applied. You can set it to smooth motion, which is ideal for general shots, or for a more aggressive stabilization approach.
- Method: You can choose between different stabilization methods like “Subspace Warp,” “Perspective,” and “Position, Scale, Rotation.” Each method offers unique benefits depending on your footage.
- Crop Less or Smooth More: This setting allows you to balance between minimizing cropping of the video and maximizing the smoothing effect. Experiment with these settings to see what works best for your project.
By tweaking these options, you can achieve a stabilization that aligns perfectly with your vision for the project. Additionally, consider previewing your adjustments in real-time, as this can help you assess the effectiveness of your changes immediately.
5. Common Issues and Troubleshooting
While stabilizing video in Premiere Pro is usually straightforward, you may encounter some common issues. One prominent challenge is the presence of excessive motion blur or rapid movements that Warp Stabilizer struggles to analyze. If your footage appears warped or distorted after stabilization, try adjusting the settings mentioned earlier.
Another issue is the dreaded “Rolling Shutter” effect, which occurs in footage taken with CMOS sensors and can lead to bending or wobbling in straight lines during stabilization. To combat this, consider using a combination of stabilization methods or shooting at a higher frame rate to minimize this effect.
Occasionally, you may find that the Warp Stabilizer doesn’t work as expected on clips with complex movements. In such cases, trimming the clip to isolate the segment that needs stabilization may yield better results. Also, if your footage features rapid direction changes, consider splitting the clip and applying stabilization to each part individually.
6. When to Avoid Stabilization
While stabilization is a fantastic tool, it’s not always the best solution. If your footage intentionally incorporates shaky movements—like in action sequences or documentary-style filming—applying stabilization can disrupt the intended aesthetic. In these cases, consider whether the shakiness adds to the narrative before deciding to smooth it out.
Additionally, if your footage is already relatively stable, applying stabilization may lead to visual artifacts or cropping that could detract from the overall quality. Always assess each clip on a case-by-case basis to determine whether stabilization is necessary.
For instance, if you’re filming a dynamic sports scene or an immersive point-of-view perspective, the slight shakiness may enhance the realism and intensity of the experience for viewers. Knowing when to embrace imperfections is just as important as knowing when to refine them.
7. Alternative Stabilization Techniques
Beyond Warp Stabilizer, you can explore other methods to stabilize video in Premiere Pro. Some editors prefer using the “Motion” settings to manually adjust position and scale. This method can be more labor-intensive but may yield precise results for specific clips.
Another technique involves combining stabilization with additional effects, such as the “Transform” effect. By adjusting position and scale with the Transform effect, you can create a customized stabilization approach that complements your footage while keeping the creative integrity intact.
You may also find value in third-party plugins like Mercalli or ReelSteady, which offer advanced stabilization features and custom settings that could be better suited for specific projects. Testing various options can lead to discovering the best solution for your unique editing style. (See: Importance of stabilizing video footage.)
8. Exporting Your Stabilized Footage
After stabilizing your video, it’s time to export the final product. Go to the “File” menu, select “Export,” and then choose “Media.” Here, you can customize your export settings based on the platform you’ll use to share your video. Keep in mind the desired resolution and format to ensure optimal playback quality.
Always preview your footage before finalizing the export. This step allows you to catch any lingering issues that might have been overlooked during the editing phase. Once you’re satisfied, hit the export button, and watch your stabilized video come to life!
Consider creating different export presets for specific platforms like YouTube, Instagram, or Vimeo, as each has its own recommended settings for optimal viewing. This attention to detail can significantly enhance the viewer experience across various media.
Frequently Asked Questions
1. What is the best footage to stabilize?
Footage that has noticeable shake due to handheld filming is ideal for stabilization. However, ensure that the footage is not overly blurred or drastically shaky, as extreme cases may lead to undesirable results.
2. Does Warp Stabilizer work with all types of footage?
While Warp Stabilizer is versatile, it performs best with footage that has consistent motion. Rapid or erratic movements can confuse the effect and lead to undesirable outcomes. Always assess your footage before applying stabilization.
3. Can I stabilize footage after applying effects?
It’s generally recommended to apply Warp Stabilizer before adding other effects to maintain the best quality. Applying stabilization after other effects might alter their appearance due to the adjustments made to the footage.
4. How does stabilization affect my video’s resolution?
Stabilization can crop your video slightly, which may reduce resolution if working with lower quality footage. Always start with the highest resolution possible to maintain visual integrity.
5. Are there any alternatives to Adobe Premiere Pro for stabilization?
Yes, there are several alternatives, including Final Cut Pro, DaVinci Resolve, and even some mobile applications like iMovie. Each software has its own stabilization tools that you can explore depending on your needs.
Additional Tips for Successful Video Stabilization
Getting the best results from stabilization often involves some pre-planning and additional tweaks. Here are some tips that can help you maximize the effectiveness of the Warp Stabilizer effect: (See: Tips for improving video production quality.)
- Use a Tripod When Possible: Whenever you have the opportunity, using a tripod can drastically reduce any unwanted shake. This is especially recommended for interviews or stationary shots that require a clean visual presentation.
- Higher Frame Rates: Shooting at a higher frame rate (like 60 fps or higher) can help capture smoother motion, which makes it easier for the Warp Stabilizer to analyze and correct any shake.
- Plan Your Shots: Consider the types of movements you’re making with the camera. Smooth, controlled motions will often yield better results with stabilization than erratic movements.
- Use a Higher Resolution: If your project allows it, shoot in a higher resolution. This provides more pixels for the software to work with when stabilizing, which can lead to better results.
- Test Before Committing: Don’t be afraid to experiment with different stabilization methods and settings on short clips before applying them to your entire project. This ensures you find the best approach without wasting valuable editing time.
Real-World Examples of Video Stabilization
Video stabilization is used across various industries and applications. Here are a few real-world examples where stabilization can make a significant difference:
- Documentary Filmmaking: Documentaries often rely on handheld shots to create an intimate feel. However, excessive shake can detract from the viewer’s experience. By utilizing stabilization, filmmakers can enhance the storytelling while preserving the authenticity of the footage.
- Travel Vlogging: Vloggers often shoot while on the move, resulting in shaky footage. Stabilization allows them to maintain a professional look, even when capturing dynamic scenes like bustling market streets or scenic landscapes.
- Action Sports: In the world of action sports, whether it’s skateboarding, surfing, or biking, stabilization can help keep the focus on the athlete’s performance, ensuring that viewers are not distracted by camera shake.
- Commercial Ads: High-production commercials often utilize stabilized footage to convey a sense of professionalism and polish, making the product or brand look more appealing.
Expert Perspectives on Video Stabilization
Industry professionals often have valuable insights into best practices for video stabilization. Here are some expert perspectives:
“Stabilization is more than just eliminating shake; it’s about preserving the integrity of your shots. Always consider the narrative and the emotional response you want to evoke with your footage,” advises a professional videographer.
“Combining stabilization techniques with creative camera movements can lead to stunning results. Don’t shy away from experimenting with different effects,” states a seasoned film editor.
Advanced Techniques and Effects
For those looking to push their editing skills further, there are advanced techniques that can enhance the stabilization process:
- Multi-Layer Stabilization: For complex shots, consider layering multiple stabilized clips. This technique allows for more control and can create unique visual effects that stand out.
- Combining with Color Grading: After stabilization, applying color grading can enhance the visual appeal of your footage, ensuring that the final product looks polished and professional.
- Split-screen Comparisons: Use side-by-side comparisons of stabilized vs. unstabilized footage to emphasize the impact of stabilization in your projects. This can be especially useful for teaching or presenting to clients.
Future Trends in Video Stabilization
The world of video editing is constantly evolving, and so are the tools and techniques for stabilization. Here are a few trends to keep an eye on:
- AI-Driven Stabilization: As artificial intelligence continues to advance, we can expect more intelligent stabilization tools that automatically detect the optimal settings based on the footage.
- Real-Time Stabilization: Future software updates may allow for real-time stabilization during shooting, providing instant feedback to videographers on their footage quality.
- Integration with Virtual Reality: As VR gains popularity, stabilization techniques will need to adapt to different viewing experiences, ensuring that immersive content remains smooth.
Conclusion
Stabilizing video in Premiere Pro is an essential skill for anyone looking to enhance their video production quality. By mastering the Warp Stabilizer effect and understanding when to apply it, you’ll be able to create visually stunning content that holds your audience’s attention. Experimenting with different settings and techniques can lead to even more refined results, showcasing the creative possibilities that Premiere Pro has to offer. So the next time you’re faced with shaky footage, remember these tips and transform it into a polished masterpiece!
“`
Trending Now
Frequently Asked Questions
How do I stabilize video in Premiere Pro?
To stabilize video in Premiere Pro, apply the Warp Stabilizer effect by searching for it in the Effects panel. Drag it onto your clip in the timeline, and Premiere Pro will analyze the footage to reduce camera shake, resulting in smoother playback.
What is video stabilization in Premiere Pro?
Video stabilization in Premiere Pro is a technique used to reduce unwanted camera shake from footage. It improves the viewing experience by using software algorithms, primarily through the Warp Stabilizer effect, to analyze and correct jitter in your videos.
What tools are needed for video stabilization in Premiere Pro?
The primary tool needed for video stabilization in Premiere Pro is the Warp Stabilizer effect. This effect can be found in the Effects panel and is essential for analyzing and smoothing out shaky footage during post-production.
Can I stabilize handheld footage in Premiere Pro?
Yes, you can stabilize handheld footage in Premiere Pro using the Warp Stabilizer effect. This tool compensates for camera shake, making your handheld shots appear more professional and visually appealing.
Is hardware stabilization better than software stabilization?
Hardware stabilization, using gimbals or stabilizers during filming, can reduce the need for post-production work. However, software stabilization in Premiere Pro, like the Warp Stabilizer effect, offers flexibility and is effective for many projects, especially with limited resources.
Agree or disagree? Drop a comment and tell us what you think.