How to create notebook in Evernote
“`html
Evernote is renowned for its robust note-taking capabilities, allowing you to organize your thoughts, ideas, and projects effortlessly. If you’re looking to create a notebook in Evernote, you’re on the right path to streamlined productivity and effective information management. In this guide, we’ll walk you through the steps of creating a notebook, explore its features, and provide insights into optimizing your Evernote experience.
1. Understanding Evernote: A Quick Overview
Before diving into the nitty-gritty of creating a notebook, let’s take a moment to understand what Evernote is and why it has become a go-to tool for millions. Founded in 2004, Evernote provides a digital workspace where users can write notes, create to-do lists, and save important information from the web. With its cross-platform capabilities, it allows users to sync their notes across devices, making it an invaluable tool for anyone who juggles various tasks.
Evernote’s structure revolves around notes and notebooks. A notebook serves as a container for related notes, enabling you to categorize and access information seamlessly. Whether you’re a student managing lecture notes, a professional organizing project details, or simply someone looking to keep personal thoughts in check, using notebooks effectively can enhance your productivity significantly.
2. Getting Started: Setting Up Your Evernote Account
To get started with Evernote, you first need to set up an account. This process is straightforward:
- Visit the Evernote Website: Go to www.evernote.com and click on the ‘Sign up’ button.
- Choose a Plan: Evernote offers several plans, including a free version and various premium options. Select the one that suits your needs best.
- Fill Out Your Information: Enter your email address and create a password. You can also sign up using Google or Apple accounts for convenience.
Once you’ve signed up, download the Evernote app for your smartphone or desktop to sync your notes everywhere you go. When you log in for the first time, take a moment to familiarize yourself with the interface, which includes a navigation pane, a note editor, and various organizational tools.
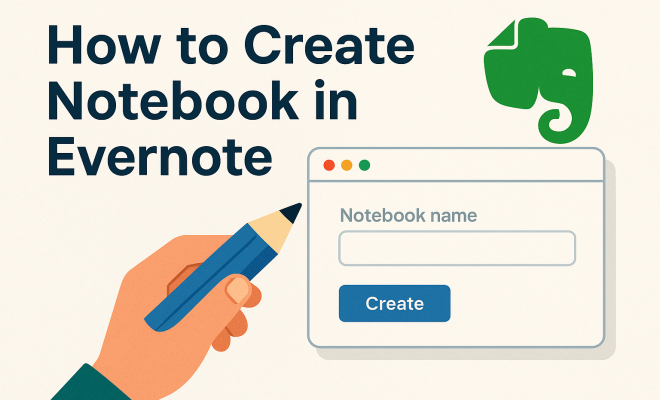
3. Creating Your First Notebook in Evernote
Now that your account is set up, you’re ready to create a notebook in Evernote. Follow these simple steps:
- Open Evernote: Launch the Evernote app on your device or navigate to the web version.
- Locate the Notebooks Section: In the left sidebar, you will find the ‘Notebooks’ section. Click on it to expand.
- Create a New Notebook: Click on the ‘+ New Notebook’ button. A dialog box will appear prompting you to enter a name for your notebook.
- Name Your Notebook: Choose a descriptive name that reflects the content you’ll store. For example, if it’s for work projects, consider naming it ‘Work Projects’ or ‘Client Notes.’
- Save Your Notebook: After entering the name, click ‘Create’ or ‘Save’ to finalize.
Congratulations! You’ve just created your first Evernote notebook. You can now start adding notes to it, making it a centralized hub for your thoughts and ideas.
4. Organizing Your Notebooks: Best Practices
Creating a notebook is just the beginning. To make the most out of Evernote, consider organizing your notebooks effectively. Here are some best practices: (See: Evernote – Wikipedia.)
- Use Categories: Segment your notebooks into categories based on projects, topics, or areas of interest. This makes it easier to locate related notes later.
- Limit the Number of Notebooks: While it can be tempting to create a notebook for every subject, it’s wise to keep it manageable. Aim for no more than 10-15 main notebooks to avoid feeling overwhelmed.
- Utilize Notebook Stacks: Evernote allows you to group notebooks into stacks. For example, you could create a stack called “Personal” and include notebooks for “Travel,” “Health,” and “Finances.” This hierarchical structure enhances navigability.
Effective organization not only saves time but also boosts your productivity by allowing you to find information swiftly when you need it.
5. Adding Notes to Your Notebook
With your notebook created and organized, it’s time to start populating it with notes. Here’s how to add new notes:
- Create a New Note: Click the ‘+ New Note’ button, typically located at the top of your workspace.
- Choose Your Format: Evernote supports text, images, audio recordings, and web clippings. You can type directly into the note, attach files, or record your voice.
- Organize Your Notes: Be sure to select the appropriate notebook for each note you create. You can also add tags for better organization and searchability.
Adding notes frequently and categorizing them appropriately will ensure that your notebook grows into a useful resource rather than a chaotic collection of unlinked ideas.
6. Advanced Features to Enhance Your Notebook Experience
Once you’ve mastered the basics of creating a notebook in Evernote, it’s time to explore some advanced features that can elevate your experience:
- Tags: Tags are a powerful organizational tool. You can tag notes with keywords to enhance searchability. For instance, if you have a note about a meeting with a client, you might tag it with the client’s name, the project, and the meeting date.
- Reminders: Evernote allows you to set reminders on notes. This is particularly useful for tasks requiring follow-up or deadlines associated with notes.
- Collaboration: If you’re working on a team project, Evernote offers collaboration features that let you share notebooks with others. You can dictate who can view or edit the notes, making teamwork seamless.
By harnessing these advanced features, you can maximize the utility of your notebooks, turning them into dynamic tools for collaboration and project management.
7. Maintaining Your Notebooks: Regular Check-Ups
Creating and populating your notebooks is just the beginning; maintaining them is crucial for long-term usability. Here are a few tips:
- Regular Review: Set aside time weekly or monthly to review your notebooks. This helps you declutter unnecessary notes and ensures you’re on top of your tasks.
- Archive Old Notes: If you have notes that are no longer relevant, consider archiving them instead of deleting. This way, you can retain the information without cluttering your current projects.
- Update Organization: As your projects or interests evolve, so too should your notebook organization. Don’t hesitate to rename notebooks or rearrange stacks as necessary.
By putting in the effort to maintain your notebooks, you ensure they remain effective tools that adapt to your changing needs.
8. Syncing Across Devices: Keeping Your Notebooks at Your Fingertips
One of Evernote’s standout features is its ability to sync your notes and notebooks across all your devices. Whether you’re on your laptop, tablet, or smartphone, you can access your notes anywhere, anytime. (See: CDC on digital note-taking tools.)
The syncing process occurs in real-time, meaning any changes you make on one device will reflect on all your other devices almost instantly. To ensure this feature operates smoothly:
- Stable Internet Connection: Ensure you have a reliable internet connection while using Evernote. This guarantees that all your notes sync properly.
- Update the App: Regularly update the Evernote app on your devices. New updates often fix bugs and improve syncing capabilities.
- Check Sync Settings: Make sure your sync settings in the app are configured correctly. You can set it to sync automatically or manually, depending on your preferences.
This seamless access is perfect for on-the-go note-taking, especially during meetings or classes when you need to jot down ideas quickly without worrying about losing them.
9. Integrating Evernote with Other Tools
Evernote can be integrated with various tools to enhance your productivity further. Here are a few popular integrations:
- Google Drive: You can attach Google Drive files directly into your Evernote notes, allowing for easy access to project files without leaving the app.
- Slack: Integrating Evernote with Slack allows you to share notes directly within your team channels, improving communication and collaboration.
- Zapier: This tool enables you to create automated workflows between Evernote and other applications like Trello or Asana, streamlining your task management processes.
By leveraging these integrations, you can build a more cohesive and efficient workflow that fits your needs.
10. Using Evernote for Different Purposes: Real-World Examples
Evernote isn’t just a note-taking app; it’s versatile enough to serve various purposes. Here are some examples of how different users can utilize Evernote:
- Students: Create notebooks for each subject, storing lecture notes, study guides, and important research materials. The ability to attach images and PDFs makes it easy to keep all study materials in one place.
- Professionals: Use Evernote to manage projects by creating separate notebooks for each client or project. Incorporate meeting notes, client feedback, and to-do lists to keep everything organized and easily accessible.
- Travelers: Organize travel itineraries, packing lists, and research on destinations. Evernote’s web clipping feature allows you to save articles and tips from the internet to consult later.
These examples highlight just a few of the many ways Evernote can be tailored to meet your specific needs, showcasing its flexibility and capacity to enhance productivity.
11. Frequently Asked Questions (FAQ)
Here are some common questions users have when it comes to creating and managing notebooks in Evernote: (See: Evernote app review by NY Times.)
- How many notebooks can I create in Evernote? You can create an unlimited number of notebooks in Evernote, but it’s advisable to keep the number manageable for better organization.
- Can I share my notebooks with others? Yes, Evernote allows you to share notebooks with other users. You can specify whether they can view or edit the notes within the notebook.
- What happens if I delete a notebook? When you delete a notebook, all notes within that notebook will also be deleted. However, you can recover deleted notebooks for a limited time through the Trash section in Evernote.
- Are my notes secure in Evernote? Evernote employs encryption and other security protocols to protect your data. Additionally, you can enable two-factor authentication for added security.
- Can I access Evernote offline? Yes, Evernote offers offline access on devices with the premium plan, allowing you to view and edit your notes without an internet connection.
12. Tips for Maximizing Your Evernote Experience
To truly harness the power of Evernote, consider these additional tips that can help you get the most out of your experience:
- Utilize Web Clipping: Evernote’s web clipper is a fantastic tool that allows you to save articles, images, and web pages directly into your notebooks. This is especially useful for research and keeping track of interesting content you come across online. You can choose to save the entire page or just a simplified article view.
- Experiment with Templates: Evernote offers a variety of templates for note-taking. Whether you’re planning a project, taking meeting notes, or organizing a study session, using a template can save you time and ensure that you don’t miss crucial information.
- Leverage the Search Function: Evernote’s search capabilities are one of its most powerful features. You can search for keywords not just in titles but also within the body of notes, including handwritten notes and PDFs. This means you can find what you need quickly, without having to sift through tons of information.
- Explore Third-Party Integrations: Beyond the popular integrations previously mentioned, there are countless other third-party apps that can work with Evernote. For example, you can connect with productivity tools like Todoist or Microsoft Teams to create a more robust workflow. Check out the Evernote marketplace for more options.
- Stay Updated: Evernote frequently updates its platform with new features and improvements. Staying informed about these changes can help you take advantage of new tools or enhancements that could improve your workflow.
13. Challenges You Might Encounter
Like any tool, Evernote has its quirks. Here are some challenges users may face and tips to address them:
- Overwhelming Number of Notes: As you use Evernote more, you might find that you accumulate a lot of notes. To combat this, regularly review and archive or delete notes that are no longer relevant.
- Sync Issues: Sometimes notes may not sync across devices immediately. If this happens, check your internet connection and ensure your app is up to date. You can also manually initiate a sync in the app settings.
- Learning Curve: Evernote has a lot of features, and it can be overwhelming at first. Take your time to explore and familiarize yourself with the interface and capabilities. Utilize Evernote’s help center and community forums for guidance.
14. Evernote vs. Other Note-Taking Apps
While Evernote is a popular choice for note-taking, it’s good to know how it stacks up against other apps in the market. Here’s a comparison with a few notable alternatives:
- OneNote: Microsoft OneNote is a strong competitor. It offers similar features like notebooks and tags, but it’s more integrated into the Microsoft ecosystem. If you’re already using Microsoft Office, OneNote might be more convenient.
- Notion: Notion is gaining popularity for its highly customizable workspace. While it offers note-taking capabilities, it also serves as a project management tool. If you need a more integrated solution for both notes and project planning, Notion is worth considering.
- Google Keep: If you prefer simplicity, Google Keep offers a more straightforward note-taking experience. It lacks some advanced features of Evernote but excels in speed and ease of use for quick notes and reminders.
Choosing the best note-taking app ultimately depends on your specific needs, preferences, and how you plan to use it in your daily life.
15. Final Thoughts
Learning how to create a notebook in Evernote is just the first step in your journey towards mastering this powerful tool. From setting up your account to organizing your notes and utilizing advanced features, Evernote can significantly enhance your productivity and information management. As you become more familiar with its capabilities, you’ll find yourself leveraging these features to create a personal information hub that suits your lifestyle. Remember, the key to success with Evernote lies in consistent use and regular maintenance. So get started, and watch your productivity soar!
“`
Trending Now
Frequently Asked Questions
How do I create a notebook in Evernote?
To create a notebook in Evernote, first sign in to your account. Click on the 'Notebooks' option in the sidebar, then select 'New Notebook.' Name your notebook and click 'Create.' This allows you to organize your notes efficiently.
What is the purpose of notebooks in Evernote?
Notebooks in Evernote serve as containers for related notes, helping you categorize and manage information easily. They enable users to maintain organized collections of notes for different subjects, projects, or areas of interest.
Can I access my Evernote notebooks on different devices?
Yes, Evernote offers cross-platform capabilities, allowing you to access your notebooks and notes seamlessly across multiple devices. Once you sync your account, your information will be available on both mobile and desktop applications.
What plans does Evernote offer for users?
Evernote provides several plans, including a free version with basic features and various premium options that offer advanced functionalities. Users can choose a plan that best fits their needs, whether for personal use or professional tasks.
Is it easy to set up an Evernote account?
Yes, setting up an Evernote account is straightforward. You simply visit the Evernote website, click 'Sign up,' and fill out your information. You can also sign up using Google or Apple accounts for added convenience.
Have you experienced this yourself? We’d love to hear your story in the comments.