How to Use the iPhone’s Portrait Mode
The iPhone’s Portrait Mode is a useful tool for taking stunning photos with a professional-looking bokeh effect. This feature is available on iPhones with dual-lens cameras or on the iPhone XR and above. If you’re new to Portrait Mode, here’s a guide to help you use it like a pro.
- Open the Camera App
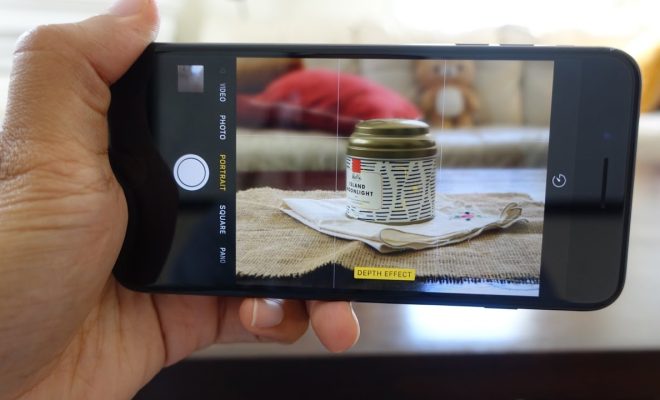
To access the Portrait Mode, open the Camera app on your iPhone. If you have an iPhone with a dual-lens camera, you’ll find the Portrait Mode option alongside other modes like Video, Photo, and Square. On newer iPhones like the XR, 11, and 12, tap the Portrait tab at the bottom of the Camera app.
- Choose Your Subject
Your subject is the most important part of the portrait, so choose carefully. The iPhone’s Portrait Mode works best on people, pets, and objects that are close to the camera. If you’re shooting a person, position them in front of a plain background to enhance the bokeh effect.
- Compose Your Shot
With your subject in position, compose your shot. You can use the gridlines on the Camera app to align your subject and ensure that they’re centered in the frame. You’ll also want to ensure that enough light is falling on your subject for a clear shot.
- Tap on the Subject
To activate the Portrait Mode, tap on your subject on the screen. A yellow box will appear around the subject, and a “Depth Effect” message will appear at the bottom of the screen. Once this message appears, you can take your shot.
- Adjust the Lighting
Portrait Mode also allows you to adjust the lighting of your shot. Swipe left or right on the screen to cycle through the different lighting options, including natural light, studio light, contour light, stage light, and stage light mono. Each option produces a different effect on the subject’s face or body.
- Take Your Shot
Once you’re satisfied with your composition and lighting, take your shot. Hold your iPhone steady and press the shutter button. You’ll hear a short chime and see a preview of your shot. If you’re not happy with the result, you can delete it and try again.
- Edit Your Shot
After taking your shot, you can edit it to enhance the details. Tap on the photo to open it, and then tap on the “Edit” button. Here, you can adjust the brightness, contrast, and saturation of your shot, or crop it to remove unwanted elements.
In conclusion, the iPhone’s Portrait Mode is a great way for anyone to take professional-looking photos. With this guide, you can now use the Portrait Mode like a pro and capture beautiful shots of your subjects. So, go ahead and experiment with this powerful feature to create stunning portraits.