How to install deck railing
“`html
Installing deck railing is more than just a safety measure; it’s a significant aspect of your outdoor space that can enhance its beauty and functionality. Whether you’re looking to create a cozy retreat or a grand entertainment area, a well-installed railing can add the perfect finishing touch. This comprehensive guide will walk you through the essential steps and considerations to successfully install deck railing.
1. Understanding Deck Railing Basics
Before diving into the installation process, it’s crucial to understand the purpose and types of deck railings available. Deck railings not only serve to keep people safe but also define the space and add aesthetic appeal. Safety codes often require railings to be installed at a height of at least 36 inches, depending on your local building codes.
There are several materials you can choose from when planning to install deck railing: wood, composite, metal, and vinyl. Each material comes with its own set of benefits and drawbacks. For example, wood offers a classic look but requires regular maintenance, while metal options like aluminum or steel provide durability and a modern aesthetic.
2. Gathering Necessary Tools and Materials
Before you start the installation process, ensure you have all the necessary tools and materials. Here’s a checklist to guide you:
- Measuring tape
- Level
- Drill and drill bits
- Safety glasses
- Screwdriver
- Wood screws or appropriate fasteners
- Post anchors or brackets (if needed)
- Railings and balusters
- Wood filler (if working with wood)
- Paint or sealant (if required)
Having everything ready before you start will save you time and prevent interruptions during the installation process.
3. Planning Your Railing Layout
Effective planning is vital when you install deck railing. You’ll need to determine the layout and spacing of your posts and balusters. Typically, posts are placed at corners and intervals of no more than six feet apart. Balusters, the vertical elements between the rails, should be spaced no more than four inches apart to prevent small children from slipping through.
Consider drawing a layout on paper to visualize how everything will come together. This not only helps in ensuring accuracy during installation but also provides a guide for measuring and cutting your materials.
4. Preparing the Deck
Preparation is key to a successful railing installation. Start by clearing your deck of any furniture and debris. Next, inspect the area where you’ll be attaching the railing to ensure it’s structurally sound. Look for any damaged boards or loose screws, as these can compromise the stability of your railing.
If your deck is new or the surface is uneven, you might need to install a ledger board or blocking to create a stable base for your railing posts. Ensuring a solid foundation will enhance the longevity and safety of your railing.
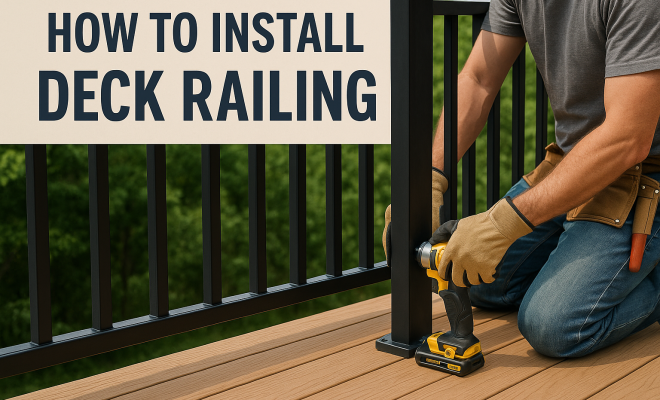
5. Installing Posts
The first major step in your railing installation is securing the posts. Depending on the style of railing you’ve chosen, you might need to use post anchors or brackets. Begin by marking where each post will go according to your planned layout.
When ready, drill holes for the posts and secure them in place using the anchors or brackets. Make sure each post is level and plumb. This step is crucial; any misalignment now will affect the entire railing system later. Once secured, use wood filler to cover any visible screws if you’re working with wood.
6. Attaching the Top and Bottom Rails
Once the posts are firmly in place, the next step is to attach the top and bottom rails. Start with the bottom rail, which should be positioned a few inches above the deck surface. Secure it to the posts using brackets or screws, ensuring it is level across the span.
After that, you can install the top rail. This rail not only adds to the aesthetic but also provides additional structural integrity. Be sure to check for levelness and secure it firmly to each post. (See: deck railings installation guide.)
7. Installing Balusters
With the rails in place, the focus shifts to the balusters. These vertical elements provide safety and add visual interest to your railing design. Balusters should be installed according to local building codes, typically spaced no more than four inches apart.
To install, start at one end and work your way to the other. This method ensures even spacing and a professional look. You can use a spacer block to maintain uniform gaps while securing each baluster. Once again, check for levelness as you proceed.
8. Finishing Touches
After installing the balusters, it’s time to complete the look of your deck railing. Depending on the material used, you may want to sand down any rough edges or apply a coat of paint or sealant to protect the wood from the elements. If you’ve used composite or vinyl, ensure everything is clean and free of debris.
Consider adding post caps or decorative elements to enhance the visual appeal. These can transform a simple railing into a standout feature of your deck. Once you’ve completed the finish, give everything a final inspection.
9. Maintenance Tips for Longevity
After investing time and effort to install deck railing, it’s essential to maintain it properly for long-lasting results. Different materials require different maintenance routines. For wood railings, regular staining or sealing is crucial to prevent rot and decay.
Composite materials generally require less upkeep, but periodic cleaning is vital to maintain their appearance. Inspect your railing biannually for any signs of damage, such as loose screws or warped boards, and make repairs as necessary. Proper maintenance will extend the life of your railing and ensure your deck remains a safe and beautiful space.
10. Common Mistakes to Avoid
Even experienced DIYers can make mistakes when installing deck railing. One common error is failing to check local building codes, which can lead to safety hazards or the need for costly adjustments later. Another frequent misstep is improper spacing of balusters, which can compromise safety.
Additionally, neglecting to ensure posts are plumb and level can result in a wobbly railing. Always take your time during the installation process and double-check measurements. If you’re unsure, seeking advice from professionals or experienced friends can save you time and frustration.
11. Choosing the Right Style of Railing
When you install deck railing, one of the most enjoyable aspects is selecting the style that best fits your home’s aesthetic and your personal taste. There are numerous styles available, including traditional, modern, and even eclectic designs. You might choose a classic wood railing for a rustic feel, a sleek metal railing for a contemporary look, or a combination for a unique twist.
Consider the architectural style of your home as well. For instance, if you have a Victorian-style home, ornate wood railings with intricate details might be more fitting than minimalist designs. On the other hand, a modern house may benefit from glass panels or cable railings that provide an unobstructed view.
Don’t forget about color and finish. A fresh coat of paint can dramatically change the appearance of wood railings, while metal options typically come in various finishes to match your home’s exterior. Composite materials also offer a variety of colors that can blend seamlessly with your deck.
12. Building Codes and Regulations
Understanding local building codes is essential when you install deck railing. These regulations can dictate everything from the height of the railing to the spacing of balusters. Familiarizing yourself with these rules will help you avoid costly mistakes and ensure compliance, which is crucial for safety and insurance purposes.
Many municipalities have strict requirements for deck railings to safeguard against falls, especially if your deck is elevated. For instance, some areas might require that the railing be at least 42 inches high for decks over a certain height. Checking with your local building department can provide clarity and help you gather necessary permits.
Additionally, if you’re using specific materials or designs, there may be additional requirements. For example, if you’re installing glass railings, there may be specifications regarding safety glass thickness and the strength of mounting hardware. Understanding these details before you start will streamline the process.
13. Advanced Railing Systems
If you’re seeking to elevate your deck’s design further, consider advanced railing systems. These can include glass panels, which offer a sleek, modern aesthetic and unobstructed views, or cable railings, which are becoming increasingly popular for contemporary outdoor spaces. Both options provide a unique look while maintaining safety and durability.
Another innovative option is the use of integrated lighting within the railing system. This not only enhances safety by illuminating the space at night but also adds an extra layer of ambiance to your outdoor area. LED lights can be integrated into the posts or along the rails, creating a stunning visual effect after sunset. (See: deck safety guidelines.)
Smart home technology is also making its way into deck railings. Some systems now offer automated railings that can open and close electronically, providing a seamless transition between indoor and outdoor spaces. While these advanced options may come at a higher cost, they can significantly enhance the functionality and appeal of your deck.
14. Cost Considerations
When planning to install deck railing, budget is a crucial factor. The cost can vary significantly depending on the materials you choose, the complexity of the design, and whether you hire a professional or tackle the project yourself. As of recent estimates, basic wood railing can cost anywhere from $15 to $25 per linear foot, while metal options can range from $25 to $50 per linear foot.
If you’re leaning towards custom or advanced materials like glass or cable systems, expect to pay a premium. Installation costs should also be factored in if you’re not planning to do it yourself, potentially adding another $10 to $30 per linear foot depending on the complexity of your design.
It’s wise to get multiple quotes from contractors if you decide to hire help. Always discuss materials, labor, and any additional features such as lighting upfront to avoid unexpected expenses. Planning your budget carefully can enable you to achieve your desired look without overspending.
15. Frequently Asked Questions (FAQ)
What is the best material for deck railing?
The best material depends on your aesthetic preferences, budget, and maintenance willingness. Wood offers a classic look but requires upkeep. Composite is low-maintenance, while metal provides durability and a modern feel.
How high should deck railings be?
Most building codes require deck railings to be at least 36 inches high for raised decks. However, check your local regulations, as some areas may require a height of 42 inches for decks over a certain elevation.
Can I install deck railing myself?
Yes, many homeowners choose to install deck railing themselves, especially with some DIY experience. Following proper guidelines, having the right tools, and taking your time can lead to a successful installation. If you’re uncertain, consult with professionals for advice or assistance.
How do I maintain my deck railing?
Maintenance varies by material. Wood railings should be stained or sealed regularly, while composite railings benefit from occasional cleaning. Inspecting for damages biannually is recommended, regardless of the material, to ensure safety and longevity.
What are post caps, and do I need them?
Post caps are decorative elements that sit on top of railing posts. They can enhance the visual appeal of your railing and add protection against moisture and UV rays, prolonging the life of the posts. While not essential, they are a great finishing touch.
16. Deck Railing Trends to Consider
Staying updated with current trends can help you choose a railing system that not only meets safety regulations but also enhances the overall look of your outdoor space. One popular trend is the use of glass panels, which provide a seamless view of your surroundings while maintaining safety. This design is particularly ideal for homes with scenic views or waterfront properties.
Another trend is the integration of smart technology, such as lighting systems that can be controlled via smartphone apps. This feature can enhance both safety and ambiance, allowing you to enjoy your deck in the evening without worrying about tripping hazards.
For those who prefer a more rustic charm, reclaimed wood is gaining popularity as a sustainable option. Utilizing salvaged materials not only adds character to your deck but also reduces environmental impact. Pairing this with modern metal fittings can create a striking contrast and style.
Lastly, if you’re looking for an eco-friendly solution, consider composite materials made from recycled plastics and wood fibers. These materials are designed to mimic the look of wood but require far less maintenance and are resistant to rot and insects.
17. Safety Features in Railing Installation
When you install deck railing, incorporating safety features is paramount, especially if you have children or pets. Consider installing railings that have vertical balusters rather than horizontal bars. This design helps prevent children from climbing over or slipping through.
Additionally, look for railings that offer a smooth finish to avoid injuries from sharp edges. Some systems may include built-in barriers or extra tall designs to further enhance safety. If you opt for glass panels, ensure they are made of tempered safety glass, which is less likely to shatter and provides better protection.
Another consideration is the use of rounded edges on rails and posts; this small detail can significantly reduce injury risk. Finally, ensure all components are securely fastened and regularly inspected to maintain their structural integrity, especially after harsh weather conditions.
18. Planning for Seasonal Changes
Another important aspect to consider is how seasonal changes can affect your deck railing. In areas with extreme weather, such as heavy snow or intense sun, your railing materials will face different stresses. For instance, wood railings can warp or crack due to moisture changes, while metal can become hot in direct sunlight.
To prepare for winter, consider using covers or applying protective sealants to guard against snow and ice. For summer months, ensure that any protective finishes are renewed regularly to prevent fading or degradation from UV exposure. Planning for these seasonal impacts will help extend the lifespan of your railing system.
19. Professional Installation vs. DIY
Determining whether to hire a professional or take on the install deck railing task yourself is a significant decision. If you’re handy with tools and confident in your skills, DIY installation can save money and allow for personal customization. However, it’s essential to assess your capabilities realistically. Complex designs or non-standard measurements may require professional expertise.
On the other hand, hiring professionals means you can rely on their experience for a more polished finish and adherence to building codes. Although it may come with a higher price tag, it can save you time and potential headaches during installation.
Always obtain multiple quotes and check references for any contractors you consider hiring. If you choose the DIY route, consider consulting resources like instructional videos or guides that pertain to the specific materials you’re using.
Installing deck railing doesn’t have to be a daunting task. With the right preparation, tools, and knowledge, you can create a beautiful and safe space that enhances your deck’s functionality. Remember to plan carefully, follow safety guidelines, and enjoy the process of transforming your outdoor area.
“`
Trending Now
Frequently Asked Questions
What are the steps to install deck railing?
To install deck railing, start by understanding the types of railings available. Gather necessary tools such as measuring tape, drill, and screws. Plan the layout by determining post and baluster spacing, typically placing posts no more than six feet apart. Finally, secure the posts, attach the railings and balusters, and ensure everything meets safety codes.
What materials can be used for deck railing?
Deck railings can be made from various materials including wood, composite, metal, and vinyl. Wood offers a classic aesthetic but requires maintenance, while metal options like aluminum and steel provide durability and a modern look. Composite materials are low-maintenance and resistant to weathering.
How high should deck railings be installed?
Deck railings should typically be installed at a height of at least 36 inches, although this can vary based on local building codes. It's important to check your local regulations to ensure compliance for safety and legal standards.
What tools do I need to install deck railing?
Essential tools for installing deck railing include a measuring tape, level, drill with bits, safety glasses, screwdriver, wood screws or appropriate fasteners, post anchors or brackets, and railings and balusters. Having these tools ready will streamline the installation process.
How do I plan the layout for deck railing?
Planning the layout for deck railing involves determining the spacing and placement of posts and balusters. Posts should be positioned at corners and no more than six feet apart. Proper planning ensures stability and adherence to safety standards.
What’s your take on this? Share your thoughts in the comments below — we read every one.