The Tech Edvocate

Top Menu

  • Advertisement
  • Apps
  • Home Page
  • Home Page Five (No Sidebar)
  • Home Page Four
  • Home Page Three
  • Home Page Two
  • Home Tech2
  • Icons [No Sidebar]
  • Left Sidbear Page
  • Lynch Educational Consulting
  • My Account
  • My Speaking Page
  • Newsletter Sign Up Confirmation
  • Newsletter Unsubscription
  • Our Brands
  • Page Example
  • Privacy Policy
  • Protected Content
  • Register
  • Request a Product Review
  • Shop
  • Shortcodes Examples
  • Signup
  • Start Here
    • Governance
    • Careers
    • Contact Us
  • Terms and Conditions
  • The Edvocate
  • The Tech Edvocate Product Guide
  • Topics
  • Write For Us
  • Advertise

Main Menu

  • Start Here
    • Our Brands
    • Governance
      • Lynch Educational Consulting, LLC.
      • Dr. Lynch’s Personal Website
      • Careers
    • Write For Us
    • The Tech Edvocate Product Guide
    • Contact Us
    • Books
    • Edupedia
    • Post a Job
    • The Edvocate Podcast
    • Terms and Conditions
    • Privacy Policy
  • Topics
    • Assistive Technology
    • Child Development Tech
    • Early Childhood & K-12 EdTech
    • EdTech Futures
    • EdTech News
    • EdTech Policy & Reform
    • EdTech Startups & Businesses
    • Higher Education EdTech
    • Online Learning & eLearning
    • Parent & Family Tech
    • Personalized Learning
    • Product Reviews
  • Advertise
  • Tech Edvocate Awards
  • The Edvocate
  • Pedagogue
  • School Ratings

logo

The Tech Edvocate

  • Start Here
    • Our Brands
    • Governance
      • Lynch Educational Consulting, LLC.
      • Dr. Lynch’s Personal Website
        • My Speaking Page
      • Careers
    • Write For Us
    • The Tech Edvocate Product Guide
    • Contact Us
    • Books
    • Edupedia
    • Post a Job
    • The Edvocate Podcast
    • Terms and Conditions
    • Privacy Policy
  • Topics
    • Assistive Technology
    • Child Development Tech
    • Early Childhood & K-12 EdTech
    • EdTech Futures
    • EdTech News
    • EdTech Policy & Reform
    • EdTech Startups & Businesses
    • Higher Education EdTech
    • Online Learning & eLearning
    • Parent & Family Tech
    • Personalized Learning
    • Product Reviews
  • Advertise
  • Tech Edvocate Awards
  • The Edvocate
  • Pedagogue
  • School Ratings
  • Nočno sijajanje zaslonov: estetski pregled spletne igralniške izkušnje

  • This Nordstrom Fall Beauty Product Delivers a ‘Filter Effect’ — Without the Filter

  • Your Smart Devices ARE Listening: The Multi-Million Dollar Deception Revealed

  • The Shocking Truth About AquaHarvest’s Water Footprint in Our Deserts

  • MindLink’s BCI Scandal: 10 Urgent Questions About Your Brain Data

  • Level-5’s AI Apology: Why Fans Are Furious Over One Small Detail

  • This Crucial New Law Just Changed Everything for Kids Online

  • Humanity’s Reckoning? This Viral AI Extinction Warning Ignited a Firestorm

  • Unveiling the Battle: Why Teachers Unions in New York Are Fighting This Federal Program

  • Unbelievable: This Private School Twitter Challenge Is Sparking Outrage

Digital & Mobile Technology
Home›Digital & Mobile Technology›How to Add Money to a Venmo Balance

How to Add Money to a Venmo Balance
By Matthew Lynch
June 23, 2023
0
Spread the love

Venmo is a popular payment app that allows users to send and receive money quickly and easily. The app also offers the option to add money to a Venmo balance, which can then be used to make payments to other users, as well as to businesses that accept Venmo.

If you’re wondering how to add money to a Venmo balance, follow these simple steps:

Step 1: Link a Funding Source

Before you can add money to your Venmo balance, you’ll need to link a funding source like a bank account or debit card. To do this, go to the “☰” menu in the app and select “Settings.” From there, select “Payment Methods” and follow the prompts to enter your bank account or debit card information. Venmo will then verify your funding source, which can take anywhere from a few minutes to a few days.

Step 2: Access the Venmo Balance Screen

Once your funding source is linked, you can access the Venmo balance screen by tapping the “☰” menu in the app and selecting “Venmo Balance.” From there, you’ll see your current balance (if you have one) and the option to “Add Money.”

Step 3: Choose an Amount to Add

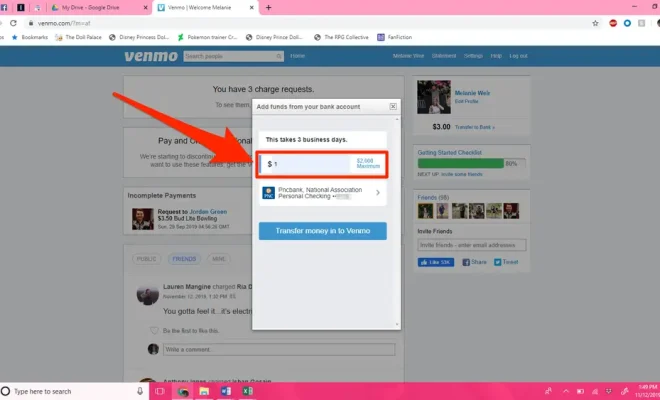
Tap the “Add Money” button and enter the amount you’d like to add to your Venmo balance. Venmo allows you to add as little as $1 and as much as $10,000, depending on your account limits.

Step 4: Review and Confirm

Review the details of your transaction, including the funding source and the amount you’re adding. If everything looks correct, tap “Add Money” to complete the transaction. Venmo will deduct the amount from your funding source and add it to your Venmo balance.

Step 5: Use Your Venmo Balance

Congratulations! You’ve successfully added money to your Venmo balance. You can now use your balance to make payments to other users, as well as to businesses that accept Venmo. Just select “Pay or Request” from the app menu and follow the prompts to send a payment from your Venmo balance.

In Conclusion

Adding money to a Venmo balance is a simple process that can be completed in just a few taps. By linking a funding source and following the steps outlined above, you can easily add money to your Venmo balance and start making quick, convenient payments to friends and family, as well as to businesses that accept Venmo.


Previous Article

Apps That Let You Send Multiple Photos ...

Next Article

How to Add a Border in Google ...

Matthew Lynch

Related articles More from author

  • Digital & Mobile Technology

    How to Add a Watermark to Your Photos: Different Ways

    August 5, 2023
    By Matthew Lynch
  • Digital & Mobile Technology

    Is DaVinci Resolve Really Free? What’s the Catch?

    August 5, 2023
    By Matthew Lynch
  • Digital & Mobile Technology

    How to Create a Full Backup on a Windows 10 Computer

    July 6, 2023
    By Matthew Lynch
  • Digital & Mobile Technology

    The 8 Best Earthquake Apps of 2023

    June 9, 2023
    By Matthew Lynch
  • Digital & Mobile Technology

    How to Sync Your Alexa Device With Your Fire TV

    June 15, 2023
    By Matthew Lynch
  • Digital & Mobile Technology

    USB-C: Everything You Need to Know

    June 10, 2023
    By Matthew Lynch

Search

Login & Registration

  • Log in
  • Entries feed
  • Comments feed
  • WordPress.org

Newsletter

Signup for The Tech Edvocate Newsletter and have the latest in EdTech news and opinion delivered to your email address!

About Us

Since technology is not going anywhere and does more good than harm, adapting is the best course of action. That is where The Tech Edvocate comes in. We plan to cover the PreK-12 and Higher Education EdTech sectors and provide our readers with the latest news and opinion on the subject. From time to time, I will invite other voices to weigh in on important issues in EdTech. We hope to provide a well-rounded, multi-faceted look at the past, present, the future of EdTech in the US and internationally.

We started this journey back in June 2016, and we plan to continue it for many more years to come. I hope that you will join us in this discussion of the past, present and future of EdTech and lend your own insight to the issues that are discussed.

Newsletter

Signup for The Tech Edvocate Newsletter and have the latest in EdTech news and opinion delivered to your email address!

Contact Us

The Tech Edvocate
910 Goddin Street
Richmond, VA 23231
(601) 630-5238
[email protected]

Copyright © 2026 Matthew Lynch. All rights reserved.