How to install AIO liquid cooler
“`html
As computer enthusiasts and gamers know, achieving optimal cooling is crucial for performance and longevity in any PC build. Among the myriad of cooling solutions available today, AIO (All-In-One) liquid coolers have gained immense popularity due to their efficiency and ease of installation. But how do you install an AIO liquid cooler properly? In this comprehensive guide, we will walk you through the installation process, provide practical insights, and offer tips to enhance your cooling setup.
1. Understanding AIO Liquid Coolers
Before we dive into the installation process, let’s take a moment to understand what AIO liquid coolers are and why they’re a preferred choice for many PC builders. Unlike traditional air coolers, AIOs use a closed-loop liquid cooling system to dissipate heat more efficiently.
The system consists of a pump, a radiator, and water blocks, which work together to move coolant away from the CPU and dissipate heat through the radiator. This design not only reduces temperatures significantly compared to air cooling but also often results in quieter operation, as the fans can run at lower speeds. Moreover, the compact nature of AIO units allows for better aesthetics and more space within your case.
Additionally, AIO liquid coolers come in various sizes and designs, catering to different preferences and case configurations. Some models feature RGB lighting for a visually appealing setup, while others focus on high-performance cooling capabilities. Understanding the differences can help you select the right cooler for your specific needs.
2. Gathering Your Tools and Components
To successfully install an AIO liquid cooler, you’ll need a few essential tools and components. Here’s what you should have ready:
- Components: Your AIO liquid cooler, compatible CPU socket mounting brackets, thermal paste (often pre-applied), and your CPU.
- Tools: A Phillips-head screwdriver, a flat-head screwdriver (if necessary), and possibly some zip ties for cable management.
- Safety Gear: An anti-static wrist strap is recommended to prevent any damage to sensitive components.
Double-check that your cooler is compatible with your CPU socket type, as not all AIOs fit every CPU. Most manufacturers specify compatibility on their product pages or packaging. If you’re unsure, consult forums or guides specific to your CPU model for further confirmation.
3. Preparing Your Case and CPU
Before installation, ensure your PC case is ready. It’s advisable to work in a clean environment, free from dust and debris. Start by removing the side panel of your case to access the motherboard. Depending on your setup, it might be easier to remove the entire motherboard from the case for installation.
Next, locate your CPU socket and remove any existing CPU cooler if you have one installed. Clean the surface of the CPU with isopropyl alcohol and a lint-free cloth, ensuring no thermal paste residue is left. This step is vital for the new thermal paste to adhere properly and conduct heat efficiently.
Familiarize yourself with the motherboard layout as well. Knowing where the CPU power connector and fan headers are located can save you time during the installation process. Additionally, consider routing your cables in a way that promotes airflow within the case, enhancing cooling efficiency overall.
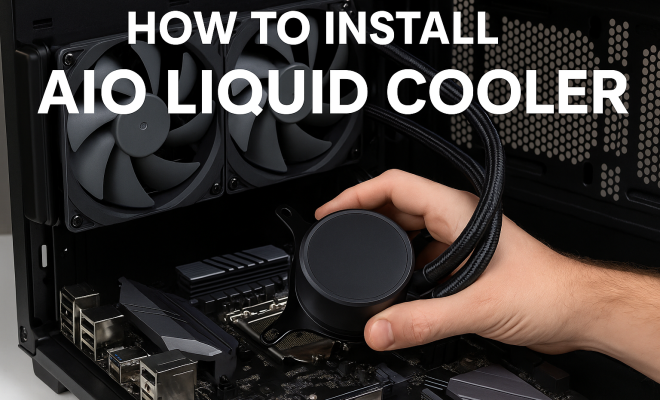
4. Installing the AIO Pump and CPU Block
The heart of your AIO cooler is the pump and CPU block assembly, which will be mounted directly onto your CPU. Most AIOs come with a backplate designed to support the mounting system. Start by attaching this backplate to the back of your motherboard, aligning it with the CPU socket.
Next, apply the provided thermal paste if it’s not pre-applied. A pea-sized amount in the center of the CPU is generally sufficient. Then, carefully place the CPU block over the CPU, ensuring it sits evenly. Secure it according to the manufacturer’s instructions, which usually involves tightening screws in a criss-cross pattern to prevent uneven pressure. (See: Understanding liquid cooling systems.)
Don’t rush this step. A proper thermal interface is essential for effective heat transfer, so make sure the CPU block is mounted securely without over-tightening, which can damage the CPU or cooler. After securing the block, you can check that it’s not wobbling and is making solid contact with the CPU surface.
5. Mounting the Radiator and Fans
With the CPU block in place, the next step is to mount the radiator. This is often where personal preference and case compatibility come into play. AIO radiators can typically be mounted at the top, front, or rear of the case. Ensure you check your case dimensions and clearance for GPU and RAM.
Attach the fans to the radiator, making sure they are oriented correctly for optimal airflow. Usually, you want the fans to pull air through the radiator, which means they should face the same direction as the airflow in your case. Once the fans are attached, secure the radiator in position, using the screws provided with the cooler.
If you have the option, consider a push-pull configuration by adding fans on both sides of the radiator. This can significantly enhance cooling performance, especially during heavy usage or gaming sessions. Additionally, assess the case’s airflow design—using dust filters can help keep your system cleaner and maintain cooling efficiency.
6. Connecting the AIO Cooler to Power
At this stage, it’s essential to connect the AIO cooler to your motherboard and power supply. Locate the 3-pin or 4-pin pump header on your motherboard, typically labeled as ‘CPU_FAN’ or ‘AIO_PUMP.’ Connect the pump wire to this header to ensure the pump operates correctly.
Next, connect the fans to either the radiator or the CPU_FAN header on the motherboard. If your AIO has RGB features, make sure to connect those to the appropriate header. Double-check all connections before closing up the case to prevent any operational issues.
For those using RGB lighting, it’s worth exploring software options that allow for customization of lighting effects. Many modern motherboards come equipped with RGB headers and corresponding software, giving you the ability to sync your cooler’s lighting with other components for a cohesive look.
7. Testing Your Installation
It’s time to power up your system to ensure everything is functioning correctly. Start by turning on your PC and monitoring the AIO cooler’s performance. Check for any unusual noises or leaks, and ensure the pump is running. You should also monitor the CPU temperatures using hardware monitoring software.
Run stress tests to see how the cooling performs under load. This will help you confirm that the installation was successful and that your CPU is being adequately cooled. If you notice excessive temperatures, you may need to recheck the installation, ensuring proper contact between the CPU and block. Utilize software such as HWMonitor or CPU-Z for comprehensive temperature readings.
8. Maintaining Your AIO Cooler
Once installed, maintaining your AIO cooler is crucial for long-term performance. While AIOs are generally maintenance-free, there are still steps you can take to ensure optimal functioning. Regularly clean the radiator and fans to prevent dust buildup, which can hinder cooling efficiency.
Additionally, keep an eye on coolant levels and check for leaks or unusual noises. If you notice any signs of wear or issues, consider replacing the unit or consulting the manufacturer’s warranty for assistance. Proper maintenance not only extends the life of your cooler but also enhances the overall performance of your system.
Every few months, unplug the fans and use compressed air to blow out any dust from the radiator. Maintaining clear airflow will significantly improve cooling performance. Additionally, inspect the tubing for any signs of wear or damage to prevent potential leaks. (See: Importance of computer cooling.)
9. Common Issues and Troubleshooting
Even with careful installation, you might encounter issues with your AIO liquid cooler. Common problems include inadequate cooling, pump failure, or noise issues. If temperatures are higher than expected, ensure that the pump is functioning correctly and that there is good airflow within your case.
For noise issues, check that the fans are securely mounted and not vibrating against other components. Pump noise can often be reduced by adjusting fan curves in your BIOS or through software. If problems persist, consider reaching out to the manufacturer for troubleshooting guidance or potential warranty replacement.
Other issues may include air bubbles trapped in the pump or radiator. If you suspect this, gently tilting the case or rotating the cooler may help dislodge them. In severe cases, you might need to perform a complete replacement, depending on the warranty terms.
10. Frequently Asked Questions
What’s the difference between AIO liquid coolers and custom liquid cooling systems?
AIO coolers are pre-assembled, closed-loop systems that require minimal setup, while custom liquid cooling systems are built from individual components, offering more flexibility and performance tuning but requiring extensive knowledge and maintenance.
Can I install an AIO cooler in a small case?
Yes, but you need to ensure that the radiator size is compatible with your case. Most AIO coolers come in different sizes (120mm, 240mm, 360mm) to fit various case configurations. Always check your case specifications before purchasing.
Do I need to replace the thermal paste after installing an AIO cooler?
If the AIO comes with pre-applied thermal paste, you typically don’t need to replace it unless you’re re-installing the cooler. If you remove the cooler, it’s advisable to clean the old paste and apply a new layer for optimal performance.
How do I know if my AIO cooler is working properly?
Monitor your CPU temperatures under load; they should remain within safe limits. Additionally, listen for any unusual noises from the pump or fans. You can also check software readings for pump speed and fan speeds via your motherboard’s monitoring tools.
Are AIO coolers noisy?
Generally, AIO coolers operate quietly compared to air coolers, especially under light loads. However, noise levels can increase significantly under heavy loads or if the fans are set to run at high RPMs. Consider configuring fan curves in BIOS or using software to optimize noise levels based on temperature.
Can I use an AIO cooler for overclocking?
Yes, AIO coolers are well-suited for overclocking, as they provide efficient heat dissipation. Just ensure that the cooler you choose has adequate cooling capacity and that your case allows for proper airflow.
11. Comparing AIO Liquid Coolers to Other Cooling Solutions
When considering an AIO liquid cooler, it’s important to understand how it stacks up against other cooling solutions. Two popular alternatives are air coolers and custom liquid cooling systems. Here’s a quick comparison: (See: Liquid cooling in computer science.)
Air Coolers
Air coolers, which rely on large heatsinks and fans to dissipate heat, are generally easier to install and maintain than AIOs. They typically come in various sizes and can offer competitive performance, especially high-end models. However, they may struggle with overclocked CPUs due to airflow limitations and are usually bulkier, which can be an issue in compact cases. Additionally, air coolers tend to be noisier under load compared to their liquid counterparts.
Custom Liquid Cooling Systems
Custom liquid cooling systems offer the highest degree of performance and flexibility. They can cool CPUs, GPUs, and even RAM with a tailored solution that suits your specific needs. However, they require a greater investment of time and money for assembly and maintenance. For those who enjoy building PCs and want the best cooling possible, custom loops can be very rewarding. Yet, for most users, AIO liquid coolers strike a perfect balance between performance and ease of installation.
12. Expert Perspectives on AIO Liquid Coolers
Industry experts often weigh in on the benefits and drawbacks of AIO liquid coolers. A common consensus is that while AIOs might not reach the performance levels of custom loops, they provide significant benefits for the average user. According to PC hardware expert Linus Sebastian of Linus Tech Tips, “AIOs offer a great way to get into liquid cooling without the hassle of a custom loop. They’re reliable, efficient, and a lot of fun to set up.”
Additionally, many gamers appreciate AIOs for their aesthetic appeal. Matthew, a PC builder and online streamer, notes, “RGB lighting has become essential for gaming builds, and AIO coolers often come equipped with this feature, allowing me to match my setup’s vibe.” This highlights the growing trend of aesthetics playing a role in cooling solution choices.
13. Statistics on AIO Liquid Coolers
Recent surveys indicate that AIO liquid coolers account for approximately 40% of the liquid cooling market, reflecting their increasing popularity among PC builders. According to a report by market research firm Statista, the global market for gaming hardware, including cooling solutions, is projected to reach $18 billion by 2025, with liquid coolers leading in sales growth.
Additionally, benchmarks show that high-performance AIOs can reduce CPU temperatures by up to 30% compared to stock air coolers under load, making them an attractive option for overclockers and gamers.
14. Conclusion: Embracing AIO Liquid Cooling
Installing an AIO liquid cooler might seem daunting at first, but with careful planning and attention to detail, you can achieve excellent cooling performance for your CPU. Not only will this enhance your system’s performance, but it will also contribute to its longevity. So, roll up your sleeves, gather your tools, and dive into this rewarding DIY experience!
“`
Trending Now
Frequently Asked Questions
What is an AIO liquid cooler?
An AIO (All-In-One) liquid cooler is a closed-loop cooling system designed to dissipate heat from the CPU more efficiently than traditional air coolers. It consists of a pump, radiator, and water blocks that work together to move coolant away from the CPU, providing better cooling performance and often quieter operation.
How do you install an AIO liquid cooler?
To install an AIO liquid cooler, gather your tools and components, including the cooler, compatible mounting brackets, and thermal paste. Secure the radiator in your case, attach the water block to the CPU, and connect the pump and fans to the motherboard for power. Follow the manufacturer's instructions for best results.
What tools do I need to install an AIO liquid cooler?
You will need a Phillips-head screwdriver, a flat-head screwdriver (if necessary), and your AIO liquid cooler, along with compatible CPU socket mounting brackets and thermal paste. Having these tools ready will make the installation process smoother and more efficient.
Are AIO liquid coolers better than air coolers?
AIO liquid coolers are generally more efficient than air coolers, as they can dissipate heat more effectively and often operate more quietly. They also offer better aesthetics and take up less space in the case. However, the choice between AIO and air cooling depends on your specific needs and preferences.
Do AIO liquid coolers require maintenance?
AIO liquid coolers typically require less maintenance than custom liquid cooling systems. However, it's important to check for leaks and ensure that the fans and radiator are free of dust. Most AIO units are designed to be maintenance-free for their lifespan, but occasional checks can help ensure optimal performance.
Have you experienced this yourself? We’d love to hear your story in the comments.