How to install power supply
“`html
Installing a power supply might seem daunting, especially if you’re new to building or upgrading computers. But fear not! In this comprehensive guide, we’ll walk you through how to install a power supply step-by-step, ensuring your system runs smoothly and efficiently. We’ll also dive into essential tips, common mistakes to avoid, and the importance of choosing the right power supply for your needs.
1. Understanding Power Supply Basics
Before you start installing a power supply, it’s crucial to grasp the basics of what it is and how it functions within your computer. A power supply unit (PSU) converts the electricity from your wall outlet into a usable form for your computer. It supplies various voltages, including +3.3V, +5V, and +12V, which power different components like the motherboard, CPU, and graphics card.
Power supplies come in different wattages, which determine how much power they can deliver. It’s essential to choose a power supply that meets or exceeds the total power requirements of your system. You can calculate your needs using online PSU calculators, which take into account all your components. Having the right PSU is vital not only for performance but also for the longevity of your hardware.
2. Choosing the Right Power Supply
When it comes to how to install a power supply, your first step is selecting the right model. Consider factors such as wattage, efficiency rating (like 80 PLUS certification), and connector types. Higher wattage ensures that your PSU can handle the demands of components, especially if you plan to overclock or add more hardware later.
Efficiency ratings are crucial because they indicate how much power is lost as heat. An 80 PLUS certified power supply is a good choice, offering at least 80% efficiency at regular loads. Moreover, pay attention to the connector types; different motherboards and components require specific connectors. Ensure your chosen PSU includes the necessary cables for smooth installation.
For example, if you’re using multiple GPUs for gaming or rendering, you might want to consider a PSU with 1000W or more. Some high-performance CPUs and GPUs can consume a significant amount of power, so a PSU that can handle these loads is essential. In general, it’s better to have a PSU that provides a bit more power than you need, rather than one that just meets your system’s requirements. This not only ensures stability but can also prolong the lifespan of your PSU.
3. Gathering the Required Tools
Before you begin the installation process, gather all necessary tools. Here’s a quick checklist:
- Phillips screwdriver
- Anti-static wrist strap (optional but recommended)
- Flashlight (if needed for visibility)
- Cable ties or Velcro straps for cable management
- Power supply tester (optional, but useful for checking functionality)
Having these tools handy will make the installation smoother and more efficient. An anti-static wrist strap helps prevent damage to components from static electricity, so it’s wise to wear one if you have it. If you’re unsure of your PSU’s functionality, a power supply tester can provide peace of mind before installation.
4. Preparing Your Workspace
Creating a suitable workspace is often overlooked but can significantly impact your installation experience. Clear a large, flat surface free of clutter to lay down your components. Make sure it’s well-lit to avoid any mishaps during the installation. Some users find that working on a non-static surface, such as a wooden table, can help reduce the risk of static discharge.
Additionally, it’s wise to ground yourself before starting to avoid static shocks. You can do this by touching a metal object or using an anti-static wrist strap. Ensure your computer case is unplugged and all components are disconnected before proceeding with the installation. (See: Power supply basics and functions.)
5. Removing the Old Power Supply
If you’re replacing an existing power supply, start by disconnecting all cables attached to it. This includes power cables to the motherboard, graphics card, and storage devices. Take care to note or label where each cable was connected, as this will help you when installing the new PSU. If you have trouble remembering, taking a quick photo can be a handy reference.
Once disconnected, unscrew the old power supply from the case. This usually involves locating screws at the back of the case holding the PSU in place. Once unfastened, carefully slide the old power supply out of the case. Now you’re ready for the new installation!
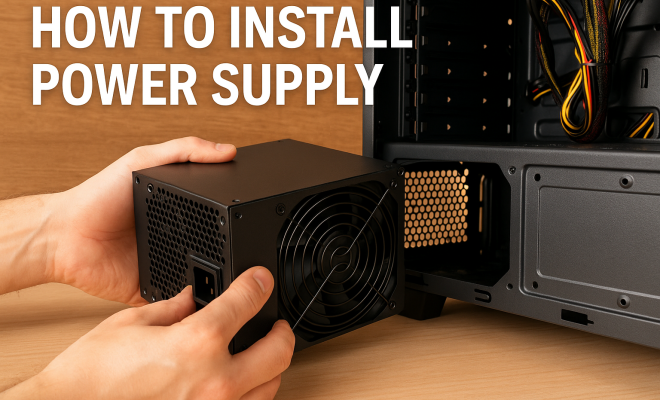
6. Installing the New Power Supply
With your old power supply removed, it’s time to install the new one. Begin by carefully inserting the new PSU into the power supply compartment of your case. Make sure the fan (if applicable) is oriented correctly for optimal airflow—usually towards the case’s ventilation. Some cases allow you to position the PSU either with the fan facing up or down; choose the orientation that best suits your case design for improved cooling.
Secure the power supply by screwing it into place. Once it’s firmly attached, connect the necessary cables to the motherboard, CPU, and any other components like the graphics card. Take your time with this step—ensuring each connection is snug will help prevent power issues down the line. Don’t forget to connect any additional cables, such as those for SSDs or HDDs, to ensure all components receive power.
7. Cable Management Tips
Once everything is connected, it’s time to tidy up and manage your cables. Good cable management isn’t just about aesthetics; it also improves airflow within your case, reducing heat build-up and enhancing performance. Use cable ties or Velcro straps to bundle cables together, keeping them organized and out of the way of fans. It’s a good idea to keep power cables separate from data cables to minimize interference and maintain clarity.
Consider routing cables through designated channels in your case to maintain a clean look. A tidy setup not only enhances airflow but also makes future upgrades or troubleshooting much more manageable. Remember, a little extra effort in organization can save time and headaches later! For those interested in a truly clean look, investing in a modular power supply can be beneficial, allowing you to use only the cables you need.
8. Final Checks and Powering On
Before you plug in your system and power it on, double-check all your connections. Ensure that all cables are securely fastened and that there are no loose or stray wires. It’s also a good idea to check the PSU switch (if equipped) is turned to the ‘on’ position. If your PSU comes with a power switch, make sure it’s set to the correct position before powering up the machine.
Once everything looks good, plug the PSU into the wall and turn on your computer. Listen for any unusual sounds, and watch for any warning lights on the motherboard. If everything checks out, congratulations! You’ve successfully learned how to install a power supply.
9. Troubleshooting Common Issues
If you encounter issues after installation, don’t panic. Start by checking all your connections again, ensuring everything is firmly in place. A common issue is the PSU not supplying enough power, which might require you to re-evaluate your components and upgrade to a higher wattage unit. It’s also worth noting any unusual noises coming from the PSU; this could indicate a fault that needs attention.
Other problems, like random shutdowns or hardware not powering up, could be a sign of faulty components or incorrect connections. If issues persist, consult your motherboard manual for troubleshooting help or seek assistance from online tech forums. Remember, patience is key when diagnosing problems.
10. Understanding Power Supply Ratings
To ensure you’re making an informed choice, it’s essential to understand the power supply ratings. Power supply units are rated by their wattage, which indicates the maximum amount of power the unit can supply. However, not all wattage ratings are created equal. For instance, a PSU rated at 500W might only deliver that amount under ideal conditions. Look for reviews and tests that demonstrate its real-world performance. (See: Importance of choosing the right power supply.)
Additionally, the amperage ratings on the +12V rail are crucial for components like the CPU and graphics card. Insufficient amperage can lead to stability issues, particularly under load. Therefore, check the specifications for your components to see their requirements and match them with the PSU’s output.
11. Power Supply Form Factors
Power supplies come in several form factors, the most common being ATX, which fits the majority of computer cases. However, if you’re working with a smaller case, you may need a smaller form factor like SFX or TFX. These compact PSUs are designed to fit in tight spaces while still delivering adequate power. Always check your case specifications to ensure compatibility before purchasing a new PSU.
In addition to size, consider the cooling features of the power supply. Many modern units come equipped with larger, quieter fans or even fanless designs that can operate silently under low loads. Choosing the right cooling solution can make a significant difference in overall system noise and thermals.
12. Frequently Asked Questions (FAQ)
Q1: How do I know what wattage power supply I need?
A1: You can calculate your required wattage by adding up the wattage requirements of all your components. Many manufacturers list the typical power consumption for their products, or you can use online PSU calculators to simplify the process.
Q2: What is the difference between modular, semi-modular, and non-modular power supplies?
A2: Modular power supplies allow you to attach only the cables you need, reducing clutter. Semi-modular units come with essential cables attached and others detachable. Non-modular units come with all cables attached, which can make cable management more challenging.
Q3: How often should I replace my power supply?
A3: A good quality power supply can last five to ten years. However, if you notice issues such as unexpected shutdowns, strange noises, or if you’re upgrading significant components, it may be time to consider a replacement.
Q4: Can a power supply be too powerful for my system?
A4: While having a power supply with too much wattage won’t damage your system, it can lead to inefficiencies. A PSU that operates under low load may not run as efficiently, resulting in wasted energy. However, it’s generally better to have a slightly overpowered PSU than one that is underpowered.
Q5: Is it safe to use a second-hand power supply?
A5: While it’s possible to use a second-hand power supply, it’s risky. Older PSUs may not deliver consistent power, and they can fail, potentially damaging your other components. If you choose to buy second-hand, ensure it’s from a reputable source and check its performance rating.
13. Power Supply Upgrade Considerations
If you’re considering an upgrade to your power supply, there are a few factors you might want to keep in mind. First, assess your current and future hardware needs. If you plan on upgrading to more powerful components, like a high-end graphics card or a beefier processor, it’s wise to invest in a power supply that not only meets your current requirements but has some headroom for future upgrades. A PSU with a higher wattage rating allows you to expand your system without worrying about power constraints.
Another consideration is the quality of the power supply. Look for brands that are known for reliability and performance. Reviews from reputable tech sites can provide insights into how well a PSU performs under load, its efficiency ratings, and its longevity. Remember, investing in a quality PSU can save you money in the long run by preventing damage to other components that might occur due to a lower-quality supply. (See: Choosing the right power supply for computers.)
14. Environmental Considerations and Efficiency
With growing concerns about energy consumption and environmental impact, efficiency ratings of power supplies have become increasingly important. Power supplies that are 80 PLUS certified are tested to meet specific efficiency metrics at different loads. This certification is not just a marketing gimmick; it indicates that the PSU wastes less power as heat, which translates into lower electricity bills and less environmental impact.
Choosing an efficient power supply not only benefits your wallet but also contributes to a more sustainable tech ecosystem. With the increasing demand for energy-efficient devices, opting for a PSU with a higher efficiency rating makes sense both financially and environmentally.
15. The Role of Power Supply in Overclocking
If you are into gaming or performance computing, overclocking may be in your future. Overclocking involves pushing your hardware beyond its factory settings for improved performance. However, this process significantly increases the power demand of your components, particularly the CPU and GPU. It’s crucial to ensure that your power supply can handle the increased wattage requirements that come with overclocking.
In addition to sufficient wattage, a PSU with strong amperage on the +12V rail is essential for stable overclocking. Insufficient power can lead to unstable performance, crashes, and even hardware damage. Therefore, it’s advisable to research the overclocking limits of your components and ensure that your PSU is rated to handle those demands.
16. Best Practices for Maintaining Your Power Supply
Once you’ve installed your power supply, maintaining it can help extend its lifespan. Regularly checking for dust buildup and ensuring proper airflow can prevent overheating. Dust can accumulate on fans and vents, reducing efficiency and causing noise. Periodically cleaning your system will help maintain optimal performance and reliability.
It’s also a good idea to monitor the performance of your PSU using software that tracks voltages and loads. If you notice significant fluctuations in power delivery, it may be time to check the PSU or consider a replacement. Keeping an eye on these metrics can help you catch any potential issues before they lead to component failure.
Installing a power supply is a crucial skill for any PC enthusiast or gamer. Armed with this knowledge, you can confidently tackle this task and ensure your system runs at its best. Remember to always prioritize safety and proper cable management for a clean and efficient setup. Happy building!
“`
Trending Now
Frequently Asked Questions
What do I need to know before installing a power supply?
Before installing a power supply, it's important to understand its function in your computer, which involves converting wall electricity into usable voltages for components. Additionally, ensure you select a power supply that meets your system's wattage requirements and includes the necessary connectors for your hardware.
How do I choose the right power supply for my computer?
Choosing the right power supply involves considering wattage, efficiency ratings, and connector types. Ensure the wattage exceeds your system's needs, especially if you plan on upgrading. Look for an 80 PLUS certified PSU for better efficiency and make sure it has the appropriate connectors for your motherboard and components.
What are common mistakes to avoid when installing a power supply?
Common mistakes when installing a power supply include not checking compatibility with your components, underestimating wattage needs, and neglecting to organize cables for airflow. Ensure all connections are secure and double-check that the PSU provides the necessary voltages for your hardware.
Why is wattage important when selecting a power supply?
Wattage is crucial because it determines the maximum power a power supply can deliver to your computer components. Choosing a PSU with insufficient wattage can lead to system instability, crashes, or hardware damage. It's essential to calculate your total power requirements to avoid these issues.
How can I ensure my power supply is efficient?
To ensure your power supply is efficient, look for units with an 80 PLUS certification, which guarantees at least 80% efficiency at standard loads. Higher efficiency ratings reduce power loss as heat, leading to lower energy bills and improved system performance.
What’s your take on this? Share your thoughts in the comments below — we read every one.