Install a Smart Switch: Your Guide to a Smarter Home
“`html
In an age where convenience and technology merge seamlessly, upgrading your home with smart devices is more than a trend—it’s a necessity. One of the simplest yet most effective upgrades you can make is to install a smart switch. With the ability to control your lighting from anywhere, schedule when your lights turn on or off, and even integrate them with other smart home systems, a smart switch can revolutionize how you interact with your living space. This guide will walk you through everything you need to know about installing a smart switch, providing practical insights and expert tips along the way.
1. Understanding Smart Switches
Before we delve into the installation process, let’s clarify what smart switches are. Essentially, a smart switch replaces your traditional light switch and connects to your home Wi-Fi network. This connection allows you to control your lights remotely using a smartphone app or voice commands through a smart assistant like Amazon Alexa or Google Assistant. Smart switches vary in functionality; some allow for dimming, others offer programmable schedules, and some can even monitor energy usage.
The market is teeming with options, from brands like Lutron and TP-Link to Wemo and GE. Each comes with unique features, so it’s crucial to choose one that fits your specific needs. Additionally, smart switches are generally compatible with LED, CFL, and incandescent bulbs, making them versatile for any home.
2. Why Upgrade to Smart Switches?
Installing smart switches not only elevates your home’s functionality but also enhances its energy efficiency. By scheduling your lights to turn off during the day when no one is home, you can significantly reduce electricity consumption. Additionally, smart switches can boost your home security; setting your lights to turn on and off at various times can simulate occupancy, deterring potential intruders.
Moreover, smart switches add a touch of modernity to your home. If you’re planning to sell your property, this upgrade can increase its value. Buyers are increasingly looking for smart home features, and having smart switches installed can make your home more attractive on the market.
The potential energy savings from smart switches are noteworthy. According to a report from the U.S. Department of Energy, smart lighting controls can save up to 30% on energy bills, which makes the initial investment worthwhile. Additionally, the convenience of managing your home lighting from anywhere adds an invaluable level of comfort and control.
3. Tools and Materials Needed
Before you start the installation process, gather the necessary tools and materials. Here’s what you’ll need:
- A smart switch kit
- Screwdriver (usually a flathead and Phillips)
- Wire stripper
- Voltage tester
- Electrical tape
- Wire nuts
- Safety goggles and gloves
Make sure to choose a smart switch that aligns with your home’s wiring setup. Some switches require a neutral wire, while others do not. Reviewing your electrical system beforehand ensures you have the right type of switch for your needs. It’s also a good idea to check if your home has any older wiring that could affect compatibility with modern smart devices.
4. Safety First: Turn Off Power
Safety should always be your top priority when working with electricity. Before you begin the installation, turn off the power to the switch at your circuit breaker. Use a voltage tester to ensure that the switch you will be working on is not receiving any power. Wear safety goggles and gloves to protect yourself from any accidental shocks.
It’s also wise to notify anyone in your household about the ongoing work to prevent them from turning the power back on while you’re handling the wiring. Safety first means no shortcuts! (See: Smart switch definition and features.)
Another precaution is to have a flashlight handy in case there are any issues during the installation process, especially if you’re working in poorly lit areas. This ensures you can see what you’re doing without risking a shock from faulty wiring.
5. Remove the Existing Switch
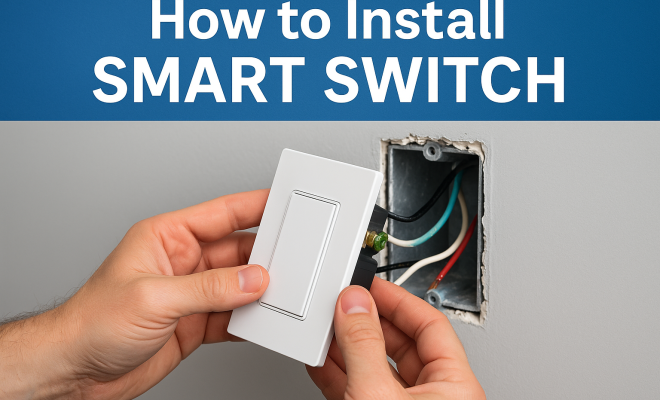
Once you’ve ensured that there is no power to the switch, it’s time to remove the existing switch. Unscrew the cover plate and then the switch itself. Keep track of the screws, as you will need them for your new smart switch. Take a picture of the wiring before you disconnect it—this will serve as a helpful reference when connecting your new smart switch.
Carefully disconnect the wires, noting where each wire was attached on the old switch. If you have a three-way switch setup, be sure to identify which wires are traveler wires, as the installation may vary slightly. Setting everything up correctly is crucial for a functional smart switch. If you’re unsure, consider consulting the installation guide that comes with your smart switch, which often provides detailed diagrams and tips.
6. Wiring the Smart Switch
Now it’s time for the nitty-gritty: wiring your smart switch. If your switch requires a neutral wire, connect it to the appropriate terminal on your smart switch. Next, attach the load wire (the wire that goes to the light fixture) and then the line wire (the power source). If you’re unsure about the connections, refer to the smart switch’s installation manual, as different brands may have slightly varying requirements.
For those installing a three-way switch, you will likely encounter traveler wires. Follow the instructions provided by the manufacturer closely to ensure everything is wired correctly. Once all connections are secure, cover them with wire nuts and use electrical tape to further secure them. This ensures that there are no loose connections that could lead to shorts or other electrical issues.
In cases where you’re dealing with multiple switches, consider color-coding your wires with electrical tape or markers. This way, you can easily identify which wires belong to which switch, making the installation process smoother and less prone to errors.
7. Installing the Smart Switch
Once your smart switch is wired correctly, it’s time to install it into the wall. Gently push the wires back into the electrical box, taking care not to crimp or damage them. Align the switch with the mounting holes and screw it into place. After securing the switch, reattach the cover plate.
This step is simple, but it’s essential to ensure that the switch is level and flush with the wall. A crooked switch can not only look unprofessional but may also affect its operation. Once the switch is in place, check to ensure the screws are tight but not overly so, as this could damage the switch casing.
8. Restore Power and Test the Switch
With everything installed, it’s time to restore power at the circuit breaker. Once the power is back on, test your smart switch to see if it operates correctly. Use the physical switch to see if the lights respond as expected, and then download the associated app for your smart switch to complete the setup process.
The app will typically guide you through connecting your smart switch to your Wi-Fi network and integrating it with any smart assistants you may use. Follow the prompts, and in a matter of minutes, your smart switch will be operational and ready to take command of your lighting.
To get the most out of your smart switch, spend some time exploring the app features. Many apps allow you to set up lighting schedules, create scenes for different activities, or even monitor the energy consumption of connected devices. This extra functionality can greatly enhance your experience and help you utilize your smart switch to its full potential. (See: Smart switches and home safety.)
9. Integrating with Smart Home Systems
One of the biggest advantages of smart switches is their integration capabilities. Most smart switches work seamlessly with popular smart home ecosystems like Google Home, Amazon Alexa, and Apple HomeKit, allowing you to control your lights with voice commands or through a centralized app.
Once you’ve added your smart switch to your home network via the manufacturer’s app, explore the integration options available. You can create custom routines, such as turning on all lights at a specific time or dimming lights for movie nights—all with simple voice commands. This added convenience elevates your home automation experience.
For those who enjoy customizing their environments, consider setting up geofencing features available in some apps. This can automatically turn your lights on or off based on your location, for instance, turning on the lights when you arrive home after dark, so you’re greeted with illumination.
10. Maintenance and Troubleshooting
After successfully installing your smart switch, it’s essential to maintain it and troubleshoot any issues that may arise. Regularly check for firmware updates via the app, as manufacturers frequently release updates to improve performance and security.
If you encounter issues, such as the switch not responding to commands, try resetting the switch based on the manufacturer’s instructions. Sometimes, a simple power cycle or app refresh can resolve connectivity issues. Joining user forums or communities related to your smart switch brand can also provide valuable insights and solutions from fellow users.
Keep an eye on the overall performance of the smart switch. If you notice unusual behavior—like lights flickering or becoming unresponsive—this could indicate a wiring issue or a problem with the switch itself. Always consult the troubleshooting section of the user manual, as it may save you time and hassle.
11. Choosing the Right Smart Switch for Your Home
With a vast array of smart switches on the market, selecting the right one can feel overwhelming. Here are some factors to consider that can help narrow down your choices:
- Compatibility: Ensure the smart switch you choose is compatible with your existing light fixtures and home wiring. Some switches may not work with certain types of bulbs or fixtures.
- Features: Determine which features are most important to you. Do you need dimming capability? Is energy monitoring a priority? Look for switches that offer the features that match your lifestyle.
- Smart Home Integration: Confirm that the switch works with the smart home ecosystem you use. Some switches have limited compatibility and may not work with all systems.
- Ease of Installation: Some models are designed for DIY installation, while others may require professional help. Check reviews to see how easy it is for others to install.
- Price: Prices can vary significantly based on features. Balance your budget with the features you need to select the best option.
Researching different models can also help you discover new functionalities or features you may not have considered, potentially enhancing your smart home experience even further.
12. Frequently Asked Questions (FAQ)
Q1: Can I install a smart switch if I don’t have a neutral wire?
A1: Yes, some smart switches are designed to work without a neutral wire. These models often use a different technology to maintain a small amount of power to the switch. However, it’s essential to check the specifications before purchasing. (See: Benefits of smart home devices.)
Q2: What happens if the Wi-Fi goes down?
A2: If your Wi-Fi goes down, you may lose remote access to your smart switch. However, in most cases, you can still operate the switch manually by using the physical button on the switch itself.
Q3: Are smart switches safe to use?
A3: Yes, smart switches are safe when installed correctly. They undergo rigorous safety testing and meet industry standards. Always follow installation instructions carefully to ensure safety.
Q4: How do I reset my smart switch?
A4: Resetting methods vary by brand and model, but commonly involves holding down the switch or using the app to initiate a reset. Refer to your user manual for specific instructions.
Q5: Can smart switches be used outdoors?
A5: While some smart switches are designed for outdoor use, many are not. Make sure to choose a model rated for outdoor conditions if you plan to install it outside. This ensures it can withstand weather elements.
13. Common Installation Pitfalls
While installing a smart switch can be straightforward, there are some common pitfalls that DIYers should be aware of to ensure a smooth installation process. Here are a few to watch out for:
- Not Checking Compatibility: Before you purchase a smart switch, make sure it’s compatible with your existing setup. This includes understanding the type of bulbs you have and whether your wiring is suitable for a smart switch installation.
- Ignoring the Neutral Wire Requirement: Many smart switches require a neutral wire to function correctly. If yours doesn’t have one, you might end up purchasing a switch that you can’t use, leading to frustration and delays.
- Assuming You Can Skip the App Setup: Some users think they can just install the switch and start using it. However, most smart switches require app setup to function fully. Don’t skip this step, as it often includes crucial firmware updates and connection configurations.
- Overtightening Screws: When securing the switch, it’s easy to overtighten screws, which can damage the switch. Tighten them just enough to secure the switch in place without applying excessive force.
- Forgetting to Label Wires: If you’re not familiar with electrical work, it can be easy to forget which wire connects where. Labeling each wire or taking a clear photo of the previous setup can save you time and trouble during installation.
14. Expert Tips for Optimal Use
To truly get the most out of your smart switch, consider these expert tips:
- Utilize Schedules and Timers: Many smart switches allow you to create schedules for your lights, which can help with energy savings and security. Set your lights to turn on at sunset or to mimic your daily routine when you’re away.
- Experiment with Scenes: Create scenes that fit your lifestyle, such as a “Movie” scene that dims the lights or a “Party” scene that brightens up the space. This can enhance your home environment and make it more enjoyable.
- Monitor Energy Usage: Some smart switches come equipped with energy monitoring. Use this feature to understand which lights consume the most energy and adjust your usage accordingly.
- Keep Your Firmware Updated: Regular firmware updates can enhance the functionality and security of your smart switch. Make it a habit to check for updates through the app periodically.
- Integrate with Other Smart Devices: If you have other smart home devices, look into how you can integrate them with your smart switch. For example, you can set up routines that link your smart thermostat with your lighting system for better energy management.
15. Conclusion: Embrace Smart Living
Installing a smart switch can significantly enhance your home’s lighting control and energy efficiency. With careful planning and execution, you can transform your living space into a smart environment in just a few hours. So, are you ready to roll up your sleeves and install a smart switch in your home? The upgrade is well worth it!
“`
Trending Now
Frequently Asked Questions
What is a smart switch and how does it work?
A smart switch is a device that replaces your traditional light switch and connects to your home Wi-Fi network. This allows you to control your lights remotely via a smartphone app or voice commands using smart assistants like Amazon Alexa or Google Assistant.
What are the benefits of installing smart switches?
Installing smart switches enhances your home's functionality and energy efficiency. They enable you to schedule lights, reduce electricity consumption, and improve security by simulating occupancy, all while adding a modern touch to your living space.
Can smart switches work with different types of bulbs?
Yes, smart switches are generally compatible with various types of bulbs, including LED, CFL, and incandescent. This versatility makes them suitable for any home lighting setup.
How do I choose the right smart switch for my home?
When selecting a smart switch, consider the features that meet your needs, such as dimming options, programmable schedules, and energy monitoring. Research different brands like Lutron, TP-Link, Wemo, and GE to find one that fits your specific requirements.
Is it easy to install a smart switch?
Installing a smart switch can be straightforward, especially if you follow a guide. Basic electrical knowledge is helpful, but many smart switches come with detailed instructions. If you're unsure, consider hiring a professional for installation.
Agree or disagree? Drop a comment and tell us what you think.