How to wrap text in Excel
“`html
When it comes to organizing data in spreadsheets, clarity is key. Whether you’re compiling a budget, creating a project timeline, or analyzing survey results, the way your text appears can significantly impact readability and presentation. One of the most effective tools at your disposal is the ability to wrap text in Excel. This feature allows lengthy entries to be displayed neatly within a cell, eliminating clutter and improving the overall aesthetics of your spreadsheet. In this article, we’ll explore eight essential tips for mastering text wrapping in Excel, ensuring you make the most of this powerful function.
1. Understanding Text Wrapping in Excel
Before diving into the how-tos, it’s crucial to understand what text wrapping actually is. In Excel, text wrapping refers to the way text is displayed within a single cell. When you wrap text, any text that exceeds the cell’s width automatically moves to a new line within the same cell, allowing for better visibility without altering the cell’s dimensions.
This feature is particularly useful when dealing with long strings of text, such as comments, descriptions, or detailed data entries. Instead of having text spill over into adjacent cells or become truncated, wrapping keeps everything contained and organized. Excel provides several methods to enable this feature, which we will discuss below.
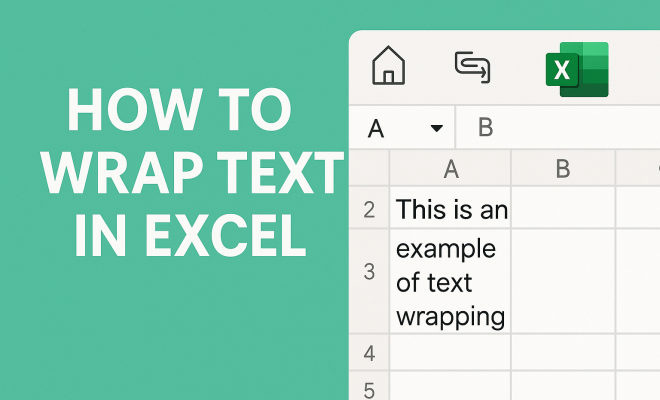
2. How to Wrap Text in Excel: Step-by-Step Guide
Enabling text wrapping in Excel is a straightforward process. Here’s how you can do it:
- Select the cell or range of cells you want to format.
- Navigate to the Home tab on the Ribbon.
- Look for the Alignment group and click on the Wrap Text button.
Once you’ve completed these steps, any text that exceeds the width of the cell will automatically wrap to the next line. It’s a simple yet effective way to enhance the clarity of your data presentation.
3. Adjusting Row Heights for Maximum Visibility
After enabling the wrap text feature, you may notice that some of your cells still appear cramped or that text is cut off. This can occur because Excel often does not automatically adjust row heights to accommodate wrapped text. To ensure that all your text is visible, you might need to manually adjust the row height.
To do this, simply hover your mouse over the bottom edge of the row number on the left side of the Excel interface. When the cursor changes to a double-headed arrow, click and drag to increase the row height. Alternatively, you can select the row and go to the Format option in the Home tab, where you’ll find an option to AutoFit Row Height. This automatically adjusts the height to fit the content within the cells.
4. Using Keyboard Shortcuts for Efficiency
If you find yourself frequently using the wrap text feature, keyboard shortcuts can save you a lot of time. In Excel, you can quickly wrap text in a selected cell by pressing Alt + H, then W. This sequence activates the wrap text feature without needing to navigate through the Ribbon manually.
Using shortcuts not only improves efficiency but also helps you stay focused on your data work without interruption. The more familiar you become with these shortcuts, the more fluid and productive your workflow will be.
5. Incorporating Wrap Text into Excel Tables
If you’re working with Excel tables, wrapping text becomes even more critical. Tables often contain headers and other information that can be lengthy, making it essential to ensure all data remains visible. When you convert a range of cells into a table, you can apply the wrap text feature to headers and body cells alike.
To wrap text in a table, just select the cells within the table and follow the same steps outlined earlier. This ensures that any lengthy titles or entries are displayed clearly, improving the readability of your table. Remember, a well-organized table not only looks more professional but also conveys information more effectively. (See: Microsoft Excel overview on Wikipedia.)
6. Combining Text Wrapping with Other Formatting Options
Excel offers a myriad of formatting options that can complement text wrapping. For instance, you can change the font size, style, or color to enhance the legibility of wrapped text. Using larger font sizes can make your data stand out, while bolding headers can help differentiate them from regular entries.
Another useful tactic is to center the text both vertically and horizontally within the cell. This can be done in the Alignment group, providing a professional appearance to your spreadsheet. When you combine these formatting options with wrapped text, the result is not only visually appealing but also functionally effective.
7. Common Issues and Troubleshooting
Despite its advantages, users often encounter issues when attempting to wrap text in Excel. A common problem is wrapped text appearing to overlap with adjacent cells. This usually happens if the adjacent cell is filled with data. To fix this, ensure that the adjacent cells are empty or that you adjust the column width appropriately.
Another issue could be the inability to wrap text due to merged cells. When cells are merged, the wrap text function may not work as expected. To resolve this, you can unmerge the cells and then apply the wrap text function to each individual cell as needed. Understanding these common pitfalls can help you navigate text wrapping more effectively.
8. Practical Applications of Wrapping Text in Excel
Finally, let’s discuss some practical applications of the wrap text feature in Excel. For anyone managing project timelines, being able to wrap text in Excel allows for clear delineation between different project phases and tasks, making schedules much easier to follow.
Similarly, if you’re compiling survey data or feedback, wrapping text can ensure that participants’ responses are complete and coherent without taking up excessive space. In financial modeling, wrapping text can be vital for displaying long formulas or explanations clearly. The ability to wrap text in Excel is not just a stylistic choice, but a functional necessity for any data management tasks.
9. Advanced Text Wrapping Techniques
Once you’ve mastered the basics of wrapping text, you can explore more advanced techniques to enhance your Excel spreadsheets further. One useful method is using conditional formatting with wrapped text. For example, you can set conditions based on data thresholds that change the font color or style of wrapped text. This can help you quickly identify important values in your data set.
Additionally, you can use text wrapping in combination with cell merging for creating headers that span multiple columns. This technique enhances the visual hierarchy of your data and can make your reports easier to navigate. Just remember to keep an eye on merged cells, as they can sometimes complicate sorting and filtering.
10. Statistics on Excel Usage
According to a recent survey by the International Data Corporation, over 750 million people worldwide use Microsoft Excel. Of these users, a staggering 82% reported that they rely on Excel for data organization and presentation tasks, making it one of the most essential tools in any business environment.
Moreover, organizations that utilize Excel effectively report a 50% increase in productivity. A significant factor in this increase is the efficient presentation of information, which includes features like text wrapping. Users who leverage formatting tools like wrap text are often able to convey complex data in a more digestible format, leading to better decision-making.
11. Comparison with Other Spreadsheet Software
While Excel is the go-to spreadsheet software for many, it’s not the only option available. Alternatives like Google Sheets and Apple Numbers also offer text wrapping functionalities, but the implementation and features can differ slightly.
For instance, Google Sheets automatically wraps text when you enter data that exceeds the cell width, while Excel requires you to enable the setting manually. Additionally, Google Sheets allows for collaborative editing in real-time, which can be advantageous for teams working together on data projects. (See: CDC on computer ergonomics.)
On the other hand, Excel offers more robust data analysis tools and features that might be missing in simpler applications. This makes it ideal for advanced users who require in-depth functionalities along with text formatting options like wrapping.
12. Expert Perspectives on Data Presentation
Data presentation is a critical skill in today’s information-driven world. Experts emphasize that clarity and organization are paramount in making data understandable. Excel educator Jane Doe states, “Incorporating features like text wrapping can drastically change the way your audience perceives your data. A well-presented spreadsheet is more likely to engage readers and facilitate discussions.”
Similarly, data analyst John Smith notes, “Text wrapping not only enhances readability but also helps maintain a professional look. It shows attention to detail, which can be crucial in business settings.” These perspectives highlight the importance of mastering text wrapping, as it can significantly influence how your data is received.
13. FAQs About Text Wrapping in Excel
What is the difference between wrapping text and merging cells?
Wrapping text keeps all text within a single cell visible without altering the cell’s width, while merging cells combines multiple adjacent cells into one larger cell. Merging cells can sometimes complicate data manipulation, while wrapping text enhances readability without losing data structure.
Can I wrap text in Excel for all cells at once?
Yes! You can select multiple cells and enable the wrap text feature simultaneously. This is especially useful when formatting tables or large data sets to maintain consistency throughout your spreadsheet.
Will text wrapping affect my printing layout?
Yes, wrapped text can impact your printed layout. It’s a good practice to preview your document before printing. You might need to adjust row heights or margins to ensure that all wrapped text appears correctly on the printed page.
Is text wrapping available in Excel for Mac?
Absolutely! Text wrapping is a standard feature in both Windows and Mac versions of Excel. You can enable it using the same steps outlined earlier in this article.
What if my text still appears cut off after wrapping?
If your text is still cut off after enabling wrap text, check the row height and ensure it’s sufficient to display all wrapped lines. You can also try adjusting the column width to create more space for the text.
14. Text Wrapping in Different Excel Versions
It’s important to note that the process for wrapping text may vary slightly across different versions of Excel, such as Excel 2010, Excel 2016, and the latest Excel 365 version. While the fundamental steps remain the same, the user interface might change slightly. For example, in Excel 2010, the Ribbon interface is similar to later versions, but certain features may be placed differently or have different icons.
In Excel Online, the wrap text feature is available, but users should be aware that it might lack some advanced formatting options compared to the desktop versions. Regardless of the version, the basic functionality remains intact, and knowing how to wrap text will help improve your data presentation no matter which platform you are using. (See: Harvard University resources.)
15. Using Wrap Text for Better Data Visualization
When you wrap text in Excel, you’re not just making your spreadsheet look better, you’re also enhancing its functionality as a data visualization tool. For example, if you are creating a dashboard that includes several metrics, having clear and concise labels that are wrapped can help viewers quickly understand what each metric represents. This is especially true in scenarios where you’re presenting to stakeholders who may not be familiar with the technical jargon used within the data.
Consider using wrap text in combination with other visualization tools within Excel, such as charts or graphs. For instance, a chart title that is wrapped can make it easier for viewers to grasp the context of the data being presented. The clearer your text, the more effective your visualizations will be as a communication tool.
16. Creating Templates with Wrapped Text
If you find yourself repeatedly using text wrapping in your spreadsheets, creating a template can save you a lot of time. You can set up a new workbook with all necessary formatting, including text wrapping in the headers and specific columns where you often input long text. This way, every time you create a new project, all you have to do is input your data into the pre-formatted cells.
Templates can be particularly useful for business reports, budget sheets, or project management documents, where consistency is key. You can save your template in Excel and simply customize it with new data as needed, which helps maintain a professional look across all your documents.
17. Additional Resources and Learning Tools
If you want to further enhance your Excel skills, including mastering text wrapping, there are numerous resources available. Microsoft offers extensive tutorials on their website, covering everything from the basics to advanced features. YouTube is another great platform where many Excel experts share tips and tricks, including specific videos dedicated to text formatting.
Online platforms like Coursera and Udemy also host Excel courses that can provide a more structured learning experience. These courses often include practical exercises that allow you to practice wrapping text along with other formatting techniques in real-time.
Wrapping text in Excel is a powerful tool that can enhance both the functionality and aesthetics of your spreadsheets. By mastering this feature along with its associated tips, you’ll be able to present your data in a clearer, more organized manner. Whether you’re a seasoned Excel user or a newcomer, these strategies will undoubtedly improve your productivity and the quality of your work.
“`
Trending Now
Frequently Asked Questions
How do I wrap text in Excel?
To wrap text in Excel, select the cell or range of cells you want to format. Go to the Home tab on the Ribbon, find the Alignment group, and click on the Wrap Text button. This will automatically move any text that exceeds the cell’s width to a new line within the same cell.
What is the purpose of wrapping text in Excel?
Wrapping text in Excel improves the readability and organization of data within a cell. It prevents text from spilling over into adjacent cells or being truncated, allowing for a cleaner presentation of lengthy entries such as comments or descriptions.
Can you wrap text in Excel for multiple cells at once?
Yes, you can wrap text for multiple cells in Excel. Simply select the range of cells you wish to format, then go to the Home tab, click on the Wrap Text button in the Alignment group. This will apply text wrapping to all selected cells simultaneously.
How do I adjust row height after wrapping text in Excel?
After wrapping text in Excel, you may need to adjust the row height for better visibility. You can do this by hovering over the bottom border of the row header until the cursor changes to a double arrow, then click and drag to increase the height as needed.
Is there a shortcut to wrap text in Excel?
While there is no direct keyboard shortcut to wrap text in Excel, you can quickly access the Wrap Text feature by selecting the cell and then pressing Alt + H, W. This will open the Wrap Text option in the Home tab, allowing for fast formatting.
What did we miss? Let us know in the comments and join the conversation.