Master Star Trails: Your Guide to Capturing Celestial Art
“`html
Shooting star trails is a captivating way to capture the beauty of the night sky, turning mere photographs into stunning celestial art. This technique reveals the movement of stars over time, creating mesmerizing streaks of light that can evoke a sense of wonder and tranquility. If you’re eager to learn how to shoot star trails like a pro, this guide will provide you with all the essential information and practical insights you need.
1. Understanding Star Trails
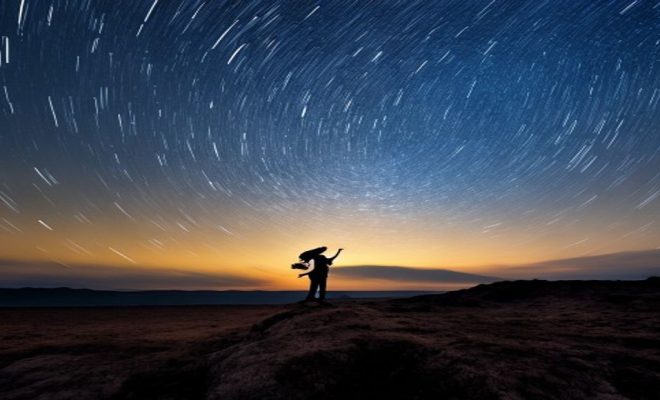
Before grabbing your camera, it’s important to understand what shooting star trails entails. Star trails are the result of long-exposure photography, where the camera captures the movement of stars over a set duration. As the Earth rotates, stars appear to move across the sky, leaving trails that can be visually stunning.
The length of the exposure directly affects the appearance of your star trails. For instance, a 30-second exposure will yield shorter trails, while an hour-long exposure creates longer, more pronounced streaks. The key is to balance the duration with the desired effect, ensuring you capture the beauty without overwhelming the viewer.
Interestingly, the shape and length of the star trails can also depend on your geographic location. In the Northern Hemisphere, shooting toward the North Star (Polaris) will create circular trails, while shooting toward the equator will yield linear tracks. This geographic variance can add an additional layer of creativity to your compositions.
2. Choosing the Right Location
Your chosen location significantly impacts the quality of your star trail photography. To achieve the best results, seek out places with minimal light pollution, such as remote areas or national parks. Locations like the Badlands National Park in South Dakota or the Joshua Tree National Park in California are renowned for their dark skies.
Additionally, consider the landscape itself. Natural features like mountains, trees, or bodies of water can add depth and interest to your compositions. Scout your location ahead of time to find the perfect vantage point, and check local weather conditions for clear skies.
It’s also worth researching the Milky Way’s position. Using apps like SkySafari or Stellarium can guide you to where the galactic core will be visible in the night sky during your shoot. This can add an extra layer of beauty to your photos as you incorporate the galactic core into your star trail images.
Consider visiting locations known for their dark skies, such as the International Dark Sky Parks, which are specifically preserved for stargazing. These parks offer an optimal environment for capturing not only star trails but various celestial phenomena, enhancing your overall shooting experience.
3. Essential Gear for Shooting Star Trails
To shoot star trails effectively, you need the right equipment. Here’s a list of essential gear:
- Camera: A DSLR or mirrorless camera that allows for manual settings is ideal.
- Tripod: A sturdy tripod is crucial to keep the camera steady during long exposures.
- Wide-angle lens: A lens with a wide aperture (f/2.8 or wider) is preferred as it captures more light.
- Remote shutter release: Using a remote release or camera timer helps eliminate camera shake.
- Extra batteries: Long sessions can drain batteries quickly, so bring extras.
- Light source: A red LED flashlight is useful for adjusting settings without ruining your night vision.
- Star tracking mount: For those serious about astrophotography, a star tracker can significantly enhance the quality of your star trails by compensating for Earth’s rotation.
Each component plays a vital role in ensuring your star trail photos turn out as intended, so invest in good-quality gear where possible. A good backpack can also be essential to transport your equipment safely and comfortably to your shooting location.
Another useful tool is a weather app that provides real-time updates on conditions, as well as forecasts, helping you choose the best nights for your photography endeavors. Keeping an eye on humidity and cloud cover can greatly impact your shooting quality.
4. Settings: Finding the Right Exposure
Getting your camera settings right is crucial for shooting star trails. Start by setting your camera to manual mode, allowing for complete control over exposure settings. Here’s a basic guideline:
- Aperture: Set your aperture as wide as possible (f/2.8 or f/4) to capture maximum light.
- ISO: Start with an ISO of around 800-1600. Experiment to find the best balance between noise and exposure.
- Shutter Speed: For single exposures, try 30 seconds maximum to avoid star trails becoming round or overexposed. For longer trails, consider stacking multiple shots.
These initial settings can serve as a solid foundation, but be prepared to make adjustments based on the environment and your creative vision. Don’t be afraid to take test shots to refine your settings before settling in for a long exposure. This can save you time and ensure you get the most out of your shoot. (See: Understanding star trails on Wikipedia.)
Remember to consider the impact of atmospheric conditions on your settings as well. High humidity can cause lens fogging, so keeping a lens cloth handy can help you maintain clarity in your images. Similarly, windy conditions can shake your tripod, so be prepared to stabilize it if needed.
5. Techniques for Shooting Star Trails
There are several techniques photographers use when shooting star trails. The simplest is to take a long exposure shot, allowing the camera to capture the stars’ movement over time. However, there are other methods worth considering.
One popular technique is to create a series of shorter exposures and then stack them in post-processing. This can help reduce noise and allows for more control over the final image. Software like StarStaX or Adobe Photoshop can be used to blend these images seamlessly. Another option is the use of intervalometers, which allow you to automate the shooting process and capture multiple photos at preset intervals.
Consider experimenting with interval shooting over varying lengths of time. For example, you could take 30-second exposures every two minutes for an hour, then blend those images. This method captures the stars’ movement while mitigating potential noise issues that can arise from longer exposures.
In addition, you might want to explore the technique of “light painting,” where you illuminate parts of your foreground while capturing star trails. This can create a stunning contrast between the moving stars and the static landscape, adding depth to your images.
6. Post-Processing Your Star Trails
Post-processing plays a crucial role in enhancing your star trail images. After capturing your photos, it’s time to bring them to life with software like Adobe Lightroom or Photoshop. Start by adjusting exposure, contrast, and color balance to make the stars pop against the sky.
Stitching together multiple exposures can create smoother trails and reduce noise. Many photographers advocate for the use of plugins or software specifically designed for star trail photography, as they offer specialized tools for blending images effectively. Don’t hesitate to experiment with different effects to see what resonates best with your artistic vision.
Additionally, using gradient filters in post-processing can help balance the exposure between the sky and foreground, especially if your landscape is significantly darker than the sky. This technique enhances the overall appeal by ensuring that both elements are well represented.
Using masking techniques can also help you isolate certain elements in your image for further enhancement. For example, selectively brightening the foreground while maintaining the natural look of the night sky can yield a more dynamic final image.
7. Understanding the Moon’s Influence
When planning your star trail photography sessions, consider the moon’s phase. A bright, full moon can illuminate the landscape beautifully, but it also competes with the stars, diminishing their visibility. The best time for shooting star trails is during a new moon or when the moon’s glow is minimal.
Check lunar calendars and plan your outings accordingly. Cloud cover can also obstruct your view, so keep an eye on the forecast leading up to your shoot. Understanding these environmental factors can make a significant difference in your photographic outcomes.
To further enhance your moonlit star trail photos, try incorporating the moon into your composition. A silhouetted foreground with a bright moon can create a mesmerizing effect, blending the beauty of both the stars and the lunar landscape.
You can also experiment with the timing of your shots throughout the night. As the moon rises and sets, it will cast different shadows and provide varying light levels, which can dramatically alter the mood of your image.
8. Common Mistakes to Avoid
Even experienced photographers can run into pitfalls when shooting star trails. One common mistake is failing to check camera settings before starting. Always double-check your aperture, ISO, and shutter speed to ensure they’re set correctly.
Another issue can arise from using low-quality tripods; any vibrations can ruin a long exposure. Additionally, many beginners neglect to scout their location beforehand, missing out on unique foreground elements that can enhance the composition. Always take some time to assess your surroundings and adjust your shot accordingly.
Be mindful of battery life as well. Long exposure sessions can drain batteries quickly, leading to interruptions in your shooting process. Carrying spare batteries for your camera and checking their charge levels before you head out can help avoid disappointing moments. (See: NASA's explanation of star trails.)
Also, check for dust on your lens, which can create unwanted artifacts in your images. A clean lens can make a significant difference, especially when capturing the night sky where clarity is paramount.
9. Sharing Your Creations
Once you’ve captured stunning star trail images, it’s time to share your work. Social media platforms like Instagram and photography forums are great for showcasing your art and connecting with fellow enthusiasts. Don’t shy away from sharing your process and the challenges you faced; storytelling can make your posts more engaging.
Consider entering photography contests or submitting your work to online galleries. This can not only provide exposure but also open doors to new opportunities. Remember, every photo you take is a chance to express your creativity and inspire others to look up and appreciate the night sky.
Additionally, consider creating a dedicated portfolio website to showcase your star trail photography. This can serve as an online gallery for potential clients and a way to share your passion with a wider audience. Providing educational content related to your photography journey can also engage viewers and encourage interaction.
Don’t forget to watermark your images if you’re sharing them online, especially if you’re concerned about copyright. A subtle watermark can protect your work while still allowing viewers to appreciate the beauty of your photography.
10. Exploring Different Styles of Star Trails
Star trails can be adapted to various styles, allowing you to express your creativity in unique ways. One popular approach is creating concentric star trails by positioning your camera to point towards the celestial poles. This results in circular trails that can be visually striking.
Another style involves integrating time-lapse techniques, where you can create a video that showcases the gradual movement of stars across the sky. This dynamic form of star trail photography not only captivates viewers but also provides an immersive experience of the night sky.
For a more abstract effect, you can experiment with different shutter speeds and compositions, capturing the essence of star trails in less conventional ways. Blending different styles can also yield unexpected and fascinating results, pushing the boundaries of traditional star trail photography.
Consider incorporating local wildlife or stationary objects into your frames to tell a story. For example, you might capture the movement of stars while including a silhouette of a tree, creating a natural frame that adds context to your image.
11. Safety and Preparation Tips
When venturing out into remote areas for star trail photography, safety should be a priority. Always inform someone of your plans, and if possible, go with a partner. Familiarize yourself with the area, and make sure to carry a physical map, as GPS signals can be unreliable in remote locations.
Dress appropriately for the weather and terrain, and bring along essentials such as water, snacks, and a first aid kit. A portable power bank can also be helpful to keep your devices charged in case of emergencies.
Consider bringing along a blanket or reclining chair to stay comfortable while you wait for the perfect moment to capture your star trails. Being prepared and comfortable can make your shooting experience much more enjoyable. (See: Scientific articles on star trails.)
It’s also wise to carry a personal safety device, such as a whistle or pepper spray, especially if you’re shooting in isolated areas. Being aware of your surroundings can help keep you safe while you focus on capturing the beauty of the night sky.
12. Frequently Asked Questions (FAQ)
What is the best time of year to shoot star trails?
The best times to shoot star trails are typically during the summer and fall, when the skies are clearer, and nights are longer. However, this can vary based on your location and specific weather conditions. Check local forecasts and lunar calendars to plan effectively.
Do I need special software for stacking images?
While not strictly necessary, using software like StarStaX, Photoshop, or specialized astrophotography apps can significantly enhance your ability to stack images smoothly and efficiently. These tools are designed to handle the nuances of star trails specifically.
How long should I expose my shots for?
Exposure length can vary based on conditions and desired effects. For single exposures, aim for 30 seconds to avoid overexposure. For longer, more defined trails, consider stacking multiple shorter exposures instead.
Can I shoot star trails in urban areas?
While it’s challenging due to light pollution, it’s not impossible. Find locations with minimal streetlights or shoot during times when urban lighting is reduced. Use creative techniques to frame your shots, incorporating elements of the urban landscape with the stars.
Is it possible to include constellations in my star trail photos?
Yes! You can use apps like Star Walk or SkySafari to help you identify constellations and position your camera accordingly. Including prominent constellations in your composition can add another layer of interest to your star trail images.
What if I encounter clouds during my shoot?
Clouds can obstruct your view of the stars, so always check the weather ahead of time. If clouds are present, you may need to adjust your plans or find an alternative location with clearer skies. If you’re already out and clouds roll in, consider capturing the clouds themselves, as they can produce dynamic images in their own right.
What are some common issues that can affect star trail photography?
Common issues include light pollution, lens fogging due to humidity, and vibrations from wind or unstable tripods. You can manage these by choosing dark locations, using lens hoods or anti-fog solutions, and ensuring your tripod is stable and secured.
How can I make my star trails stand out?
Consider incorporating foreground elements such as trees, mountains, or water bodies to create depth. Additionally, experimenting with different compositions, like framing your trails with a unique landscape, can make your images more visually appealing.
Can I use filters while shooting star trails?
Generally, it’s best to avoid filters during long exposures, as they can cause flare and distort the light trails. However, if you’re shooting in areas with excessive light pollution, a light pollution filter may help enhance your images without compromising the star trails.
“`
Trending Now
Frequently Asked Questions
What are star trails in photography?
Star trails are the streaks of light created by the movement of stars during long-exposure photography. As the Earth rotates, the camera captures these movements, resulting in captivating images that showcase the night sky's beauty.
How do you shoot star trails?
To shoot star trails, use long-exposure settings on your camera. Choose a location with minimal light pollution, set a duration for your exposure, and aim towards the North Star for circular trails or the equator for linear tracks.
What is the best exposure time for star trails?
The best exposure time for star trails varies based on the desired effect. Shorter exposures (around 30 seconds) produce shorter trails, while longer exposures (up to an hour) create more pronounced, elongated streaks.
Where is the best place to photograph star trails?
The best places to photograph star trails are areas with minimal light pollution, such as national parks or remote locations. Badlands National Park and Joshua Tree National Park are excellent choices for capturing stunning night skies.
How does location affect star trails?
Location significantly affects star trails; in the Northern Hemisphere, shooting towards the North Star results in circular trails, while shooting towards the equator produces linear tracks. This geographic variance can enhance the creative aspect of your compositions.
Agree or disagree? Drop a comment and tell us what you think.