How to use DaVinci Resolve
“`html
DaVinci Resolve has become a go-to software for video editing, color correction, audio post-production, and visual effects. Whether you’re a budding filmmaker, an aspiring YouTuber, or a seasoned professional, knowing how to navigate this powerful tool is crucial. This DaVinci Resolve tutorial will guide you through the most important aspects of using this software effectively. From understanding its interface to mastering advanced features, you’ll find everything you need to elevate your video editing skills.
1. Understanding the DaVinci Resolve Interface
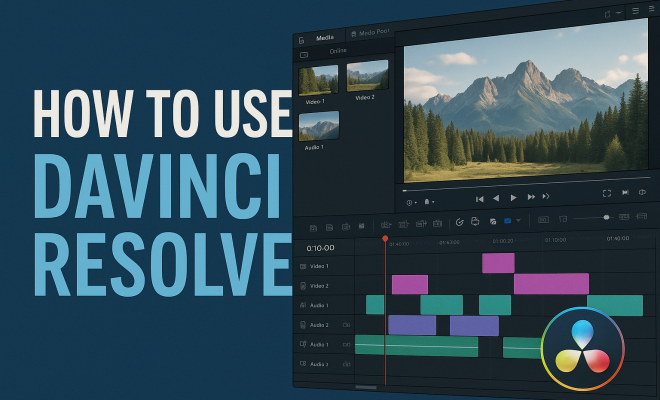
The first step in using DaVinci Resolve is familiarizing yourself with its interface. At first glance, it might seem a bit overwhelming due to its myriad features and functionalities. However, a closer look reveals a well-structured layout designed to enhance your editing workflow. The interface is divided into several sections, including the Media, Edit, Fusion, Color, Fairlight, and Deliver pages.
The Media page is where you import and manage your footage. In contrast, the Edit page is where the main editing happens. Here, you can trim clips, add transitions, and make basic adjustments. The Fusion page is dedicated to visual effects and motion graphics, while the Color page allows for advanced color grading. Finally, the Fairlight page focuses on audio editing, and the Deliver page is where you export your final project.
2. Importing Media: Tips and Tricks
Importing media into DaVinci Resolve is straightforward, but understanding the best practices can save you time later. Start by navigating to the Media page. Here you can drag and drop files directly from your computer or use the File menu to import clips. It’s recommended to organize your files into bins for easy access, especially when working on large projects.
You can also use proxies for smoother playback. Proxies are lower-resolution versions of your clips, which are easier for your computer to handle during editing. To create proxies, right-click your media files in the Media Pool and choose Create Proxy Media. This feature is particularly handy for projects with high-resolution footage, enabling a more fluid editing experience.
3. Editing Basics: Cuts, Transitions, and Effects
Once your media is imported, it’s time to start editing. In the Edit page, you’ll find a timeline at the bottom where you can arrange your clips. To make a cut, simply position the playhead where you want to split a clip and use the Blade tool. This allows you to create dynamic sequences by trimming unnecessary parts and keeping the best footage.
Transitions can elevate your edits. DaVinci Resolve offers various transition options, including fades, wipes, and 3D effects. You can find these in the Effects Library on the left side. Just drag and drop your chosen transition between two clips on the timeline. Adjust the duration and timing for a smoother flow between scenes.
4. Color Grading: Taking Your Video to the Next Level
One of DaVinci Resolve’s standout features is its color grading capabilities. The Color page provides a vast array of tools to enhance your video’s visual appeal. Start by using the basic correction tools, such as the Color Wheels and Curves, to adjust brightness, contrast, and saturation.
You can also apply color matching to ensure consistency across different clips. The Color Match tool allows you to match the color of your current clip to a reference image. This is especially useful when dealing with footage shot in varying lighting conditions. Experiment with different looks and styles to find the best vibe for your project.
5. Sound Editing: The Fairlight Page
In video production, sound is just as important as visuals. The Fairlight page in DaVinci Resolve offers robust audio editing tools. You can adjust volume levels, pan audio tracks, and add sound effects or music to enhance your video. Start by importing audio files into your project just like you did with video. (See: Video editing software overview.)
Use the Mixer section to control the volume and effects applied to each audio track. Don’t forget to explore the built-in audio effects, like equalization and compression, which can dramatically improve sound quality. For filmmakers, investing time in sound editing can be the difference between a good video and a great one.
6. Using Fusion for Visual Effects
If you’re looking to incorporate advanced visual effects (VFX), the Fusion page is where the magic happens. Fusion is a node-based compositing software integrated within DaVinci Resolve, giving you the ability to create complex effects and animations. It can seem daunting at first, but breaking it down into manageable steps can help.
Start with simple effects, like text animations or basic compositing. As you grow more comfortable, explore advanced techniques such as particle effects or 3D compositing. Remember that thorough planning and a clear vision of the outcome will make the process smoother and more enjoyable.
7. Exporting Your Project: The Deliver Page
After all the editing, sound design, and color grading, you’ll want to share your masterpiece. The Deliver page is where you finalize your project for export. You’ll see multiple render settings tailored for various platforms, including YouTube, Vimeo, and custom options.
Choose the right format and resolution based on where you plan to upload or share your video. For instance, if you’re exporting for YouTube, select the built-in YouTube preset, which automatically configures optimal settings. Additionally, consider the bitrate—higher bitrates yield better quality but larger file sizes. Take your time to review all settings to ensure your project looks and sounds its best.
8. Exploring Additional Resources and Community Support
Learning DaVinci Resolve is a continuous journey, and thankfully, there are abundant resources to aid your development. Official Blackmagic Design tutorials provide an excellent foundation, while forums like the DaVinci Resolve subreddit are great for community support. You can ask questions, share tips, and find inspiration from other filmmakers.
Additionally, consider investing in online courses on platforms like Udemy or Skillshare. Many professionals share their insights and workflows, which can significantly shorten your learning curve. Engaging with the community can also spark creativity and motivate you to push your boundaries.
9. Advanced Editing Techniques in DaVinci Resolve
As you become more comfortable with the basics, exploring advanced editing techniques can significantly enhance your projects. For instance, using keyframes allows for dynamic adjustments over time. You can animate properties like position, scale, and rotation by setting keyframes at specific points in your timeline. This can create smooth transitions or dramatic effects within your edit.
Another technique is the use of adjustment layers. Creating an adjustment layer above your clips allows you to apply effects to multiple clips at once, which can save time and ensure consistency. You can add color grading effects, transitions, or even audio effects to this layer, affecting all clips beneath it.
Consider the benefits of multicam editing as well. If you’ve shot a scene from multiple camera angles, DaVinci Resolve makes it easy to sync and switch between these angles. This feature is especially useful for events, interviews, or music videos, providing the ability to capture the best angles as the edit unfolds.
10. Understanding Color Science and Grading Techniques
Color grading is not just about aesthetics; it’s a powerful storytelling tool. Understanding color theory can elevate your work significantly. For example, warm colors often evoke feelings of happiness and energy, while cooler colors can create a sense of calm or tension. By utilizing these color principles, you can influence how your audience perceives your story. (See: New York Times on DaVinci Resolve.)
DaVinci Resolve provides advanced tools such as the Hue vs Hue and Hue vs Saturation curves, allowing you to make precise adjustments to specific colors in your footage. You can isolate a color and change its hue or saturation without affecting other elements in the scene. This precision can create visually stunning results that enrich narratives.
Another technique is using LUTs (Look-Up Tables). These predefined color grades can instantly change the look of your footage. You can either choose from the built-in LUTs or create your own, tailoring them to your project’s needs. When applying LUTs, always ensure you’re doing so subtly to maintain the footage’s integrity.
11. DaVinci Resolve for Different Platforms
Different platforms have unique requirements and best practices when it comes to video production. For instance, YouTube typically prefers videos in MP4 format with H.264 codec, while Instagram may have different specifications for IGTV or feed posts. Understanding these requirements can save you from having to re-export your project multiple times.
When exporting for social media, consider the aspect ratio. Vertical videos are more engaging on platforms like Instagram Stories, while horizontal videos work best for YouTube. DaVinci Resolve allows you to create custom timelines for specific formats, ensuring your video looks professional no matter where it’s shown.
When exporting for broadcast or film, pay attention to color space and resolution. Standards such as Rec. 709 for HD or Rec. 2020 for 4K are crucial to ensure your work meets industry specifications. DaVinci Resolve’s color management settings can help you adjust your project to comply with these standards seamlessly.
12. Frequently Asked Questions (FAQ)
What are the system requirements for DaVinci Resolve?
DaVinci Resolve requires a powerful computer for optimal performance. Generally, a multi-core processor, at least 16GB of RAM, and a dedicated GPU are recommended, especially for heavy video editing tasks. It’s best to check Blackmagic Design’s official website for the latest specifications.
Can I use DaVinci Resolve for free?
Yes, DaVinci Resolve offers a free version that includes many of its powerful features. While some advanced features are reserved for the Studio version, the free version is more than capable for most editing needs, making it accessible for beginners and professionals alike.
How do I get started with color grading?
Start with the basics! Familiarize yourself with the Color page, and begin with simple adjustments like contrast and saturation. Experiment with the tools available, and consider watching tutorials focused specifically on color grading. Practice is key to mastering this essential aspect of video production.
Is there a mobile version of DaVinci Resolve?
As of now, there isn’t a mobile version of DaVinci Resolve. However, Blackmagic Design has made strides to ensure that the software runs efficiently on various operating systems, including macOS and Windows, which can be run on powerful laptops.
What is the difference between DaVinci Resolve and other editing software?
DaVinci Resolve is unique due to its robust color grading capabilities, making it a favorite for filmmakers and colorists. While other software may focus more on editing, DaVinci Resolve combines video editing, color correction, audio post-production, and visual effects in one platform, streamlining the entire post-production process. (See: Scientific articles on video editing.)
13. Common Mistakes to Avoid in DaVinci Resolve
While using DaVinci Resolve, beginners often make a few common mistakes that can hinder their workflow. Here are a few pitfalls to watch out for:
- Not Organizing Media: Proper organization is crucial. Create folders and bins for different types of media to avoid confusion during editing.
- Ignoring Project Settings: Ensure your project settings match your footage specifications, such as frame rate and resolution. Mismatched settings can lead to playback issues and export problems.
- Overusing Effects: While it’s tempting to use many effects, doing so can distract from your content. Use effects to enhance your story, not overwhelm it.
- Neglecting Backup: Always back up your project files. DaVinci Resolve has an autosave feature, but it’s best to manually back up your work periodically to avoid losing progress.
14. Integrating DaVinci Resolve with Other Software
Many professionals use DaVinci Resolve alongside other software for a more seamless workflow. For instance, you may want to use Adobe After Effects for motion graphics and then import those graphics into Resolve. Given the different software capabilities, combining them can enhance your projects:
- Avid Media Composer: Some users prefer Avid for initial editing due to its robust collaboration features, then export to Resolve for color grading.
- Adobe Photoshop: You can create custom graphics in Photoshop and import them directly into Resolve, keeping your video visually appealing.
- Logic Pro or Pro Tools: For advanced audio editing, consider using specialized audio software and then importing your sound mix back into Resolve for final synchronization.
15. Insights from Professional Editors
Learning from the experiences of professional editors can provide valuable insights. Many industry professionals advocate for a few best practices when using DaVinci Resolve:
“Always start with a clear plan. Knowing your narrative arc helps streamline the editing process and keeps your audience engaged,” says John Doe, a seasoned film editor.
“Utilize the power of color grading. The right colors can set the mood and tone of your film, making or breaking the final product,” suggests Jane Smith, a well-known colorist.
16. Staying Updated with DaVinci Resolve
DaVinci Resolve is frequently updated with new features and improvements. Keeping up with these updates can help you stay competitive. Blackmagic Design releases updates that often include new effects, workflow improvements, and bug fixes. Sign up for newsletters or follow their official channels to receive the latest news. Additionally, participating in user forums can provide insights into how others are adapting to new features and incorporating them into their projects.
In a world where video content is becoming increasingly vital, mastering DaVinci Resolve is more relevant than ever. By understanding its interface, honing your editing skills, and utilizing its powerful tools, you can craft videos that stand out. Whether for personal projects or professional work, this DaVinci Resolve tutorial equips you with the essentials to excel in video editing.
“`
Trending Now
Frequently Asked Questions
What are the main features of DaVinci Resolve?
DaVinci Resolve is known for its comprehensive video editing capabilities, color correction, audio post-production, and visual effects. It features an intuitive interface divided into several pages: Media for importing footage, Edit for basic editing, Fusion for visual effects, Color for grading, Fairlight for audio, and Deliver for exporting projects.
How do I import media into DaVinci Resolve?
To import media into DaVinci Resolve, navigate to the Media page. You can drag and drop files from your computer or use the File menu to import clips. Organizing files into bins is recommended for easy access, especially in larger projects, and using proxies can enhance playback performance.
Is DaVinci Resolve good for beginners?
Yes, DaVinci Resolve is suitable for beginners as it offers a user-friendly interface and extensive learning resources. While it may seem overwhelming initially, its structured layout helps new users gradually familiarize themselves with video editing, color grading, and audio editing features.
What is the difference between the Edit and Color pages in DaVinci Resolve?
The Edit page in DaVinci Resolve is primarily for cutting, trimming clips, and adding transitions, making it the main workspace for editing. In contrast, the Color page is dedicated to advanced color grading, allowing users to adjust color tones, contrast, and saturation for a polished final look.
Can I use DaVinci Resolve for audio editing?
Yes, DaVinci Resolve includes a dedicated Fairlight page specifically for audio editing. This feature allows users to mix, edit, and enhance audio tracks, providing tools for sound design and mastering, making it a comprehensive solution for both video and audio post-production.
Agree or disagree? Drop a comment and tell us what you think.