DIY Guide: How to Replace Your Car’s Brake Rotors
“`html
When it comes to maintaining your vehicle, few tasks are as crucial as ensuring your brake system is in optimal condition. One important aspect of this is brake rotor replacement. Whether you’re a seasoned mechanic or a DIY enthusiast, understanding how to replace brake rotors can save you both time and money. In this guide, we’ll explore everything you need to know about brake rotor replacement, from the basics to practical tips for success.
1. Understanding Brake Rotors
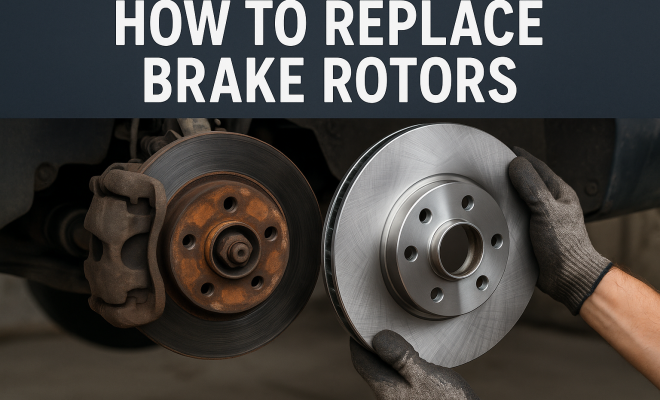
Brake rotors, also known as brake discs, are essential components of your vehicle’s braking system. They serve as a surface against which the brake pads press to slow down or stop the vehicle. Typically made from cast iron or carbon composite, brake rotors are designed to withstand high levels of heat and friction generated during braking. If the rotors become warped, worn, or damaged, they can significantly affect braking performance, leading to longer stopping distances and increased safety risks.
Brake rotors come in various types, including vented, slotted, and drilled rotors. Vented rotors have internal cooling vanes that aid in dissipating heat, while slotted rotors have grooves cut into their surfaces to help remove dust and gas. Drilled rotors feature holes that improve cooling and reduce weight. Knowing the differences between these options can help you make an informed choice when it’s time for a replacement.
The importance of brake rotors cannot be overstated; they play a crucial role in your vehicle’s overall braking efficiency. Regular wear and tear can lead to issues such as rotor thickness variation, which affects how evenly the pads contact the rotor surface. This can create uneven wear on the brake pads and ultimately lead to a compromised braking system.
2. Signs You Need to Replace Your Brake Rotors
Recognizing the signs that indicate you need a brake rotor replacement is critical for maintaining your vehicle’s safety. Common symptoms include:
- Vibrations: If you feel vibrations through the steering wheel or brake pedal when braking, it could be a sign of warped rotors.
- Squeaking or Grinding Sounds: Unusual noises when braking can indicate worn brake pads or damaged rotors.
- Increased Stopping Distance: If your car takes longer to stop, it may be due to worn rotors.
- Visual Inspection: Look for grooves, cracks, or discoloration on the rotor surface.
If you experience any of these issues, it’s time to inspect your brake rotors and consider replacement.
Additionally, understanding the mileage intervals can help you maintain your braking system proactively. Manufacturers typically recommend inspecting or replacing brake rotors approximately every 30,000 to 70,000 miles, but this can vary based on driving habits and conditions. For instance, those who frequently drive in stop-and-go traffic or travel in mountainous areas may find their rotors wear out more quickly.
3. Gathering the Right Tools and Materials
Before starting your brake rotor replacement, it’s essential to have the right tools and materials on hand. Here’s a list of what you’ll need:
- Tools: A jack and jack stands, lug wrench, socket set, brake cleaner, torque wrench, and wire brush.
- Replacement Parts: New brake rotors, brake pads (recommended to replace them together), and anti-seize lubricant.
- Safety Gear: Safety glasses and gloves are crucial to protect yourself during the process.
Having everything ready before you begin will streamline the process and minimize downtime. If you’re unsure about the parts or tools you need, consider consulting your vehicle’s manual or a professional mechanic for guidance. This preemptive measure can save you from headaches during the replacement process.
4. Preparing Your Vehicle for Brake Rotor Replacement
Safety is paramount when working on your vehicle. Start by parking on a flat surface and applying the parking brake. Then, use a lug wrench to loosen the lug nuts on the wheel you’ll be working on, but don’t remove them just yet. Next, lift the vehicle using a jack and secure it with jack stands to ensure stability. After that, fully remove the loosened lug nuts and take off the wheel to expose the brake components.
Inspect the brake components while you’re in there. Check for any signs of wear or damage on the brake pads, calipers, and other parts. This is also a good time to clean any dust or debris that has accumulated. Keeping a clean workspace will help you maintain focus on the task at hand and ensure that no dirt interferes with the new components. (See: Understanding brake rotors.)
Also, familiarize yourself with the layout of the brake system specific to your vehicle model. Some vehicles may have unique configurations that require special attention during the replacement process. You can often find helpful diagrams or instructional videos online for your make and model.
5. Removing the Old Brake Rotors
With the wheel removed, you can now access the brake caliper. To remove it, start by locating the caliper bolts. Depending on your vehicle, you might need to use a socket wrench to get them off. Once the bolts are removed, carefully lift the caliper away from the rotor. Be cautious not to stretch the brake line or damage any components during this process.
Next, you will need to remove the rotor. It may be held in place by screws or clips, so check for those and remove them if necessary. Gently wiggle the rotor to break it free from any rust or corrosion that may have built up. Once loose, simply lift the rotor off the hub and set it aside. Make sure to keep all the removed screws and clips in a safe place for reinstallation later.
It’s also a good idea to inspect the brake pads at this stage. If they show significant wear or are near the end of their lifespan, replacement is advisable. Brake pads and rotors work in tandem, and installing new pads on old rotors can lead to uneven wear and decreased performance.
6. Installing the New Brake Rotors
Now that you’ve removed the old rotors, it’s time to install the new ones. Start by cleaning the new rotors with brake cleaner to remove any protective oil or residue that can affect braking performance. Slide the new rotor onto the hub, ensuring it sits flush. If your rotor has retaining screws, replace them to secure the rotor in place.
Reattach the caliper next. Before doing this, it’s advisable to compress the caliper piston using a C-clamp or a brake caliper tool, especially if you’re installing new pads. This will create enough space for the thicker new pads. Once the caliper is back in place, reinsert the caliper bolts and tighten them to the manufacturer’s specifications using a torque wrench.
Be mindful to follow the specific torque settings provided in your vehicle’s service manual. Over-tightening can lead to damage, while under-tightening may result in the caliper coming loose while driving.
7. Final Steps and Testing Your Brake System
After you’ve installed the new rotors and reattached the caliper, the next step is to put the wheel back on. Align it with the lug bolts and hand-tighten the lug nuts before lowering the vehicle back to the ground. Once the vehicle is safely on the ground, use the torque wrench to tighten the lug nuts to the specified torque settings, ensuring they’re secure.
Before hitting the road, it’s crucial to test the brake system. Pump the brake pedal a few times to seat the pads against the rotors. Check for any unusual noises or issues before driving. A short test drive in a safe area will help ensure that everything is functioning as it should. If you notice any problems, double-check your installation.
It’s also wise to give yourself some time to acclimatize to the new braking feel. The initial braking response may vary slightly due to the pads settling in with the rotors. Be sure to avoid hard braking until you’re fully comfortable with the new components.
8. Maintenance Tips for Your Brakes
Once you’ve successfully completed your brake rotor replacement, it’s essential to maintain your brake system to prolong its life. Regularly inspect your brakes for wear, including brake pads, rotors, and brake lines. Keep an eye out for any signs of leakage or damage. It’s also advisable to keep your brake fluid at the proper level and change it according to your manufacturer’s recommendations.
Additionally, avoid aggressive driving behaviors that can lead to premature wear on your braking system. Gradual braking and allowing your brakes to cool down after heavy use can significantly extend the life of your rotors and pads.
Consider keeping a log of your brake maintenance activities, noting when you last inspected or replaced pads and rotors. This can help you stay aware of the condition of your braking system and plan future maintenance more effectively. (See: National Highway Traffic Safety Administration.)
9. When to Seek Professional Help
While many car enthusiasts can handle brake rotor replacement on their own, there are times when it’s best to consult a professional. If you feel unsure about any steps in the process, or if you encounter any unexpected issues, don’t hesitate to seek professional assistance. Mechanics have the experience and tools to diagnose problems effectively and ensure that your vehicle is safe.
Common scenarios where professional help is advisable include: issues with the brake lines, problems with the anti-lock braking system (ABS), or if you notice fluid leaks. Mechanics can also provide insight into whether other components of your braking system might need attention, like the master cylinder or brake booster.
10. Cost of Brake Rotor Replacement
The cost of brake rotor replacement can vary significantly based on several factors, including the make and model of your vehicle, the type of rotors you choose, and whether you perform the replacement yourself or hire a professional mechanic. On average, you might expect to pay between $200 to $400 per axle when having rotors replaced at a shop, which typically includes both rotors and brake pads.
If you opt for higher-end rotors, such as performance or specialty rotors, the cost could be higher. It’s also worth noting that labor costs can vary by region, with urban areas generally having higher rates. If you’re doing the replacement yourself, you can save on labor, but be sure to factor in any tools or parts you may need to purchase.
Additionally, investing in quality rotors can pay off in the long run. Cheaper rotors may save you money upfront, but they often wear out more quickly and can lead to additional costs down the line. High-quality rotors can provide better performance and longevity, making them a more economical choice in the long run.
11. Frequently Asked Questions About Brake Rotor Replacement
What is the typical lifespan of brake rotors?
Brake rotors generally last between 30,000 to 70,000 miles, depending on driving conditions and habits. Factors like heavy braking, driving in hilly areas, and the type of rotor can all influence lifespan.
Can I replace just the rotors without changing the brake pads?
While it’s technically possible to replace only the rotors, it’s not recommended. Brake pads and rotors wear together, and replacing only one can lead to uneven wear and potentially unsafe braking performance. It’s best practice to replace both at the same time.
How do I know if my rotors are warped?
If you experience vibrations in the steering wheel or brake pedal during braking, or if you hear unusual noises, it may indicate warped rotors. A visual inspection can also help; look for uneven wear patterns or surface irregularities.
Can I use any type of rotors for my vehicle?
It’s crucial to use rotors that are specifically designed for your vehicle make and model. Different vehicles have different specifications, and using incorrect rotors can lead to safety issues and poor braking performance.
What should I do if my brake warning light comes on?
If your brake warning light illuminates, it’s important to address the issue immediately. It could indicate low brake fluid, worn brake pads, or other problems within the brake system. It’s advisable to have a professional inspect your brakes as soon as possible to ensure your safety.
12. Understanding the Importance of Brake Rotor Quality
When it comes to brake rotor replacement, quality matters significantly. The materials used in manufacturing rotors impact their performance, longevity, and safety. For instance, premium rotors often feature improved heat dissipation, which reduces the risk of brake fade during prolonged use. High-quality rotors are forged from stronger materials that can withstand the rigors of everyday driving. (See: CDC on motor vehicle safety.)
Additionally, the surface finish of the rotors can play a role in overall braking performance. Some rotors come with a coated finish that resists rust and corrosion, further enhancing their lifespan. Investing in better-quality rotors can lead to improved braking performance and safety, making it a worthy consideration during replacement.
13. Comparing Different Types of Brake Rotors
Choosing the right type of brake rotor can make a difference in your vehicle’s performance. Here’s a breakdown of the three main types:
- Vented Rotors: These are commonly used in most passenger vehicles. Their design allows for better airflow, helping to dissipate heat more effectively than solid rotors.
- Slotted Rotors: With grooves that help clear dust and gases generated during braking, slotted rotors provide better stopping power under hard braking conditions. They are often favored by performance drivers.
- Drilled Rotors: Featuring holes through the rotor, these allow for maximum cooling and weight reduction. They can be ideal for high-performance applications but may be more susceptible to cracking under extreme conditions.
Understanding these differences can help you make a more informed choice based on your driving style and requirements.
14. Environmental Considerations in Brake Rotor Manufacturing
As the automotive industry becomes more conscious of environmental issues, the production of brake rotors is also evolving. Manufacturers are exploring ways to produce rotors with less environmental impact, such as utilizing recycled materials or reducing energy consumption during production. Some brands even offer eco-friendly brake rotors that generate less dust, which can improve air quality and reduce wear on brake pads.
Choosing environmentally friendly options not only supports sustainability but can also contribute to longer-lasting products, as many eco-conscious manufacturers prioritize durability alongside environmental performance.
15. Tips for a Successful Brake Rotor Replacement
To ensure a smooth brake rotor replacement process, here are some additional tips:
- Follow the Manual: Always refer to your vehicle’s service manual for specific instructions and torque specifications.
- Check the Brake Fluid: Inspect your brake fluid and replace it if it appears dirty or contaminated, as this can affect overall performance.
- Break-in New Parts: After replacing the rotors, follow proper break-in procedures to maximize their lifespan and performance.
- Ask for Help if Needed: Don’t hesitate to seek guidance from a knowledgeable friend or a professional if you encounter difficulties.
By taking the time to prepare and follow best practices, you can ensure that your brake rotor replacement is successful and that your vehicle remains safe on the road.
In summary, understanding how to perform a brake rotor replacement is a valuable skill for any vehicle owner. Not only does it enhance your car’s safety and performance, but it also empowers you to take control of your vehicle’s maintenance. By following these steps and keeping an eye on your brakes, you can ensure a smoother, safer driving experience.
“`
Trending Now
Frequently Asked Questions
How do I know if my brake rotors need to be replaced?
You can recognize the need for brake rotor replacement by noticing symptoms such as vibrations when braking, squeaking or grinding noises, or a decrease in braking performance. Additionally, if you see visible wear or warping on the rotors, it's time for a replacement to ensure safe driving.
What are the different types of brake rotors?
Brake rotors come in various types, including vented, slotted, and drilled rotors. Vented rotors have internal cooling vanes, slotted rotors have grooves for dust removal, and drilled rotors feature holes for improved cooling and reduced weight. Each type has specific advantages depending on your driving needs.
Can I replace brake rotors myself?
Yes, replacing brake rotors can be a DIY task if you have the right tools and mechanical knowledge. However, it's important to follow proper procedures and safety precautions to ensure the job is done correctly. If you're unsure, consider consulting a professional mechanic.
What tools do I need to replace brake rotors?
To replace brake rotors, you'll typically need a jack and jack stands, lug wrench, socket set, brake cleaner, and possibly a torque wrench. Having these tools ready will help ensure a smooth and efficient rotor replacement process.
How often should brake rotors be replaced?
Brake rotors should generally be inspected regularly, with replacement needed every 30,000 to 70,000 miles, depending on driving habits and vehicle type. Factors like heavy braking, driving in hilly areas, and the quality of rotors can influence how often they need replacing.
What’s your take on this? Share your thoughts in the comments below — we read every one.