How to enable screen recording iPhone
“`html
Screen recording has become an essential feature for many iPhone users, whether you’re a gamer wanting to capture your gameplay, a teacher developing tutorials, or someone simply looking to share content with friends. If you’ve ever wondered how to enable screen recording on your iPhone, you’re in the right place. This comprehensive guide will walk you through the steps, along with tips, tricks, and the best practices to maximize this feature.
1. Understanding Screen Recording on iPhone
Screen recording allows you to capture everything that happens on your iPhone’s display, including sound. This functionality can be especially useful for creating tutorials, capturing gameplay for sharing, or preserving video calls. Introduced in iOS 11, Apple made screen recording accessible directly from the Control Center, enhancing the user experience significantly.
The feature records not only the visual elements but also internal audio, making it perfect for capturing app interactions or game audio. However, it does not record external sounds unless you enable the microphone, which can be useful for voiceovers during tutorials.
2. How to Enable Screen Recording on iPhone
To enable screen recording on your iPhone, you first need to access the Control Center. Here’s a step-by-step guide:
- Open the Settings app on your iPhone.
- Scroll down and tap on Control Center.
- Look for Customize Controls. Tap on it.
- In the list of controls, find Screen Recording and tap the + icon next to it.
Once you’ve completed these steps, the Screen Recording button will appear in your Control Center, enabling you to start recording your screen with just a tap.
3. Using the Screen Recording Feature
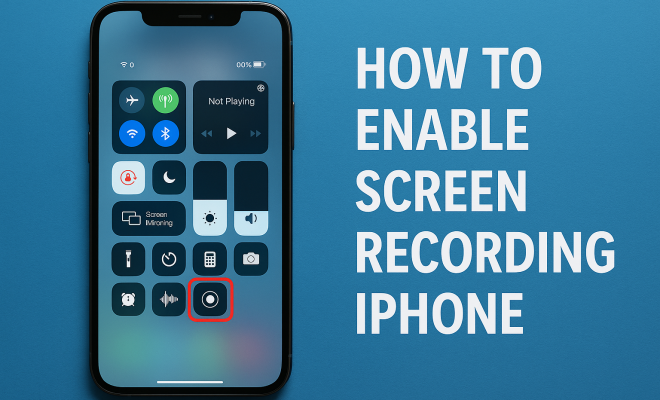
Now that you’ve enabled the feature, using it is straightforward. To begin recording, simply swipe down from the top right corner of your screen (or swipe up on older iPhone models) to open the Control Center. You’ll see the new Screen Recording icon, represented by a dot inside a circle.
Tap the icon, and you’ll see a three-second countdown before the recording begins. During this time, you can navigate to the app or content you want to record. To stop recording, tap the red status bar at the top of your screen and select Stop. Your recording will automatically save to your Photos app for easy access.
4. Customizing Your Screen Recording Settings
Apple allows you to customize the screen recording feature according to your needs. One of the most notable options is the ability to record sound. If you want to include audio from your microphone—like when you’re creating tutorials—press and hold the Screen Recording icon in the Control Center. A menu will pop up, allowing you to toggle the microphone on or off.
Additionally, you can adjust the video resolution and frame rate for the best quality recording. Higher resolutions take up more storage, so keep that in mind if you have limited space. Balancing quality with storage availability is crucial for a hassle-free experience.
5. Best Practices for Screen Recording
To make the most of your screen recording, consider these best practices:
- Plan Your Content: Before hitting that record button, outline what you want to capture. This will make your video more coherent and engaging.
- Minimize Notifications: Turn on Do Not Disturb mode to avoid interruptions during your recording. Notifications can be distracting for viewers and may detract from the quality of your content.
- Use a Stable Connection: If you’re recording a live stream or using apps that require internet connectivity, ensure you have a stable Wi-Fi connection to prevent lag.
These tips will help elevate your recording quality and ensure a smooth experience. (See: CDC's guide on screen recording.)
6. Editing Your Screen Recording
After you’ve recorded your screen, you may want to edit the footage before sharing it. The built-in Photos app on your iPhone provides basic editing tools that can enhance your video. You can trim the beginning and end of the video to remove any unnecessary parts, such as the countdown at the start or your navigation as you stop the recording.
For more advanced editing, consider using third-party apps like iMovie or Adobe Premiere Rush, which offer more functionality like adding text overlays, transitions, and effects. Editing your videos can create a more polished final product and improve viewer engagement.
7. Sharing Your Screen Recording
Once your screen recording is ready, sharing it is quite simple. You can directly share the video from the Photos app by selecting the video and tapping the Share icon. This allows you to send the video via AirDrop, Messages, Mail, or upload it to social media platforms like Instagram, Facebook, or TikTok.
If you’re sharing a tutorial or demonstration, consider creating a dedicated YouTube channel or Instagram account to reach a wider audience. Video tutorials are highly sought after, and establishing a presence on these platforms can attract viewers who share your interests.
8. Troubleshooting Common Issues
While enabling screen recording on your iPhone is generally straightforward, you may encounter some issues. Here are common problems and how to resolve them:
- Screen Recording Button Missing: If you don’t see the Screen Recording button in the Control Center, double-check your settings. Go to Settings > Control Center > Customize Controls and ensure it’s included in your active controls.
- Recording Not Working: If your screen recording isn’t functioning, try restarting your iPhone. This can solve many glitches. Additionally, ensure you have enough storage on your device, as low storage can affect functionality.
- Audio Issues: If your video lacks sound, ensure that the microphone is enabled in the Control Center before you start recording.
Addressing these issues promptly can help you maintain a seamless recording experience.
9. The Future of Screen Recording on iPhone
As technology advances, features like screen recording are likely to evolve. Apple consistently updates its software, and we can expect improvements in screen recording capabilities in future iOS updates. Possible enhancements could include better editing tools, the ability to record in higher resolutions, or even real-time streaming features.
Staying informed about updates will ensure you take full advantage of new functionalities as they become available. Whether for personal use or professional content creation, screen recording on iPhone is a feature that continues to grow in relevance and importance.
Now that you know how to enable screen recording on your iPhone, maximize its potential by experimenting with different recording techniques, editing options, and sharing methods. With practice, you’ll be capturing high-quality videos in no time.
10. Understanding the Legal and Ethical Aspects of Screen Recording
When using screen recording, it’s important to consider the legal and ethical implications. Recording content without explicit permission can lead to legal issues, especially when it comes to copyright-protected material or personal conversations. Always ask for consent if you’re recording someone else’s content or private conversations.
For example, if you’re utilizing screen recording to create a tutorial that includes a third-party app, review the app’s terms of service to ensure that your recordings comply with their policies. Many companies welcome user-generated content but may have specific guidelines on how their products can be represented. Respecting these boundaries not only protects you legally but also fosters goodwill with content creators and developers.
11. Advanced Tips for Screen Recording
For those who are looking to take their screen recording skills to the next level, here are some advanced tips:
- Use Screen Recording for Live Events: If you’re attending a virtual conference or webinar, consider using screen recording to capture important sessions. This can be especially helpful for reviewing information later and sharing insights with colleagues.
- Combine Screen Recording with Facecam: If you’re creating gaming content or tutorials, overlaying your facecam footage can create a more engaging experience. Use an app that allows you to record both your screen and your face simultaneously for a professional touch.
- Explore Annotation Tools: Some third-party apps provide annotation tools that allow you to draw or highlight specific areas while recording. This can help direct viewer attention to key points during your tutorial.
- Use Multiple Displays: If you have access to multiple devices, consider recording your iPhone screen while simultaneously showing the content on your iPad or Mac. This perspective can be beneficial for tutorials that require multi-device explanations, making it easier for your audience to follow along.
Incorporating these advanced techniques can elevate your content and keep your audience engaged. (See: New York Times article on screen recording.)
12. Popular Apps to Enhance Screen Recording
While the built-in screen recording feature on iPhone is robust, several third-party apps can enhance your recording and editing experience. Here are a few popular options:
- TechSmith Capture: This app allows you to record your screen while also providing basic editing features. It’s especially useful for creating tutorials and can integrate with other TechSmith products for advanced editing.
- Reflector 4: If you want to record your iPhone screen on a larger display, Reflector can help you mirror your iPhone to a computer and record from there. This is great for presentations or tutorials that require a larger viewing area.
- QuickTime Player (for macOS): If you have a Mac, you can connect your iPhone and use QuickTime Player to record your screen. This method allows for higher quality recordings and more extensive editing options.
- Camtasia: For those looking for a comprehensive video editing and screen recording solution, Camtasia allows you to easily create polished videos with various editing capabilities. It’s particularly favored by educators and marketers for its user-friendly interface.
Using these apps in conjunction with your iPhone’s built-in features can help you create higher quality and more engaging content.
13. Common Use Cases for Screen Recording
Screen recording is versatile, and there are countless use cases across different fields. Here are some common scenarios where screen recording proves invaluable:
- Education: Teachers are increasingly using screen recording to create instructional videos for their students. This provides a way to deliver lessons that students can review at their own pace and revisit as needed.
- Gaming: Gamers often record their gameplay to share highlights or tutorials. Platforms like Twitch and YouTube thrive on gaming content, and screen recording is a critical part of content creation for this genre.
- Business: Professionals use screen recording for creating training materials, recording meetings, or providing feedback on projects. This visual aid can enhance communication and clarity in a remote work environment.
- Technical Support: Customer support teams can use screen recording to capture user issues or demonstrate how to troubleshoot problems. This visual evidence can be much more effective than written instructions.
- Marketing: Marketers can utilize screen recording to create product demos and walkthroughs. This content can be shared on social media, embedded in emails, or used in online advertising campaigns, helping to engage potential customers more effectively.
Understanding how screen recording can be utilized in various contexts can help you recognize its potential beyond simple video captures.
14. Frequently Asked Questions (FAQ)
Q1: Can I record phone calls using screen recording on my iPhone?
A1: No, due to privacy concerns and legal regulations, iOS does not allow users to record phone calls using the screen recording feature.
Q2: Does screen recording consume a lot of battery?
A2: Screen recording does use additional battery power, especially if you’re recording in high resolution or with the microphone on. It’s advisable to charge your device before long recording sessions.
Q3: Can I record video calls on apps like Zoom or Skype?
A3: Yes, you can record video calls using the screen recording feature, but make sure to inform the other participants that you’re recording, as it’s both ethical and often required by law.
Q4: Is there a time limit for screen recording on iPhone?
A4: There is no specific time limit for screen recording on iPhone, but the recording will stop automatically if you run out of storage space.
Q5: Can I record content from apps that restrict recording?
A5: Many apps, particularly streaming services like Netflix and Hulu, have measures in place to prevent screen recording due to copyright restrictions. Always respect these restrictions and check the app’s terms of service.
Q6: How do I change the format of my screen recordings?
A6: iPhone screen recordings are saved in the standard MP4 format, which is widely compatible with most video editing software. If you need a different format, you can use editing apps to convert the video after recording.
Q7: Can I record my screen while using a specific app, like a game or video player?
A7: Yes, you can record your screen while using any app, including games and video players, as long as the app itself does not have restrictions against screen recording. Just be cautious of any copyright or licensing issues.
Q8: What should I do if my screen recording feature isn’t working properly?
A8: If your screen recording feature isn’t functioning as expected, try resetting your settings by going to Settings > General > Transfer or Reset iPhone > Reset All Settings. This won’t delete your data but will reset system settings which might help fix the issue.
By understanding these common inquiries and their answers, you can further enhance your screen recording experience on your iPhone.
15. Exploring Advanced Screen Recording Techniques
If you’re looking to enhance your screen recording capabilities even further, consider these advanced techniques:
- Utilize External Microphones: For better audio quality during recordings, consider using an external microphone. This can drastically improve the clarity of your voice in tutorials or commentary tracks.
- Plan with Storyboards: If your video is going to be complex, planning with a storyboard might help you visualize your shots better. This is especially useful for tutorials that may involve multiple steps or content transitions.
- Incorporate Music and Sound Effects: Adding background music or sound effects during the editing phase can make your screen recordings more engaging. Just be sure to use royalty-free music or obtain the proper licenses to avoid copyright issues.
16. Screen Recording for Remote Learning
With the rise of remote learning, screen recording has become a vital tool for educators. Here’s how it can enhance the learning experience:
- Asynchronous Learning: By recording lessons, educators allow students to access content at their convenience, catering to different learning paces.
- Demonstrating Software: Technology teachers and computer science educators can easily demonstrate software and coding practices, making learning more interactive.
- Feedback Mechanism: Teachers can record personalized feedback for students on assignments, allowing for a more tailored educational experience.
This adaptability makes screen recording an invaluable tool in the current educational climate.
17. Conclusion: Mastering Your Screen Recording Skills
Whether you’re a content creator, a student, or a professional, mastering screen recording on your iPhone can significantly impact how you communicate and share information. With practice and the application of the tips and tricks outlined in this guide, you can produce high-quality recordings that engage and inform your audience.
So go ahead, enable screen recording on your iPhone, and start capturing your screen in creative, insightful ways!
“`
Trending Now
Frequently Asked Questions
How do I enable screen recording on my iPhone?
To enable screen recording on your iPhone, go to the Settings app, tap on Control Center, and then select Customize Controls. Find Screen Recording in the list and tap the + icon. This will add the Screen Recording button to your Control Center for easy access.
Where is the screen recording button on iPhone?
Once you enable screen recording, the button will appear in the Control Center. On iPhones with Face ID, swipe down from the top right corner of the screen; on older models, swipe up from the bottom. The Screen Recording icon looks like a solid circle within a circle.
Does iPhone screen recording capture sound?
Yes, iPhone screen recording captures internal audio by default. If you want to record external sounds, such as your voice, you can enable the microphone by long-pressing the Screen Recording icon in the Control Center and tapping the microphone option.
Can I record my screen with audio on iPhone?
Yes, you can record your screen with audio on iPhone. To do this, open the Control Center, long-press the Screen Recording icon, and tap the microphone icon to enable audio recording. This feature is useful for voiceovers in tutorials.
What can I do with screen recording on my iPhone?
Screen recording on your iPhone allows you to capture everything displayed on your screen, including gameplay, tutorials, and video calls. It’s particularly useful for sharing content, creating instructional videos, or preserving important moments during app usage.
Have you experienced this yourself? We’d love to hear your story in the comments.