How to Connect and Sync an Xbox One Controller

The Xbox One is a popular gaming console that allows players to enjoy different types of games. The console comes with a controller designed for an exceptional gaming experience. The Xbox One console provides a wireless controller that can be used to play games. If you are wondering how to connect and sync an Xbox One controller, this article will guide you.
Before you begin the process, ensure that the Xbox One console is turned on and that the controller is charged or has batteries. You will also need to know that there are two types of Xbox One controllers; the Xbox One S controller and the Xbox Elite controller.
Connecting an Xbox One S Controller:
To connect an Xbox One S controller, follow these simple steps:
1. First, search for the circular button located at the back of the controller. This button is the ‘connect’ button.
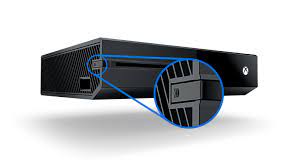
2. Secondly, search for the sync button on your Xbox One. You can identify it with an image of waves.
3. Turn on your Xbox One console and hit the sync button on the Xbox One console.
4. Now, press the ‘connect’ button on the controller.
5. Your Xbox One S controller should now be successfully connected to your Xbox One console.
Connecting the Xbox Elite Controller:
To connect an Xbox Elite controller, follow these steps:
1. Connect the short USB cable to the back of the controller.
2. Connect the other end of the USB cable into one of the USB ports on your Xbox One console.
3. Turn on your Xbox One console.
4. The controller should now be paired to the console. If there are any issues, try pressing the sync button found on the Xbox One console and press the sync button located at the back of the Xbox Elite controller.
If your Xbox One controller is still not connecting or syncing, ensure that your Bluetooth is enabled if you are using the Xbox One S controller. For the Xbox Elite controller, make sure that your controller’s firmware is up to date using the Xbox Accessories app.


