How to add sources in OBS Studio
“`html
OBS Studio, or Open Broadcaster Software, has emerged as one of the most popular tools for streaming and recording desktop activities. Whether you’re a seasoned streamer or a budding content creator, knowing how to add sources in OBS Studio is crucial for creating an engaging viewer experience. This guide will walk you through the steps, tips, and tricks on how to maximize your use of OBS Studio’s powerful capabilities.
1. Understanding OBS Studio
Before jumping into the nitty-gritty of adding sources, it’s essential to understand what OBS Studio is. Launched in 2012, OBS Studio is an open-source software that enables users to stream and record video content from their PCs. It provides a wide range of features, including video mixing, scene switching, and live streaming capabilities, which are vital for gamers, educators, and professionals alike. One of its standout features is the ability to manage multiple sources within a single scene, allowing for dynamic content creation.
By using sources, you can incorporate various media types such as images, videos, text, and even browser windows into your live stream or recording. This flexibility is what makes OBS Studio an essential tool for anyone looking to make their streams more visually appealing and interactive.
2. The Basics of Sources in OBS Studio
In OBS, sources are the building blocks of your scenes. When you create a new scene, you can add multiple sources to it, each serving a different purpose. Sources can include:
- Video Capture Device: Use this to capture video from your webcam or any external camera.
- Audio Input Capture: This source allows you to include audio from microphones.
- Image: You can add still images to your scene, perfect for logos or overlays.
- Window Capture: This lets you display a specific application or window in your stream.
- Display Capture: Capture your entire desktop screen, useful for tutorials.
- Media Source: Play video files directly in your stream.
- Text (GDI+): Add dynamic text overlays, perfect for alerts or information.
Understanding these basic sources will help you set the foundation for your stream or recording. Each source can be modified, repositioned, and layered to create a unique visual experience.
3. How to Add Sources in OBS Studio
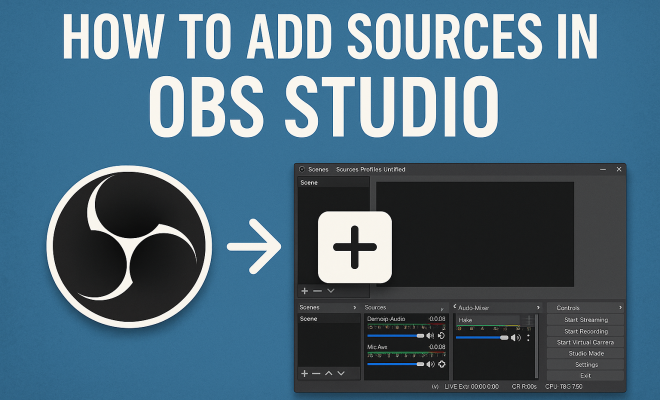
Now, let’s get into the practical steps on how to add sources in OBS Studio. This process is straightforward:
- Open OBS Studio: Launch the application and either create a new scene or select an existing one.
- Access the Sources Box: In the bottom section of the OBS interface, you’ll find the ‘Sources’ box. Click the ‘+’ button to add a new source.
- Select Your Source Type: From the list, select what type of source you want to add. For example, if you want to add a webcam, select ‘Video Capture Device’.
- Name Your Source: You will be prompted to name your source for easy identification later.
- Configure the Source: Depending on the source type chosen, you may have various options to configure. For a webcam, choose the device from the dropdown menu and adjust settings like resolution.
- Positioning: After you add the source, you can drag it within the preview window to position it where you want.
- Finalize: Click ‘OK’ to finalize the addition of your source.
Following these steps will allow you to incorporate a variety of sources into your stream, enhancing the overall experience for your audience.
4. Customizing Your Sources
Once you’ve added sources in OBS Studio, the next step is customization. Each source can be altered in multiple ways to fit your desired aesthetic and functional requirements:
- Transform Options: Right-click on a source and choose ‘Transform’ to access options like ‘Fit to Screen’, ‘Center to Screen’, or ‘Edit Transform’ for more precise control.
- Filters: Adding filters can enhance your sources significantly. Right-click on the desired source and select ‘Filters’ to add effects like color correction, crop, or chroma key for green screens.
- Layering Sources: You can adjust the order of sources by dragging them up or down in the ‘Sources’ box. The order affects which source appears in front of others.
Customizing your sources effectively can elevate the quality of your stream and make it more engaging for viewers. (See: Open Broadcaster Software overview.)
5. Common Troubleshooting Tips
As with any software, you may encounter issues when adding sources in OBS Studio. Here are some common problems and their solutions:
- Source Not Visible: If you add a source but can’t see it in the preview, double-check its position in the layering order. Ensure it’s not hidden behind another source.
- Audio Issues: If your audio input isn’t working, ensure you’ve selected the correct device in ‘Audio Input Capture’ and check the audio levels in the mixer.
- Performance Lag: If your stream is lagging, consider lowering the resolution or frame rate settings in the ‘Settings’ menu. This can help improve performance.
Knowing how to troubleshoot common issues will save you time and frustration, allowing you to focus on your content rather than technical difficulties.
6. Advanced Features to Enhance Your Stream
Once you’re comfortable with basic sources, it’s time to explore some advanced features in OBS Studio that can really enhance your stream:
- Scene Collections: Create different scene collections for various types of streams, such as gaming, tutorials, or special events. This allows for quick switching between setups.
- Hotkeys: Assign hotkeys for switching scenes or sources during your live stream. This can speed up transitions and make your stream feel more professional.
- Stream Overlays: Use third-party services like Streamlabs or StreamElements to incorporate overlays that add alerts, donation notifications, and subscriber alerts.
Utilizing these advanced features can significantly improve the quality of your content, making it more appealing to your audience.
7. Current Trends in Streaming and OBS Studio
The streaming landscape is continuously evolving, and OBS Studio is at the forefront of these changes. A few current trends include:
- Multistreaming: Many creators are now streaming on multiple platforms simultaneously. OBS Studio can be configured to support this with the right settings, allowing for greater audience reach.
- Interactive Streams: Viewers appreciate interactivity, and features like polls, Q&A sessions, and live chat integration are becoming more popular. Tools like OBS WebSocket can help integrate these features seamlessly.
- High-Quality Streaming: With the rise of 4K content, OBS Studio continues to update its capabilities to provide high-quality streaming options, allowing for a more immersive viewer experience.
Staying aware of these trends can help streamers better engage their audiences and stay relevant in a competitive landscape.
8. Resources for Learning More
If you’re looking to expand your knowledge beyond this article, there are numerous resources available:
- OBS Studio Official Documentation: The official documentation offers in-depth guides on every feature of the software.
- YouTube Tutorials: Many content creators share their workflow and tips on YouTube. Channels like OBS Project provide excellent insights.
- Community Forums: Engage with fellow users in forums like Reddit or OBS’s official forum to share experiences and solutions.
These resources can further enhance your understanding of how to use OBS Studio effectively and stay updated on new features and practices.
9. Frequently Asked Questions
What are the system requirements for OBS Studio?
OBS Studio is relatively lightweight, but for optimal performance, it’s recommended to have at least a dual-core processor, 4GB of RAM, and a compatible graphics card. For live streaming in high definitions like 1080p, a more powerful setup with a quad-core processor and a dedicated GPU is advisable. (See: streaming and recording tips.)
Can I use OBS Studio for recording only?
Yes! OBS Studio is excellent for recording as well as streaming. You can set up scenes and sources just as you would for a live stream, then select “Start Recording” to save your content to your hard drive.
How can I add sources from other applications?
To add sources from other applications, you can use Window Capture or Display Capture. Window Capture allows you to select a specific application, while Display Capture will show everything on your screen. Make sure the application you want to capture is open before adding it as a source.
Is there a mobile version of OBS Studio?
Currently, OBS Studio does not have an official mobile version. However, there are other mobile streaming apps that can be used as an alternative for live streaming on platforms like Twitch or YouTube. Some users use remote desktop applications to control OBS from a mobile device.
Can I add plugins to OBS Studio?
Absolutely! One of the strengths of OBS Studio is its support for plugins. There are a variety of plugins available that can enhance your streaming experience, from adding new features to improving performance. Just be sure to download plugins from reputable sources.
How do I configure my audio settings for optimal performance?
To get the best audio quality, go to the Audio settings in OBS Studio. You can adjust sample rates, audio bitrate, and select the correct audio input and output devices. It’s also a good idea to monitor audio levels in the Mixer section to prevent clipping or distortion.
Are there any best practices for adding sources in OBS Studio?
Yes! Organizing your sources into folders for clarity is a great practice. Additionally, naming sources descriptively will help you manage them better during a stream. Regularly check for updates to OBS, as new features and fixes can enhance your experience.
10. Additional Tips for Effective Streaming
Now that we’ve covered the basics and troubleshooting techniques, let’s dive into some additional tips to help you maximize your streaming experience:
- Engage with Your Audience: Interaction is key in streaming. Use chat features to respond to viewer comments in real time. Engaging with your audience makes them feel valued and more likely to return to your stream.
- Maintain a Consistent Schedule: Consistency can help build a loyal audience. Set a streaming schedule and stick to it, so your viewers know when to tune in.
- Invest in Quality Gear: While OBS Studio is a powerful tool, your streaming quality also depends on the hardware you use. Invest in a good microphone and camera to ensure your audience gets the best experience possible.
- Monitor Your Analytics: After your streams, review analytics to understand viewer engagement and retention rates. This information can guide you to improve future streams.
11. Deep Dive into Source Types
Each source type in OBS Studio offers unique capabilities that can enhance your streaming experience. Let’s take a deeper look at some of these source types and when to use them: (See: the rise of streaming video.)
Video Capture Device
Video Capture Devices are essential for incorporating live video feeds from cameras. Choose high-quality webcams or DSLRs for the best results. If you’re using multiple cameras, OBS allows you to switch between them seamlessly during a stream, giving you the flexibility to create dynamic content.
Audio Input Capture
Audio quality is just as important as visual quality. Invest in a good microphone and set it as your primary audio input. You can also use mixers to control multiple audio sources, allowing for background music, effects, and microphone input all at once.
Window Capture vs. Display Capture
Understanding the difference between Window Capture and Display Capture is crucial. Use Window Capture when you want to display a single application’s content, which is ideal for games or specific software. Display Capture, on the other hand, shows your entire screen. This is useful for tutorials or presentations but can expose sensitive information unless properly managed.
Media Source
The Media Source allows you to insert videos directly into your stream. This is particularly useful for running promotional videos or highlight reels. OBS provides options to loop or autoplay these videos, adding more dynamic elements to your stream.
12. SEO for Streamers
Using SEO strategies can help your streams gain visibility on platforms like YouTube and Twitch. Here are a few tips:
- Use Keywords in Titles and Descriptions: Incorporate relevant keywords like “add sources in OBS Studio” to enhance discoverability.
- Optimize Tags: Use tags to make your content easier to find. Think about what terms your audience might search for.
- Create Eye-Catching Thumbnails: Thumbnails can entice viewers to click on your stream. Use bold colors and clear images to stand out.
- Promote on Social Media: Share highlights and clips on social media platforms to draw in an audience.
13. Conclusion
Adding sources in OBS Studio is just the beginning of your journey as a content creator. With the right knowledge and tools, you can create a professional and engaging streaming experience that resonates with your audience. Keep experimenting, stay updated with the latest trends, and don’t hesitate to tap into the vast resources available. The world of streaming is filled with possibilities, and OBS Studio is an invaluable ally in helping you realize them. Related reading: top screen recorders.
“`
Trending Now
Frequently Asked Questions
How do I add a video source in OBS Studio?
To add a video source in OBS Studio, first create a new scene. Then, click the '+' button under the 'Sources' box, select 'Video Capture Device', and choose your webcam or external camera from the list. Adjust the settings as needed and click 'OK' to add it to your scene.
What types of sources can I add in OBS Studio?
In OBS Studio, you can add various types of sources including Video Capture Device for cameras, Audio Input Capture for microphones, Image for still pictures, Window Capture for specific applications, Display Capture for the entire screen, and Media Source for video files.
Can I add multiple sources in one scene in OBS Studio?
Yes, OBS Studio allows you to add multiple sources within a single scene. This feature enables you to combine different media types, such as videos, images, and audio, creating a dynamic and engaging streaming or recording experience.
Is OBS Studio free to use?
Yes, OBS Studio is an open-source software and is completely free to use. It offers a wide range of features for streaming and recording without any cost, making it accessible for both beginners and experienced content creators.
How do I capture my screen in OBS Studio?
To capture your screen in OBS Studio, create a new scene and click the '+' button in the 'Sources' box. Select 'Display Capture' to capture your entire screen or 'Window Capture' to select a specific application window. Follow the prompts to configure your settings.
Agree or disagree? Drop a comment and tell us what you think.