The Tech Edvocate

Top Menu

  • Advertisement
  • Apps
  • Home Page
  • Home Page Five (No Sidebar)
  • Home Page Four
  • Home Page Three
  • Home Page Two
  • Home Tech2
  • Icons [No Sidebar]
  • Left Sidbear Page
  • Lynch Educational Consulting
  • My Account
  • My Speaking Page
  • Newsletter Sign Up Confirmation
  • Newsletter Unsubscription
  • Our Brands
  • Page Example
  • Privacy Policy
  • Protected Content
  • Register
  • Request a Product Review
  • Shop
  • Shortcodes Examples
  • Signup
  • Start Here
    • Governance
    • Careers
    • Contact Us
  • Terms and Conditions
  • The Edvocate
  • The Tech Edvocate Product Guide
  • Topics
  • Write For Us
  • Advertise

Main Menu

  • Start Here
    • Our Brands
    • Governance
      • Lynch Educational Consulting, LLC.
      • Dr. Lynch’s Personal Website
      • Careers
    • Write For Us
    • The Tech Edvocate Product Guide
    • Contact Us
    • Books
    • Edupedia
    • Post a Job
    • The Edvocate Podcast
    • Terms and Conditions
    • Privacy Policy
  • Topics
    • Assistive Technology
    • Child Development Tech
    • Early Childhood & K-12 EdTech
    • EdTech Futures
    • EdTech News
    • EdTech Policy & Reform
    • EdTech Startups & Businesses
    • Higher Education EdTech
    • Online Learning & eLearning
    • Parent & Family Tech
    • Personalized Learning
    • Product Reviews
  • Advertise
  • Tech Edvocate Awards
  • The Edvocate
  • Pedagogue
  • School Ratings

logo

The Tech Edvocate

  • Start Here
    • Our Brands
    • Governance
      • Lynch Educational Consulting, LLC.
      • Dr. Lynch’s Personal Website
        • My Speaking Page
      • Careers
    • Write For Us
    • The Tech Edvocate Product Guide
    • Contact Us
    • Books
    • Edupedia
    • Post a Job
    • The Edvocate Podcast
    • Terms and Conditions
    • Privacy Policy
  • Topics
    • Assistive Technology
    • Child Development Tech
    • Early Childhood & K-12 EdTech
    • EdTech Futures
    • EdTech News
    • EdTech Policy & Reform
    • EdTech Startups & Businesses
    • Higher Education EdTech
    • Online Learning & eLearning
    • Parent & Family Tech
    • Personalized Learning
    • Product Reviews
  • Advertise
  • Tech Edvocate Awards
  • The Edvocate
  • Pedagogue
  • School Ratings
  • A Visitors Guide to Long Beach (CA), United States

  • A Visitor’s Guide to Fresno (CA), United States

  • A Visitors Guide to New Orleans (LA), United States

  • A Visitors Guide to Sacramento (CA), United States

  • A Visitors Guide to Lyon, France

  • JisuLife Ultra2 Portable Fan: A Powerful Multi-Function Cooling Solution

  • A Visitors Guide to Viña del Mar, Chile

  • A Visitors Guide to Århus, Denmark

  • A Visitors Guide to Bakersfield (CA), United States

  • A Visitors Guide to Aurora (CO), United States

Digital & Mobile Technology
Home›Digital & Mobile Technology›How to Install QEMU on Ubuntu to Set Up a Virtual Machine

How to Install QEMU on Ubuntu to Set Up a Virtual Machine

By Matthew Lynch
June 12, 2023
0
Spread the love

QEMU is a popular open-source emulator that is used to create and run virtual machines on a Linux environment. It is capable of running on multiple architectures like x86, ARM, PowerPC, and more. QEMU is often used in conjunction with KVM to provide full hardware emulation and can support a larger number of guest machines than other emulators.

If you want to use QEMU on Ubuntu, you need to follow these steps:

Step 1: Install QEMU

The first step is to install QEMU on your Ubuntu system. Open the terminal and execute the following command:

“`
sudo apt install qemu-kvm qemu virt-manager virt-viewer libvirt-daemon-system libvirt-clients bridge-utils
“`

This command will install QEMU, KVM, and other required components to run virtual machines in Ubuntu.

Step 2: Check Whether KVM is Enabled

You can check whether KVM is enabled on your system or not by running the following command:

“`
sudo kvm-ok
“`

If KVM is supported, you’ll get the output “KVM acceleration can be used”. Otherwise, you’ll get an error message “KVM acceleration is not available on this system”.

Step 3: Create a Virtual Machine

After installing QEMU, you can create a virtual machine using the virt-manager application. To open virt-manager, run the following command:

“`
sudo virt-manager
“`

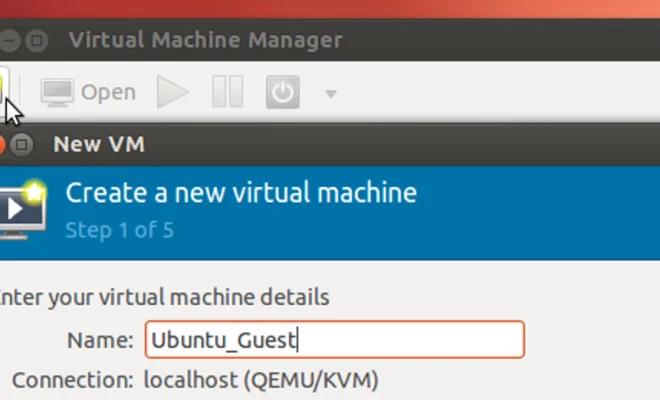
In the left pane of virt-manager, select “Localhost (QEMU)”, and click on the “Create a new virtual machine” button. The new virtual machine wizard opens up.

Step 4: Select ISO Image

In the first step of the wizard, select the installation media for your virtual machine. You can either use an ISO image, or select a network installation option.

If you’re using an ISO image, click on the “Browse” button and select the ISO file location. Then click on the “Forward” button.

Step 5: Select OS Type and Version

In the second step of the wizard, select the Operating System type and version. When you choose the OS type and version, the appropriate configuration for your virtual machine will be set up automatically.

Step 6: Allocate Resources

In the third step of the wizard, you can allocate resources like RAM and CPU to your virtual machine. You can also assign the network interface and disk storage options in this step.

Step 7: Start Your Virtual Machine

After allocating resources, you can finally start your virtual machine by clicking on the “Finish” button in the wizard. The new virtual machine will start and display on the right-hand side of the virt-manager window.

You can now use your newly created virtual machine to install and run software just like you would on a physical machine.

In conclusion, QEMU is a powerful tool to create and run virtual machines on Ubuntu. By following these simple steps, you can easily set up a virtual machine on your Ubuntu system using the QEMU emulator. With virtualization, you have the flexibility of configuring and deploying multiple virtual machines without having to purchase physical hardware.

Previous Article

How to Password Protect a ZIP File ...

Next Article

The Best IDEs and Text Editors ...

Matthew Lynch

Related articles More from author

  • Digital & Mobile Technology

    What is the Difference Between SSD and HDD?

    May 13, 2023
    By Matthew Lynch
  • Digital & Mobile Technology

    What Is a Dynamic IP Address?

    June 9, 2023
    By Matthew Lynch
  • Digital & Mobile Technology

    How to Turn Disney+ Subtitles On or Off

    August 4, 2023
    By Matthew Lynch
  • Digital & Mobile Technology

    Best Free Movies on YouTube (April 2023)

    May 31, 2023
    By Matthew Lynch
  • Digital & Mobile Technology

    The Best Golf Rangefinder Apps for Android

    June 12, 2023
    By Matthew Lynch
  • Digital & Mobile Technology

    What Is Crypto Arbitrage Trading? How Does It Work?

    August 3, 2023
    By Matthew Lynch

Search

Login & Registration

  • Register
  • Log in
  • Entries feed
  • Comments feed
  • WordPress.org

Newsletter

Signup for The Tech Edvocate Newsletter and have the latest in EdTech news and opinion delivered to your email address!

About Us

Since technology is not going anywhere and does more good than harm, adapting is the best course of action. That is where The Tech Edvocate comes in. We plan to cover the PreK-12 and Higher Education EdTech sectors and provide our readers with the latest news and opinion on the subject. From time to time, I will invite other voices to weigh in on important issues in EdTech. We hope to provide a well-rounded, multi-faceted look at the past, present, the future of EdTech in the US and internationally.

We started this journey back in June 2016, and we plan to continue it for many more years to come. I hope that you will join us in this discussion of the past, present and future of EdTech and lend your own insight to the issues that are discussed.

Newsletter

Signup for The Tech Edvocate Newsletter and have the latest in EdTech news and opinion delivered to your email address!

Contact Us

The Tech Edvocate
910 Goddin Street
Richmond, VA 23231
(601) 630-5238
[email protected]

Copyright © 2025 Matthew Lynch. All rights reserved.