How to install CPU
“`html
Installing a CPU (Central Processing Unit) may seem daunting, especially if you’re embarking on the journey of building your own computer for the first time. However, with the right guidance, the process can be straightforward and immensely rewarding. In this article, we’ll cover everything you need to know about how to install a CPU, including background information, essential tools, step-by-step instructions, and tips for a successful installation.
1. Understanding Your CPU
Before jumping into the installation process, it’s crucial to understand what a CPU is and its role within your computer. The CPU is often referred to as the brain of the computer. It performs calculations and executes instructions that allow your operating system and applications to run smoothly. In essence, the CPU determines your system’s performance capabilities.
CPUs come in different types and generations, with manufacturers like Intel and AMD leading the market. Compatibility is key when selecting a CPU, as it must align with your motherboard’s socket type. For example, Intel CPUs typically use LGA (Land Grid Array) sockets, while AMD uses AM4 sockets. When considering how to install a CPU, always check that your chosen processor is compatible with your motherboard.
Today’s CPUs are not just about raw power; many also come with integrated graphics capabilities, allowing for a smoother experience in tasks that require visual processing. This is particularly beneficial for gaming or graphic design tasks. Some popular models include Intel’s i9 series and AMD’s Ryzen 9 series, which offer cutting-edge performance.
In addition to understanding types and compatibility, it’s also worth noting the importance of thermal design power (TDP) ratings, which indicate how much heat a CPU produces and how much cooling is required. Ensuring that your cooling solution is adequate for the CPU you choose can prevent overheating and prolong the lifespan of your components.
2. Gathering Your Tools
Equipping yourself with the right tools will not only make the installation process easier but also help prevent damage to delicate components. Here’s a list of essential tools you’ll need for how to install a CPU:
- Anti-static wrist strap: This tool protects your components from static electricity that could cause damage.
- Screwdriver: A Phillips screwdriver is typically required to secure the CPU cooler and the motherboard.
- Thermal paste: This substance helps transfer heat from the CPU to the cooler. While some coolers come pre-applied with thermal paste, it’s important to have some on hand just in case.
- Instruction manuals: Your motherboard and CPU manuals provide vital information about compatibility and installation procedures.
Taking the time to gather these tools will ensure a smoother installation process and reduces the risk of errors. Additionally, having a flashlight or a magnifying glass can be helpful for inspecting small components or tight spaces.
3. Preparing Your Workspace
Creating a clean and organized workspace is essential when learning how to install a CPU. Make sure your area is free from dust and clutter, as debris can damage sensitive components during installation. Additionally, ensure you have enough space to spread out your tools and parts.
Consider an anti-static mat to provide an extra layer of protection against static discharge. This setup will help you focus on the task at hand and keep everything organized, reducing the likelihood of losing small components. Good lighting is also critical; you want to see every detail clearly as you work.
If possible, set up your workspace in a room with controlled temperature and humidity levels. Excessive heat or moisture can affect electronic components, so a comfortable and regulated environment will enhance your installation experience.
4. Removing the Old CPU
If you’re upgrading your existing CPU, the first step in how to install a CPU is to remove the old one. Begin by powering down your computer and disconnecting all cables. Open the case and locate the CPU cooler. This cooler is typically secured with screws or clips.
Once the cooler is removed, you will see the CPU socket. If your motherboard has a lever, gently lift it to release the old CPU. Carefully lift the CPU out of the socket, ensuring not to touch the pins on the bottom. Place the old CPU in an anti-static bag for safekeeping. (See: Understanding Central Processing Units.)
During this process, it’s a good idea to clean the old thermal paste from both the CPU and the cooler using isopropyl alcohol and a lint-free cloth. This ensures that there are no residues that might affect the new thermal interface when you install the new CPU.
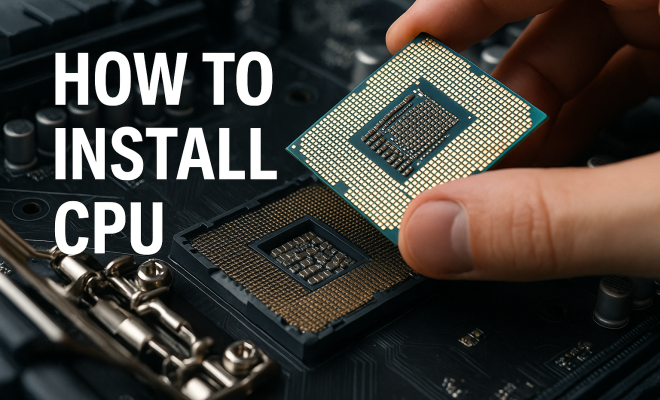
5. Installing the New CPU
Now, let’s get to the heart of how to install a CPU. Begin by aligning the new CPU with the socket on the motherboard. Look for the notches or a triangle on one corner of the CPU that matches with the socket. This alignment is crucial as it prevents damage from incorrect installation.
Gently place the CPU into the socket without applying force. Once it’s seated properly, lower the socket lever to lock the CPU in place. Avoid touching the CPU’s pins to prevent bending, which could lead to malfunction. This step is critical; a misaligned installation can result in performance issues or failure to boot.
Take a moment to review the manufacturer’s instructions for your specific CPU. Some CPUs may have additional features, such as integrated heat spreaders or specific locking mechanisms that need to be addressed. Understanding these nuances can prevent potential errors during installation.
6. Applying Thermal Paste
To ensure optimal heat transfer from the CPU to the cooler, applying thermal paste is necessary. If you’re wondering how to install a CPU correctly, this step cannot be overlooked. If your cooler doesn’t have pre-applied paste, use a small amount (about the size of a pea) of thermal paste and place it at the center of the CPU.
When you install the cooler on top, it will spread the paste evenly across the surface. Be careful not to apply too much thermal paste, as this can lead to excess spreading and potential overheating. Proper application is crucial for maintaining the CPU’s temperature during operation.
Many enthusiasts debate the best thermal paste brands and types, such as liquid metal versus traditional paste. Liquid metal can offer superior thermal conductivity, but it requires careful handling due to its electrical conductivity. For most users, a high-quality silicone-based thermal paste is sufficient.
7. Securing the CPU Cooler
After applying thermal paste, the next step in how to install a CPU is securing the CPU cooler. Position the cooler over the CPU, ensuring it aligns with the mounting brackets. Depending on your cooler type, you might need to screw it down or clip it into place.
Check the cooler’s manual for specific instructions, as different models may have unique installation processes. After securing the cooler, connect its power cable to the motherboard. This connection is vital, as the cooler needs to be powered to maintain an appropriate temperature for the CPU.
Pay attention to the cooler’s orientation as well; some coolers are designed to direct airflow efficiently through the case, which can improve overall system cooling. If you’re using an aftermarket cooler, ensure compatibility with your case size and orientation.
8. Final Checks and Booting Up
With the CPU and cooler installed, it’s time for final checks. Make sure all power connections are secure, and double-check that the CPU cooler is properly attached. Close the case, reconnect all cables, and power on your computer. Watch for any POST (Power-On Self-Test) messages as the system boots up. If everything is functioning correctly, you should see your operating system load without issues.
If you encounter problems, don’t panic. Double-check all connections, and ensure the CPU is seated correctly in the socket. If you experience persistent issues, consider consulting your motherboard’s manual or searching online forums for troubleshooting advice.
It’s also a good idea to access the BIOS or UEFI after installation to check that the system recognizes the new CPU. If the CPU isn’t detected, it could indicate a problem with installation or compatibility. Take note of any error codes or beeping patterns your motherboard may produce, as they can provide clues to what went wrong.
9. Monitoring Performance and Temperatures
Once your system is up and running, it’s important to monitor temperatures to ensure the CPU operates within safe limits. Software tools like Core Temp or HWMonitor can provide real-time temperature readings. Keeping an eye on these metrics is crucial, especially after a fresh installation.
There are also benchmarking tools available, such as Cinebench or Prime95, which can stress-test your CPU and help you gauge its performance. Regularly checking for BIOS updates and ensuring that your cooling solution is effective will help you maintain optimal performance over time.
In addition to temperature monitoring, consider running performance benchmarks to compare your new CPU’s capabilities against previous models or systems. This can be especially helpful for gamers or professionals who rely on high performance for demanding software applications.
10. Common Mistakes to Avoid
When learning how to install a CPU, it’s also important to be aware of common mistakes that can occur during the process. Here are some pitfalls to avoid:
- Inadequate preparation: Failing to read manuals or understand compatibility can lead to wasted time and frustration.
- Overapplying thermal paste: Using too much thermal paste can create a mess and may actually hinder thermal performance.
- Rushing the installation: Taking your time is essential to avoid damaging components or misaligning parts.
- Neglecting to check BIOS settings: After installation, ensure that everything is correctly configured in the BIOS, including fan speeds and power settings.
- Ignoring cooling requirements: Always ensure your cooling solution is sufficient for the TDP of your CPU to prevent overheating.
11. Frequently Asked Questions (FAQ)
1. How do I know if my CPU is compatible with my motherboard?
Check the specifications of both your CPU and motherboard. Look for the socket type and chipset compatibility listed in the motherboard manual or the manufacturer’s website. Many motherboards also have compatibility lists to assist you.
2. Can I install a CPU without an anti-static wrist strap?
While it’s not absolutely necessary, using an anti-static wrist strap is highly recommended to prevent electrostatic discharge (ESD) that can damage sensitive components. Alternatively, touching a grounded metal object before handling components can help discharge any static electricity.
3. What should I do if my new CPU doesn’t boot?
First, check all connections and ensure the CPU is seated properly. Access the BIOS to see if it’s recognized. If there’s still no boot, try reseating the RAM and checking for any error codes or beeping patterns from the motherboard.
4. Is it safe to use liquid metal thermal paste?
Liquid metal thermal paste can offer superior thermal performance, but it is conductive and can cause short circuits if it spills onto the motherboard. If you choose to use it, apply carefully, following the manufacturer’s instructions and using it sparingly.
5. How often should I replace thermal paste?
Thermal paste should be replaced every couple of years, or whenever you remove the CPU cooler for maintenance or upgrades. Over time, thermal paste can dry out or lose its effectiveness, leading to increased temperatures.
6. What is the average temperature for a CPU?
Typical idle temperatures for CPUs range from 30°C to 50°C, while under load, temperatures can rise to between 60°C and 85°C, depending on the model and cooling solution. Always refer to the CPU’s specifications for recommended temperature ranges.
12. Upgrading vs. Replacing Your CPU
When it comes to CPUs, you might find yourself in a situation where you’re considering an upgrade versus a complete replacement. Understanding the differences can help you make a more informed decision. Upgrading typically involves replacing your current CPU with a newer version that is compatible with your existing motherboard, while a complete replacement might require a new motherboard as well.
If your motherboard supports newer processors, an upgrade can be a cost-effective way to boost performance. For instance, if you have an Intel Core i5 and your motherboard supports the latest i7 models, upgrading to an i7 could significantly enhance multitasking and gaming performance. However, if you’re moving from an older platform to a newer generation that requires a new motherboard, this can be a more expensive endeavor.
Consider benchmarking your current CPU against the new models you’re considering. Tools like PassMark or Geekbench can help you compare performance metrics directly. This way, you can determine if the investment in a new CPU (and potentially a motherboard) will yield the performance boost you desire.
13. Understanding CPU Architecture
A deeper understanding of CPU architecture can also enhance your grasp of how to install a CPU and how it will affect performance. Modern CPUs operate on multicore architecture, which allows for parallel processing. This means tasks can be divided among multiple cores, enhancing performance, especially for applications designed to take advantage of such architecture, like video editing software or high-end games.
It’s also important to look at clock speeds, which are often measured in GHz. Higher clock speeds typically translate to better performance, but architecture plays an equally important role. For instance, a newer CPU with a lower clock speed may outperform an older CPU with a higher clock speed due to improvements in architecture.
When researching CPUs, pay attention to specifications like cache size, thermal design power, and integrated graphics capabilities as these factors can influence overall performance and installation considerations.
14. Choosing the Right Cooling Solution
The cooling solution is an integral part of how to install a CPU, as it affects not only installation but also performance and longevity. There are several options available, from stock coolers provided by manufacturers to high-performance aftermarket coolers.
Air coolers are popular for their cost-effectiveness and ease of installation. They typically consist of a heatsink and fan, effectively dissipating heat from the CPU. On the other hand, liquid cooling solutions offer superior thermal performance and can be quieter, though they may be more complex to install and maintain.
Consider your usage scenario: if you’re into gaming or heavy multitasking, investing in a robust cooling solution can help maintain optimal temperatures and performance levels. Research reviews and user experiences for various cooling models to find one that fits your needs and budget.
15. Final Observations
Installing a CPU can be a rewarding experience, providing you with a sense of accomplishment and a better-performing machine. By following these steps and being mindful of compatibility and cooling, you can ensure a successful installation that breathes new life into your computer. With the right tools, knowledge, and patience, you’ll confidently tackle your next CPU installation without a hitch.
“`
Trending Now
Frequently Asked Questions
How do I know if my CPU is compatible with my motherboard?
To determine if your CPU is compatible with your motherboard, check the motherboard's specifications for the supported socket type. Intel CPUs typically use LGA sockets while AMD CPUs use AM4 sockets. Additionally, verify that your motherboard's chipset supports the CPU generation you plan to install.
What tools do I need to install a CPU?
To install a CPU, you will need a few essential tools: a clean, static-free workspace, a screwdriver (usually Phillips), and possibly a thermal paste applicator. It's also helpful to have an anti-static wrist strap to prevent damage to components during installation.
What is the first step in installing a CPU?
The first step in installing a CPU is to prepare your workspace and gather your tools. Make sure the computer is powered off and unplugged. Then, locate the CPU socket on the motherboard, and carefully lift the lever or cover to access it prior to placing the CPU.
Do I need thermal paste when installing a CPU?
Yes, thermal paste is essential for effective heat transfer between the CPU and the heatsink. This paste fills microscopic gaps and improves cooling efficiency. If your CPU cooler does not come with pre-applied thermal paste, you will need to apply a small amount before installing the cooler.
What should I do if my CPU is overheating?
If your CPU is overheating, check if the heatsink is properly installed and ensure that thermal paste is applied correctly. Verify that your cooling solution is adequate for your CPU's thermal design power (TDP). Additionally, ensure that your case has proper airflow and consider upgrading your cooling system if necessary.
What’s your take on this? Share your thoughts in the comments below — we read every one.