How to Fix It When Windows 11 Is Not Detecting Headphones

Windows 11 has been making waves since its release, promising users enhanced performance and exciting new features. As with any new operating system, users may experience some issues, and one common problem faced by Windows 11 users is the failure of the system to detect headphones.
This can be frustrating, especially if listening to music or watching a movie is a common activity. If you are facing this issue, there are a few steps you can take to resolve it.
Here are five steps to fix the issue when Windows 11 is not detecting headphones:
1. Check Your Headphones
Before jumping to any conclusions about your system, it is essential to ensure that there is no issue with your headphones. Check if they are appropriately plugged into the jack and that the volume is not set to mute. Make sure that the headphone wire is also not damaged, and the edges are not frayed.
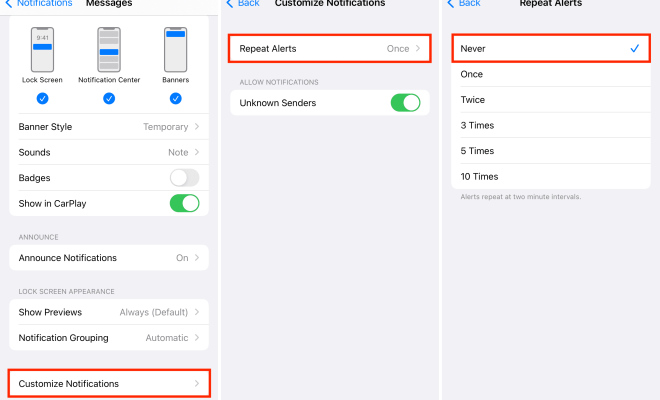
2. Check Your Sound Settings
If the headphones are correctly inserted, there may be an issue with the sound settings. To fix this, open the sound settings by clicking on the sound icon in the taskbar. From the dropdown, select “Sound Settings” and check if the headphones are listed under the “Output Devices” tab.
If they are not, click on “Devices,” then “Add a device,” and select “Headphone or Speakers.” Follow the prompts to add the headphones, and they should show up under the Output Devices.
3. Update Your Sound Drivers
If the headphones are still not showing up, it may be due to a problem with the sound drivers. To resolve this issue, update the sound drivers by following these steps:
– Open the Device Manager by pressing Windows + X and selecting “Device Manager.”
– Expand the “Sound, video, and game controllers” section and right-click on the audio device.
– Choose “Update driver,” and select “Search automatically for updated driver software.”
Windows will search for the latest driver and install it automatically. Once the driver is updated, restart your system and check if the headphones are showing up.
4. Check Your Default Playback Device
Windows 11 has a feature that allows users to set a default audio playback device. If you have more than one audio device connected to your system, such as a monitor with built-in speakers, the system could be detecting the wrong device. To fix this, follow these steps:
– Right-click on the sound icon in the taskbar.
– Choose “Open Sound settings,” navigate to the “Output Devices” tab, and click on “Manage sound devices.”
– Click on the device you want to set as the default device and select the “Set as default” option.
Now, try playing audio with your headphones, which should be detected correctly.
5. Reinstall Audio Drivers
If all the solutions above have failed, it may be time to reinstall your audio drivers. Here’s how to do it:
– Open the Device Manager and expand the “Sound, video, and game controllers” section.
– Right-click on the audio device and choose “Uninstall device.”
– Restart your system, and Windows 11 will automatically reinstall the audio drivers.
Conclusion
In conclusion, when Windows 11 is not detecting headphones, it can be a frustrating experience. However, with the solutions provided above, you can quickly fix this issue and get back to listening to your favorite music and movie audio. Remember to check your headphones first, update your sound drivers, check your sound settings, set your default audio playback device, and if all else fails, reinstall audio drivers.