How to Erase Your iPhone Settings and Data
If you are planning to sell or give away your iPhone, it is important to erase all the data and settings from it to ensure your personal information remains private. Here’s a step-by-step guide on how to erase your iPhone settings and data.
Step 1: Backup Your iPhone
Before erasing your iPhone, make sure to backup all your important data so that you can restore it later. You can backup your iPhone using iTunes or iCloud.
1. iTunes Backup:
Connect your iPhone to a computer, launch iTunes, and click on the iPhone icon. Click on “Back Up Now” and wait for the backup to complete.
2. iCloud Backup:
Go to Settings > [your name] > iCloud > iCloud Backup. Turn on iCloud Backup and click on “Back Up Now”.
Step 2: Sign Out of iCloud
To erase your iPhone, you need to sign out of iCloud. Go to Settings > [your name] > Scroll down and click on “Sign Out”. Enter your Apple ID password and click on “Turn Off”.
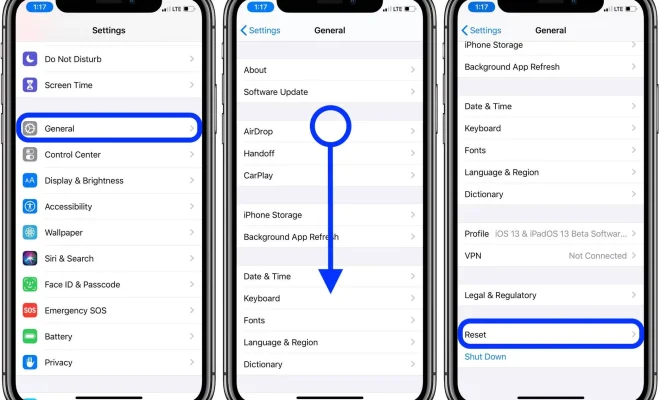
Step 3: Erase Your iPhone
Go to Settings > General > Reset > Erase All Content and Settings. Enter your passcode if prompted and click on “Erase iPhone”. This process may take a few minutes to complete.
Step 4: Restore Your iPhone
Once your iPhone is erased, you can restore it from the backup you created earlier.
1. iTunes Restore:
Connect your iPhone to the computer, launch iTunes, and click on the iPhone icon. Click on “Restore Backup” and select the backup you want to restore from.
2. iCloud Restore:
Turn on your iPhone and follow the setup process until you reach the “Apps & Data” screen. Click on “Restore from iCloud Backup” and select the backup you want to restore from.
Conclusion
Erasing your iPhone is an important step if you’re planning to sell or give away your device. By following these steps, you can ensure that your personal information remains secure and your iPhone is ready for its new owner.