How to clean Ptrap
“`html
Cleaning your P-trap may not be the most glamorous household chore, but it’s an essential task that can save you from frustrating plumbing issues down the road. Many homeowners overlook this simple maintenance step, often unaware of the buildup that can occur in this crucial part of your plumbing. Understanding how to clean your P-trap can help you keep your plumbing system running smoothly and prevent unpleasant odors and clogs.
1. What is a P-Trap?
The P-trap is a plumbing fixture that is typically located beneath sinks, including kitchen, bathroom, and laundry sinks. Its primary function is to prevent sewer gases from entering your home while allowing wastewater to flow out. The design of the P-trap, named for its shape resembling the letter ‘P,’ includes a bend that traps a small amount of water. This water acts as a barrier, effectively blocking foul odors from traveling back up through the drain.
Aside from its odor-blocking capabilities, the P-trap also captures debris and buildup from your sink, such as hair, soap scum, and food particles. Over time, this collection can lead to clogs, which is why learning how to clean your P-trap is essential for maintaining your plumbing system.
2. Signs You Need to Clean Your P-Trap
Before diving into the cleaning process, it’s crucial to recognize the signs that indicate your P-trap needs attention. If you notice any of the following issues, it’s time to roll up your sleeves and get to work:
- Foul Odors: A common sign that your P-trap needs cleaning is a smell coming from the sink. This could be due to trapped debris that has begun to decompose.
- Slow Drainage: If your water is draining slowly, it may be a result of clogs within the P-trap, signaling that it’s time for a cleaning.
- Frequent Clogs: If you find yourself constantly using a plunger or drain cleaner, the P-trap could be overwhelmed with buildup.
- Visible Build-up: If you can see debris or gunk in the P-trap area or notice water pooling around the base, it’s time to clean.
Ignoring these signs might lead to more severe plumbing problems that could be expensive to fix. Regular maintenance, including cleaning your P-trap, can help you avoid these situations.
3. Tools and Materials You’ll Need
Before you start cleaning your P-trap, gather the necessary tools and materials to make the process as smooth as possible. Here’s what you’ll need:
- Bucket: To catch any water or debris that may spill out when you remove the P-trap.
- Plumber’s Snake: If you encounter stubborn clogs, this tool can help clear them out effectively.
- Gloves: Protect your hands from dirt and grime.
- Cleaning Brush or Old Toothbrush: For scrubbing away build-up.
- Vinegar or Baking Soda: Natural cleaning agents that can help break down any buildup.
- Pliers or Wrench: To loosen the nuts on the trap.
Having these tools on hand will ensure you can tackle the cleaning job efficiently and effectively.
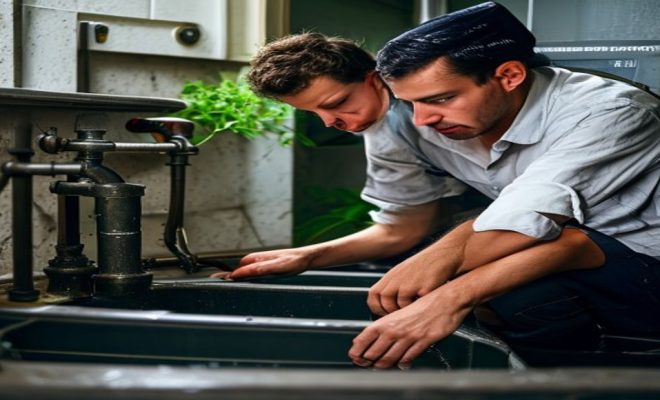
4. Step-by-Step Guide on How to Clean Your P-Trap
Now that you’re equipped with the right tools, let’s dive into the step-by-step process of cleaning your P-trap:
- Place a Bucket: Start by positioning your bucket beneath the sink to catch any water or debris that may come out when you remove the P-trap.
- Loosen the Nuts: Use your pliers or wrench to carefully loosen the nuts securing the P-trap to the sink and the drainpipe. Be cautious not to apply too much force to avoid damaging any components.
- Remove the P-Trap: Once the nuts are loose, gently pull the P-trap away from the sink and the drain. Expect some water to spill out, which is why you need the bucket in place.
- Inspect and Clean: Look inside the P-trap for any visible blockages. Use your cleaning brush or an old toothbrush to scrub away buildup. If there’s a stubborn clog, use the plumber’s snake to dislodge it.
- Flush with Water: Rinse the P-trap thoroughly with hot water to ensure all debris is washed away before reassembling it.
- Reattach the P-Trap: Once cleaned and rinsed, align the P-trap back to its original position and tighten the nuts securely. Ensure there are no leaks by running water through the sink.
By following these steps, you can effectively clean your P-trap and maintain a healthy plumbing system.
5. Preventative Measures to Keep Your P-Trap Clean
Now that you know how to clean your P-trap, it’s wise to implement some preventative measures to reduce the frequency of clogs. Consider these tips: (See: Learn about P-traps on Wikipedia.)
- Use Drain Screens: Installing drain screens can help catch hair, food particles, and other debris before they enter the P-trap.
- Regular Maintenance: Schedule regular checks of your P-trap, ideally every few months. Cleaning it proactively will prevent buildup from becoming a bigger issue.
- Avoid Pouring Grease: Never pour grease down the sink, as it can solidify and cause significant clogs.
- Use Hot Water: Periodically flushing your drains with hot water can help break down any buildup.
These preventative steps will not only keep your P-trap cleaner for longer but will also contribute to the overall health of your plumbing system.
6. Understanding P-Trap Variations
While many homeowners are familiar with the standard P-trap, it’s worth noting that there are variations used in different plumbing systems. For example, some systems may employ S-traps, which are less common due to their higher risk of siphoning air. Additionally, there are also tubular traps that are more streamlined and often easier to clean.
Familiarizing yourself with the type of trap you have can significantly aid in your cleaning efforts. Each variation may have subtle differences in assembly and design, so knowing what you’re working with can save you time and frustration.
7. Common Mistakes to Avoid When Cleaning a P-Trap
Even with the best intentions, mistakes can happen during the cleaning process. To ensure you do it right, avoid these common pitfalls:
- Ignoring Safety Precautions: Always wear gloves and possibly eye protection when handling plumbing components and cleaners.
- Using Harsh Chemicals: Avoid using corrosive chemicals that could damage your plumbing. Natural solutions like baking soda and vinegar work wonders without the risk.
- Forgetting to Check for Leaks: After reassembling your P-trap, neglecting to check for leaks can lead to water damage. Make sure everything is secure before considering the job done.
Being mindful of these common mistakes can help you complete the task effectively and ensure your plumbing remains in good condition.
8. When to Call a Professional
While cleaning your P-trap is a manageable DIY task, there are times when it’s best to call in a professional plumber. If you encounter persistent clogs despite cleaning, or if the plumbing system shows signs of more serious issues like leaks or corrosion, it’s wise to seek expert help. A professional can perform a comprehensive inspection and address any underlying problems that may not be obvious.
Additionally, if you’re uncomfortable with the cleaning process or lack the necessary tools, don’t hesitate to reach out for professional assistance. It’s better to be safe than to risk causing further damage to your plumbing system.
9. The Importance of Regular Maintenance
Lastly, remember that your plumbing system is an integral part of your home, and regular maintenance is key to its longevity. Learning how to clean your P-trap and implementing preventative measures will help you avoid costly repairs and keep your home running smoothly. By making this task a part of your regular home maintenance routine, you’ll not only promote a healthier household but also extend the life of your plumbing system.
10. Expert Tips for Deep Cleaning Your P-Trap
If you want to take your P-trap cleaning to the next level, consider these expert tips that go beyond basic maintenance:
- Use a Vinegar and Baking Soda Mixture: Combine a cup of baking soda with a cup of vinegar, and pour it down the drain. Let it sit for about 30 minutes before flushing it with hot water. This natural solution can break down stubborn grime and neutralize odors.
- Check for Corrosion: When cleaning your P-trap, take a moment to examine it for any signs of rust or corrosion. If your trap is made of metal, it may need replacement if it’s showing significant wear. Plastic traps tend to last longer but can still crack.
- Inspect Your Drainage System: While you have the P-trap removed, take a peek into the drainage system leading to the wall. If you notice any debris accumulating, use a plumber’s snake to clean that out too.
Taking these extra steps can enhance the efficiency of your plumbing system and extend the cleaning intervals.
11. Common Questions About P-Traps
What happens if you don’t clean your P-trap?
Neglecting to clean your P-trap can lead to clogs, slow drainage, and unpleasant odors in your home. Over time, the buildup can worsen, potentially requiring professional plumbing services to resolve.
How often should you clean your P-trap?
As a general rule, cleaning your P-trap every six months is advisable. However, if you frequently notice clogs or odors, you may want to clean it more regularly. (See: CDC on home water treatment.)
Can I use chemical drain cleaners on my P-trap?
It’s best to avoid chemical drain cleaners as they can damage your plumbing. Instead, opt for natural solutions like baking soda and vinegar for effective, safe cleaning.
Are there any special considerations for cleaning a P-trap in a kitchen sink?
Yes, kitchen P-traps often deal with grease and food particles, which can create more buildup. Regular cleaning and the use of drain screens can help. Additionally, consider running hot water down the drain after each use to keep grease from solidifying.
How do I know if my P-trap is damaged and needs replacing?
If you notice significant rust, cracks, or leaks, it’s likely time to replace your P-trap. Additionally, if cleaning does not resolve drainage issues, it may indicate a deeper plumbing problem.
12. Comparing Different Types of P-Traps
There are a few different types of P-traps, and understanding their features can help you make informed decisions about cleaning and maintenance:
- Standard P-Trap: Made of either PVC or metal, standard P-traps are the most common type used in residential plumbing. They are relatively easy to clean and maintain.
- Deep P-Trap: This variation offers a deeper curve, which can be beneficial in some plumbing setups. However, their design may make them slightly more complex to clean.
- Flexible P-Trap: Often made from flexible plastic, these traps can bend to fit tight spaces. They can be easier to install but may require more frequent cleaning due to their design collecting debris more easily.
Choosing the right type of P-trap for your plumbing needs can make cleaning and maintenance simpler and more effective.
13. Final Thoughts on Maintaining Your P-Trap
Understanding how to clean your P-trap and maintain it regularly can save you a lot of hassle in the long run. By being proactive, you can avoid unpleasant odors and costly repairs. Take the time to familiarize yourself with your plumbing system, the specific type of trap you have, and follow the steps and tips provided. Regular cleaning and maintenance will ensure your plumbing system serves you well for years to come.
14. Advanced Cleaning Techniques
If you’re looking for more thorough ways to ensure your P-trap is spotless, here are some advanced cleaning techniques:
- Hot Water Flush: After cleaning the P-trap, run a kettle of boiling water through it to help dissolve any remaining grease or soap scum.
- Enzyme Cleaners: These are biological cleaners that use enzymes to break down organic material in your plumbing, making them an excellent option for regular maintenance.
- Hydrogen Peroxide Treatment: For deep cleaning, consider pouring a solution of hydrogen peroxide down the drain. It’s effective at breaking down odors and bacteria lurking in the trap.
15. Understanding the Health Risks of Neglected P-Traps
Neglecting to maintain your P-trap can pose health risks. Trapped debris not only creates foul odors but can also become a breeding ground for bacteria and mold. This is especially true in sinks used for food preparation.
Bacteria like E. coli can thrive in these environments, leading to potential contamination of dishes and utensils washed in your sink. Therefore, keeping your P-trap clean isn’t just about maintaining your plumbing; it’s about ensuring your home is a safe and healthy environment.
16. Environmental Impact of Plumbing Maintenance
Cleaning your P-trap can also be viewed from an environmental perspective. By using natural cleaning agents like vinegar and baking soda, you minimize chemical runoff into the water supply. This is a gentle approach that benefits both your plumbing and the environment. (See: New York Times on cleaning drains.)
Moreover, regular maintenance can prevent larger plumbing issues that often require more intensive repairs, which can be resource-intensive and result in waste. By being proactive with P-trap maintenance, you’re contributing to a more sustainable household.
17. Frequently Asked Questions About P-Traps
Can a clogged P-trap cause larger plumbing problems?
Yes, a clogged P-trap can lead to larger issues, such as backups in the pipes leading to the main drainage system. This can exacerbate plumbing problems and may require professional intervention.
Is it necessary to replace my P-trap after cleaning?
Typically, cleaning should suffice unless you notice damage, corrosion, or ongoing drainage issues. Regular inspections can help identify whether replacement is necessary.
Are there preventative products available for plumbing maintenance?
Yes, there are various preventative products like drain cleaners and maintenance tablets that can help keep your plumbing in check. Look for enzyme-based products for a safe and effective option.
How can I effectively communicate plumbing issues to a professional?
When discussing issues with a plumber, provide specifics about the symptoms you’ve observed, such as odors, slow drainage, or visible buildup. Pictures can also help illustrate the problem.
What is the lifespan of a typical P-trap?
A P-trap can last for many years, often 10-20 years, depending on the material and maintenance. Regular cleaning is key to extending its lifespan.
18. Conclusion
Cleaning your P-trap is a simple yet crucial part of home plumbing maintenance. By understanding the function of the P-trap, recognizing the signs of clogs, using proper tools and techniques, and knowing when to call a professional, you can keep your plumbing in optimal condition. With a little effort, you can prevent costly repairs and ensure a healthier home environment.
“`
Trending Now
Frequently Asked Questions
What is a P-trap and why is it important?
A P-trap is a plumbing fixture located beneath sinks that prevents sewer gases from entering your home while allowing wastewater to flow out. Its design traps a small amount of water, which acts as a barrier against foul odors and captures debris, making it essential for maintaining a healthy plumbing system.
How do I know if my P-trap needs cleaning?
Signs that your P-trap needs cleaning include foul odors from the sink, slow drainage, frequent clogs, and visible build-up of debris. If you notice any of these issues, it's time to clean your P-trap to maintain proper function.
What materials do I need to clean a P-trap?
To clean a P-trap, you will need a bucket to catch water, a wrench or pliers to remove the trap, a brush or cloth for scrubbing, and possibly a mixture of vinegar and baking soda for deeper cleaning. Make sure to have gloves on for hygiene.
Can I clean my P-trap myself?
Yes, cleaning your P-trap is a DIY task that most homeowners can handle. With the right tools and a little guidance, you can effectively remove debris and prevent clogs without needing to call a plumber.
How often should I clean my P-trap?
It's generally recommended to clean your P-trap at least once a year, or more frequently if you notice signs of clogs or odors. Regular maintenance can help prevent plumbing issues and ensure your system runs smoothly.
What did we miss? Let us know in the comments and join the conversation.