How to clean dryer vent
“`html
When was the last time you thought about your dryer vent? Most of us take this crucial appliance for granted, but neglecting its maintenance can lead to serious consequences. From increased energy bills to potential fire hazards, the importance of dryer vent cleaning cannot be overstated. In this guide, we’ll dive deep into the specifics of why and how to keep your dryer vent in tip-top shape.
1. Understanding the Importance of Dryer Vent Cleaning
Dryer vents play a critical role in the efficiency and safety of your laundry routine. When you run your dryer, it expels moisture and lint through the vent. Over time, this buildup can restrict airflow, making your dryer work harder and reducing its lifespan. In fact, according to the U.S. Fire Administration, failure to clean dryer vents is one of the leading causes of dryer-related fires.
Moreover, regular cleaning not only prevents fires but also enhances your dryer’s efficiency. A clean vent allows the appliance to operate more effectively, which can significantly lower your energy bills. So, investing some time in maintenance will ultimately save you money and keep your home safe.
Additionally, studies have shown that a clogged dryer vent can increase drying time by up to 50%. This not only wastes energy but can also lead to premature wear and tear on your dryer. Keeping your dryer vent clean is a small effort with significant long-term benefits for both your wallet and your appliance.
2. Recognizing the Signs of a Clogged Dryer Vent
Before diving into the cleaning process, it’s essential to recognize the signs that indicate your dryer vent needs attention. One of the most common symptoms is longer drying times. If your clothes come out still damp after a full cycle, it might be time to inspect your vent. Other red flags include a burning smell, the dryer feeling unusually hot, or excessive lint buildup around the lint trap.
In addition, if your laundry room feels more humid than usual or if you notice an increase in your energy bills, these could also be signs of a clogged vent. Taking note of these indicators can help you address potential issues before they escalate.
For example, if you notice that your dryer is getting hotter than normal during use, it could be a sign that there’s a blockage preventing heat from escaping. This not only poses a risk for potential fires but also means your clothes are not drying properly, leading to increased energy consumption.
3. Gathering the Right Tools for the Job
Once you’ve determined that your dryer vent needs cleaning, the next step is to gather the necessary tools. While you can hire professionals for dryer vent cleaning, doing it yourself can be a rewarding experience. You’ll need a few basic items:
- Vacuum cleaner with a hose attachment
- Dryer vent cleaning brush
- Phillips and flathead screwdrivers
- Safety goggles and gloves
- Flexible dryer vent duct (if replacement is necessary)
Having these tools on hand will make the process more efficient and ensure you’re prepared for any situation. You might also want to consider having a flashlight handy to help you see inside the vent duct more clearly.
4. Preparing for the Cleaning Process
Safety first! Before you begin the cleaning process, unplug your dryer to avoid any electrical hazards. It’s also a good idea to pull the dryer away from the wall to access the vent easily. If necessary, disconnect the vent from the back of the dryer. Make sure to have a towel nearby to catch any lint that might fall during this process.
Once you’ve prepared your workspace, take a moment to inspect the vent’s condition. Check for any visible damage or kinks that could impede airflow. If you notice any issues, you may need to replace sections of the duct.
Also, consider the length of the duct. Longer ducts are more prone to clogs due to bends and turns. If your vent is overly long, you might want to think about shortening it to improve efficiency. A straight shot from the dryer to the outside vent is ideal.
5. Cleaning the Lint Trap
Before tackling the vent itself, don’t forget to clean the lint trap. This is a critical step in dryer vent cleaning that many people overlook. Remove the lint trap from the dryer and clean it thoroughly with warm, soapy water to remove any residue that may have built up. Allow it to dry completely before reinserting it. (See: U.S. Fire Administration on dryer vents.)
Regularly cleaning the lint trap not only helps with airflow but also reduces the risk of fires. It’s a simple yet effective habit that contributes to the overall health of your dryer. In fact, a clean lint trap can improve the dryer’s efficiency by allowing it to extract moisture more effectively from your clothes.
Consider incorporating a lint trap cleaning routine into your laundry day. By doing this simple task after each load, you can prevent lint buildup and keep your dryer running smoothly.
6. Cleaning the Dryer Vent Duct
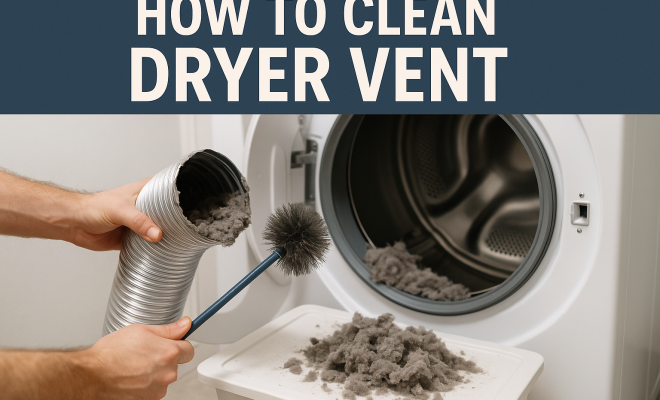
Now it’s time to tackle the main event: cleaning the dryer vent duct. Using your dryer vent cleaning brush, insert it into the duct as far as it will go. Rotate the brush to dislodge lint and debris. You may need to pull the brush out and reinsert it several times to ensure it’s thoroughly cleaned.
If you have a vacuum with a hose attachment, use it to suck up any loose lint and debris. This combination method will maximize the cleaning efficiency. Make sure to clean both ends of the duct, as well as the area where the vent exits your home. This is critical for optimal airflow.
You might also consider using a dryer vent cleaning kit that includes specialized tools designed to reach deep into the ductwork. These kits can often be found online or at your local home improvement store and can simplify the cleaning process.
7. Inspecting and Replacing the Vent
After cleaning, take a close look at the dryer vent duct for any signs of damage, such as holes or cracks. If you find any, it’s best to replace that section of duct to ensure your dryer operates efficiently. Flexible ducting is typically easy to work with and can be found at most hardware stores. Make sure to choose the right size for your dryer.
Additionally, consider using a smooth, rigid metal duct instead of plastic or foil, as these are less likely to trap lint and are safer in terms of fire hazards. Safety should always be a priority when it comes to dryer vent cleaning.
Don’t forget to check the outside vent cap as well. Sometimes, these can become clogged with lint or even debris from outside, like leaves or bird nests. Ensuring that the vent cap opens and closes freely will help maintain optimal airflow.
8. Reassembling and Testing the Dryer
Once you’ve completed the cleaning and inspection, it’s time to reassemble your dryer. Securely reattach the duct and ensure all connections are tight. Plug in the dryer and run a short cycle to test if it’s functioning properly. Keep an eye on the vent outside—if you see a strong airflow and lint being expelled, you’ve done a great job!
During this test run, listen for any unusual sounds or excessive vibrations, which could indicate that something is amiss. If it doesn’t seem to be working correctly, turn it off immediately and double-check your work.
Running the dryer empty for a few minutes can help you verify that everything is operating correctly. If the airflow is strong and consistent, you can be confident that your cleaning efforts were successful.
9. Establishing a Regular Cleaning Schedule
Now that you’ve successfully cleaned your dryer vent, it’s crucial to establish a regular maintenance schedule. Experts recommend cleaning your dryer vent at least once a year, but if you use your dryer frequently or have a large household, you may need to do it more often.
In addition to annual cleanings, make it a habit to inspect your lint trap and vent every few months. Keeping an eye on these parts of your dryer will help you catch potential issues early, ensuring your appliance remains safe and efficient. And remember, if you ever feel overwhelmed by the cleaning process, don’t hesitate to call in a professional.
To help keep track, you might consider marking your calendar or setting a reminder on your phone to perform these checks. It doesn’t take long, and staying proactive can save you the hassle of dealing with a clogged vent down the line.
10. Common Myths About Dryer Vent Cleaning
There are several myths surrounding dryer vent cleaning that can lead to complacency. One common myth is that dryer vents don’t need to be cleaned if you don’t see lint buildup outside. While it’s true that a lack of visible lint may indicate that your vent isn’t clogged, it’s not a guarantee. Many blockages can occur deeper in the venting system and go unnoticed. (See: CDC guidelines on dryer vent cleaning.)
Another myth is that using dryer sheets prevents lint buildup. While dryer sheets can help with static and soften clothes, they do not prevent lint from accumulating in your vent. In fact, they can sometimes contribute to buildup in the lint trap, which is why regular cleaning is still essential.
Also, some people believe that only older dryers pose a risk of fire due to clogged vents. Unfortunately, newer models can also be susceptible to lint buildup, especially if they are not properly vented. Always be vigilant, regardless of the age of your appliance.
11. Hiring a Professional vs. DIY Dryer Vent Cleaning
While many homeowners choose to clean their dryer vents themselves, there are benefits to hiring a professional service. A professional typically has specialized equipment that can effectively remove lint and debris from deep within the ductwork, which may be difficult to reach with standard tools.
Additionally, professionals can perform thorough inspections to identify potential problems that you may not notice, such as improper venting or structural issues that could affect dryer performance. They may also offer preventative maintenance plans to ensure your dryer vent stays clean year-round.
If you decide to go the DIY route, just remember that taking the time to do it right is essential. Investing in high-quality tools and following safety precautions can make all the difference. However, if you’re uncomfortable or unsure, there’s no shame in calling in the experts.
12. Frequently Asked Questions (FAQs)
What happens if I don’t clean my dryer vent?
Neglecting your dryer vent can lead to reduced efficiency, increased energy bills, and a higher risk of fire. Lint buildup restricts airflow, causing your dryer to work harder, which can result in overheating and potential fires.
How often should I clean my dryer vent?
Experts recommend cleaning your dryer vent at least once a year. However, if you use your dryer frequently or have a larger household, consider cleaning it every 6 months.
Can I clean my dryer vent myself?
Yes, you can clean your dryer vent yourself using the right tools. Just ensure you follow safety precautions, disconnect the dryer, and inspect the vent thoroughly.
What tools do I need for dryer vent cleaning?
You’ll need a vacuum cleaner with a hose attachment, a dryer vent cleaning brush, screwdrivers, safety goggles, and possibly a flexible duct if replacement is necessary.
How can I tell if my dryer vent is clogged?
Signs of a clogged vent include longer drying times, a burning smell, excessive lint buildup, and a hotter-than-normal dryer. If your laundry room feels more humid or your energy bills spike, it’s time to check your vent.
Is it worth hiring a professional for dryer vent cleaning?
Hiring a professional can be beneficial, especially for deep cleanings or if you’re unsure about inspecting the vent yourself. Professionals have specialized tools and expertise to ensure thorough cleaning and identify potential issues.
What are the dangers of a clogged dryer vent?
A clogged dryer vent can lead to dangerous overheating, which increases the risk of fire. The U.S. Fire Administration highlights that failure to clean dryer vents is a leading cause of home laundry room fires. In addition to fire hazards, a clogged vent can lead to carbon monoxide poisoning if the dryer is gas-powered and ventilation is improperly configured.
How can I prevent my dryer vent from clogging?
To prevent clogs, regularly clean your lint trap after each use, avoid overloading your dryer, and ensure that the venting system is properly installed without sharp bends. Additionally, consider installing a vent cap with a screen to keep out debris, and schedule regular maintenance checks.
What should I do if the vent cleaning doesn’t resolve the issue?
If cleaning the vent does not alleviate the problems you’re experiencing, such as long drying times or strange smells, you might need to have a professional inspect your dryer. There could be internal issues with the dryer itself or blockages further down the venting system that require specialized tools to access.
Overall, dryer vent cleaning is a crucial aspect of appliance maintenance that shouldn’t be overlooked. By following these steps, you can ensure your dryer operates efficiently, reduce the risk of fire hazards, and keep your home safe.
13. Economic Benefits of Dryer Vent Cleaning
Investing in your dryer vent cleaning doesn’t just keep your family safe; it can also be a smart economic decision. A clean dryer vent can significantly reduce your energy consumption. According to the U.S. Department of Energy, a dryer uses around 3.3 kWh per load when functioning efficiently. If your vent is clogged, it can take twice as long to dry clothes, effectively doubling your energy costs per load.
For households that do several loads of laundry a week, these costs can add up quickly. An average household might spend an additional $100 to $300 a year on energy bills due to inefficient dryer operation caused by clogged vents. In contrast, maintaining your dryer can extend its lifespan, potentially saving you hundreds if not thousands on premature replacements.
14. Environmental Impact of Clogged Dryer Vents
Maintaining a clean dryer vent is not only beneficial for your pocketbook but also for the environment. When dryers operate inefficiently due to clogged vents, they consume more energy, which can increase greenhouse gas emissions if those energy sources are fossil fuels. By keeping your dryer vent clean, you’re not just promoting the health of your appliance, but also playing a part in reducing your household’s carbon footprint.
For those who are environmentally conscious, regular dryer vent cleaning is a step you can take towards a more sustainable lifestyle. Saving energy means less strain on power plants and, ultimately, a positive impact on the environment.
15. How to Choose a Professional Dryer Vent Cleaning Service
If you decide to hire a professional for dryer vent cleaning, selecting a reputable service is crucial. Look for companies that are certified by the National Air Duct Cleaners Association (NADCA), as they adhere to industry standards for safety and quality. Reading customer reviews and checking for insurance can also guide you to a reliable service.
Ask potential companies about their cleaning methods and the tools they use. A thorough cleaning should involve not just vacuuming but also brushing and inspecting the entire system for any issues. Inquire about their experience specifically with dryer vents, as this specialization can make a significant difference in the quality of service you receive.
Ultimately, investing in professional services can save you time and provide peace of mind that your dryer is in safe working condition.
“`
Trending Now
Frequently Asked Questions
How often should you clean your dryer vent?
It is recommended to clean your dryer vent at least once a year. However, if you notice longer drying times or excessive lint buildup, you should clean it more frequently. Regular maintenance not only enhances efficiency but also helps prevent potential fire hazards.
What are the signs of a clogged dryer vent?
Common signs of a clogged dryer vent include longer drying times, clothes coming out damp after a cycle, a burning smell, and excessive lint buildup around the lint trap. If your laundry room feels unusually humid, it may also indicate a blockage.
Can a clogged dryer vent cause a fire?
Yes, a clogged dryer vent is a leading cause of dryer-related fires. Lint buildup restricts airflow, causing the dryer to overheat. Regular cleaning is crucial to prevent this hazard and ensure the safe operation of your dryer.
How do you clean a dryer vent?
To clean a dryer vent, first unplug the dryer and disconnect the vent hose. Use a vent cleaning brush to remove lint buildup from the vent. Additionally, vacuum the area around the dryer and reassemble everything securely before plugging it back in and testing.
Does cleaning the dryer vent save energy?
Yes, cleaning the dryer vent can significantly save energy. A clean vent allows for better airflow, which helps the dryer operate more efficiently. This can reduce drying times and ultimately lower your energy bills.
What’s your take on this? Share your thoughts in the comments below — we read every one.