The Tech Edvocate

Top Menu

  • Advertisement
  • Apps
  • Home Page
  • Home Page Five (No Sidebar)
  • Home Page Four
  • Home Page Three
  • Home Page Two
  • Home Tech2
  • Icons [No Sidebar]
  • Left Sidbear Page
  • Lynch Educational Consulting
  • My Account
  • My Speaking Page
  • Newsletter Sign Up Confirmation
  • Newsletter Unsubscription
  • Our Brands
  • Page Example
  • Privacy Policy
  • Protected Content
  • Register
  • Request a Product Review
  • Shop
  • Shortcodes Examples
  • Signup
  • Start Here
    • Governance
    • Careers
    • Contact Us
  • Terms and Conditions
  • The Edvocate
  • The Tech Edvocate Product Guide
  • Topics
  • Write For Us
  • Advertise

Main Menu

  • Start Here
    • Our Brands
    • Governance
      • Lynch Educational Consulting, LLC.
      • Dr. Lynch’s Personal Website
      • Careers
    • Write For Us
    • The Tech Edvocate Product Guide
    • Contact Us
    • Books
    • Edupedia
    • Post a Job
    • The Edvocate Podcast
    • Terms and Conditions
    • Privacy Policy
  • Topics
    • Assistive Technology
    • Child Development Tech
    • Early Childhood & K-12 EdTech
    • EdTech Futures
    • EdTech News
    • EdTech Policy & Reform
    • EdTech Startups & Businesses
    • Higher Education EdTech
    • Online Learning & eLearning
    • Parent & Family Tech
    • Personalized Learning
    • Product Reviews
  • Advertise
  • Tech Edvocate Awards
  • The Edvocate
  • Pedagogue
  • School Ratings

logo

The Tech Edvocate

  • Start Here
    • Our Brands
    • Governance
      • Lynch Educational Consulting, LLC.
      • Dr. Lynch’s Personal Website
        • My Speaking Page
      • Careers
    • Write For Us
    • The Tech Edvocate Product Guide
    • Contact Us
    • Books
    • Edupedia
    • Post a Job
    • The Edvocate Podcast
    • Terms and Conditions
    • Privacy Policy
  • Topics
    • Assistive Technology
    • Child Development Tech
    • Early Childhood & K-12 EdTech
    • EdTech Futures
    • EdTech News
    • EdTech Policy & Reform
    • EdTech Startups & Businesses
    • Higher Education EdTech
    • Online Learning & eLearning
    • Parent & Family Tech
    • Personalized Learning
    • Product Reviews
  • Advertise
  • Tech Edvocate Awards
  • The Edvocate
  • Pedagogue
  • School Ratings
  • The Brutal Truth: 8 Lies Scammers Tell About Your Student Loans

  • New Student Loan Rules: The Shocking Truth About 2026 Relief Programs

  • New Repayment Plan Changes Trigger Student Loan Scam Epidemic

  • Why Millions Are Ditching Degrees for This One Skill-Boosting Secret

  • The Quiet Revolution: How Micro-Credentials Are Reshaping Tech Careers

  • Why 96% of Employers Are Now Demanding Micro-Credentials

  • This One Incident Exposed How Vulnerable Your Student Data Really Is

  • The Brutal Truth About EdTech Security: 10 Solutions to Prevent Another Canvas LMS Disaster

  • The Billion-User Data Heist: Why Your Child’s School Data Is Under Attack

  • This Crucial Mistake Is Killing Your Tech Career (It’s Not What You Think)

Digital & Mobile Technology
Home›Digital & Mobile Technology›How to Add a Power Button to Your Raspberry Pi

How to Add a Power Button to Your Raspberry Pi
By Matthew Lynch
June 26, 2023
0
Spread the love

Are you tired of having to unplug your Raspberry Pi every time you need to shut it down or reboot it? Adding a power button to your Raspberry Pi can make it much easier and more convenient to control your device. In this article, we’ll show you how to add a power button to your Raspberry Pi’s GPIO pins.

Step 1: Gather Your Materials

To add a power button to your Raspberry Pi, you’ll need the following materials:

– A push button switch
– Two male-to-female jumper wires
– A soldering iron and solder
– Electrical tape (optional)

Step 2: Connect the Button to the GPIO Pins

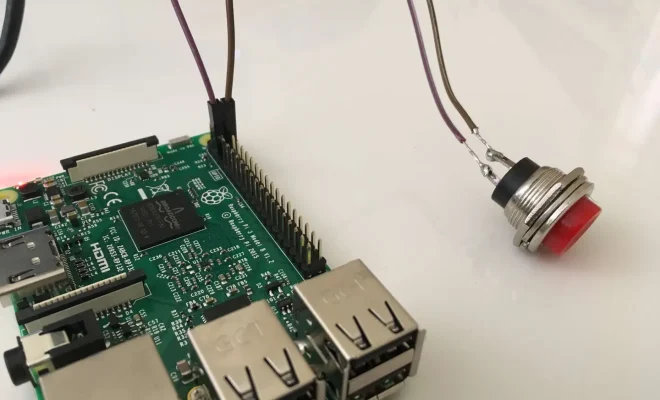
The first step is to connect the push button switch to the four GPIO pins on your Raspberry Pi. Here’s how to do it:

1. Connect one jumper wire to the first GPIO pin on your Raspberry Pi (pin 2).

2. Connect the other end of the jumper wire to one of the terminals on the push button switch.

3. Connect the second jumper wire to the third GPIO pin on your Raspberry Pi (pin 4).

4. Connect the other end of the jumper wire to the other terminal on the push button switch.

Step 3: Solder the Wires to the Switch

The next step is to solder the two jumper wires to the two terminals on the push button switch. This will ensure a secure connection. Be sure to heat up the soldering iron and apply solder to the wires and the switch to create a strong bond.

Step 4: Test the Power Button

After you’ve finished soldering the wires to the switch, test the power button to ensure it’s connected properly. To test it out, simply press the button and check if the Raspberry Pi turns off. If it does not turn off, you might have to check if the wires are connected properly.

Step 5: Put Everything Together

After you’ve tested the power button and made sure it’s connected properly, assemble everything together. Add some electrical tape to the top of the button to hold the wires and the switch together.

Final Thoughts

Adding a power button to your Raspberry Pi is a simple and convenient way to control your device. With the steps above, you can easily add a push button switch to your Raspberry Pi’s GPIO pins and have a more convenient way to shut down or reboot your device without having to unplug it.


Previous Article

Raspberry Pi 400 Review

Next Article

Raspberry Pi 4 and Raspberry Pi 400: ...

Matthew Lynch

Related articles More from author

  • Digital & Mobile Technology

    How to Calibrate Your Monitor in Windows 11

    May 19, 2023
    By Matthew Lynch
  • Digital & Mobile Technology

    How to Export Chrome Bookmarks

    May 28, 2023
    By Matthew Lynch
  • Digital & Mobile Technology

    What Is Email aka Electronic Mail?

    July 24, 2023
    By Matthew Lynch
  • Digital & Mobile Technology

    Best Mobile VPN

    April 11, 2023
    By Matthew Lynch
  • Digital & Mobile Technology

    How to Sync a Phone to a PS3

    May 10, 2023
    By Matthew Lynch
  • Digital & Mobile Technology

    What is CouchDB?

    May 6, 2023
    By Matthew Lynch

Search

Login & Registration

  • Log in
  • Entries feed
  • Comments feed
  • WordPress.org

Newsletter

Signup for The Tech Edvocate Newsletter and have the latest in EdTech news and opinion delivered to your email address!

About Us

Since technology is not going anywhere and does more good than harm, adapting is the best course of action. That is where The Tech Edvocate comes in. We plan to cover the PreK-12 and Higher Education EdTech sectors and provide our readers with the latest news and opinion on the subject. From time to time, I will invite other voices to weigh in on important issues in EdTech. We hope to provide a well-rounded, multi-faceted look at the past, present, the future of EdTech in the US and internationally.

We started this journey back in June 2016, and we plan to continue it for many more years to come. I hope that you will join us in this discussion of the past, present and future of EdTech and lend your own insight to the issues that are discussed.

Newsletter

Signup for The Tech Edvocate Newsletter and have the latest in EdTech news and opinion delivered to your email address!

Contact Us

The Tech Edvocate
910 Goddin Street
Richmond, VA 23231
(601) 630-5238
[email protected]

Copyright © 2026 Matthew Lynch. All rights reserved.