Pose-to-Pose Animation: A Step-by-Step Guide for Beginners
Animation has come a long way since the early days of hand-drawn frames. With the advent of digital tools, it’s now possible to create stunning animations with ease. Pose-to-pose animation is one such technique that’s widely used by animators all around the world. In this article, we’ll discuss what pose-to-pose animation is, why it’s important, and how you can create it yourself in a few easy steps.
What is Pose-to-Pose Animation?
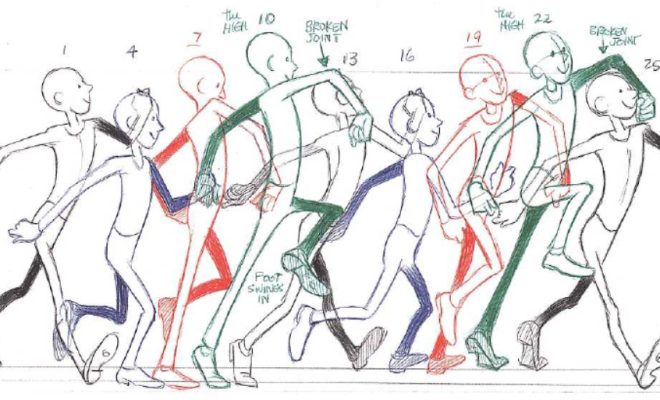
Pose-to-pose animation, also known as keyframe animation, is a technique where the animator creates key poses first and then fills in the details of the animation between these poses. This technique allows the animator to create complex animations with fewer frames and less effort than traditional frame-by-frame animation. It’s widely used in 3D animations, video games, and films.
Why is Pose-to-Pose Animation Important?
Pose-to-pose animation is an essential technique in the animation industry because it enables animators to create complex animations with a fraction of the time and effort required for traditional frame-by-frame animation. This means projects can be completed faster without sacrificing quality. It also allows for greater flexibility in editing, as key poses can be adjusted without having to change every frame in between.
Step-by-Step Guide for Creating Pose-to-Pose Animations
Now that we’ve covered what pose-to-pose animation is and why it’s important, let’s take a look at how you can create your own.
Step 1: Plan your animation – Before you start animating, it’s important to plan your animation. Sketch out your key poses, and plan out the timing and pacing of your animation. This will help you avoid mistakes later and ensure that your animation flows smoothly.
Step 2: Create Key Poses – Using your plan as a guide, create your key poses. These are the most important poses that capture the essence of your animation. You can use reference images to help you get the poses right.
Step 3: Add Breakdown Poses – Once you have your key poses, add in the breakdown poses, which are the poses that come between your key poses. These are the poses that help to smooth out the animation and make it look more natural.
Step 4: Inbetweening – Once you have your key and breakdown poses in place, it’s time to add the in-between poses. These are the poses that fill in the gaps between your key and breakdown poses. Use your animation software’s tools to help you create these in-between poses.
Step 5: Refine – Once you have all your poses in place, it’s time to refine your animation. Check the timing and pacing to ensure it’s consistent, and adjust the poses where necessary. Play back your animation to see how it looks, and make any necessary changes.
Step 6: Finalize – When you’re happy with your animation, it’s time to finalize it. This involves cleaning up your animation, adding any finishing touches, and rendering it out to a final format so that it can be used in your project.