How to wire light switch
“`html
When it comes to home improvement projects, few tasks are as practical and rewarding as wiring a light switch. Not only does this skill enable you to customize your lighting to suit your home’s ambiance, but it also helps you save on electrician costs. In this comprehensive guide, we’ll explore how to wire a light switch, covering the necessary tools, safety precautions, various switch types, and step-by-step instructions that will empower you to tackle this task with confidence.
1. Understanding the Basics of Light Switches
Before diving into the technical details of how to wire a light switch, it’s crucial to understand the components involved. A light switch is essentially a device that controls the flow of electricity to your light fixture. The switch can either allow or interrupt this flow, effectively turning the light on or off. Understanding how electricity travels through your home’s wiring system is fundamental.
Most homes are equipped with either single-pole or three-way switches. A single-pole switch controls one light from one location, while a three-way switch allows control from two different locations. Knowing which type you’re dealing with is essential to successfully wiring your switch.
There are also special switch types such as dimmer switches and smart switches that allow for more features, such as adjusting brightness or remote control via apps. As you learn how to wire a light switch, it’s beneficial to consider what kind of switch will best suit your needs.
2. Gathering the Right Tools and Materials
Before embarking on your light switch wiring project, you’ll need to gather the appropriate tools and materials. Here’s a quick checklist:
- Wire stripper
- Screwdriver (flathead and Phillips)
- Voltage tester
- Electrical tape
- Wire connectors
- New light switch (single-pole or three-way)
- Safety goggles and gloves
Having the right tools on hand not only speeds up the process but also ensures your safety as you work. Make sure your tools are in good condition to avoid accidents. Additionally, consider keeping a multimeter handy to measure voltage and check for continuity in your electrical system.
3. Safety First: Essential Precautions
Safety should always be your top priority when working with electricity. Start by turning off the power to the circuit you’ll be working on. Locate your home’s circuit breaker panel and turn off the appropriate breaker. Use a voltage tester to ensure that the power is off before touching any wires.
Additionally, wearing safety goggles and gloves is recommended to protect yourself from debris and accidental electrical contact. Remember, if you’re ever in doubt about your safety or abilities, it’s best to consult with a licensed electrician.
It’s also helpful to let others in your home know that you’ll be working on the electrical system. A simple sign on the breaker panel can remind everyone to avoid turning the power back on while you’re working.
4. Identifying the Wiring Setup
Before you can successfully wire a light switch, it’s important to familiarize yourself with the existing wiring setup. Typically, you’ll encounter two main types of wires: the hot wire and the neutral wire. The hot wire, which is usually black or red, carries the current to the switch. The neutral wire is typically white and returns the current to the power source. (See: Understanding electric switches.)
In a single-pole switch, you would generally find two wires connected: the hot wire coming from the power source and another hot wire running to the light fixture. In a three-way switch configuration, you’ll also find traveler wires that connect to another switch. Understanding this setup is key to knowing how to wire a light switch effectively.
It’s also worth noting that in some older homes, you might encounter additional wiring types such as knob-and-tube wiring or aluminum wiring, which may require different handling and safety considerations.
5. Step-by-Step: Wiring a Single-Pole Switch
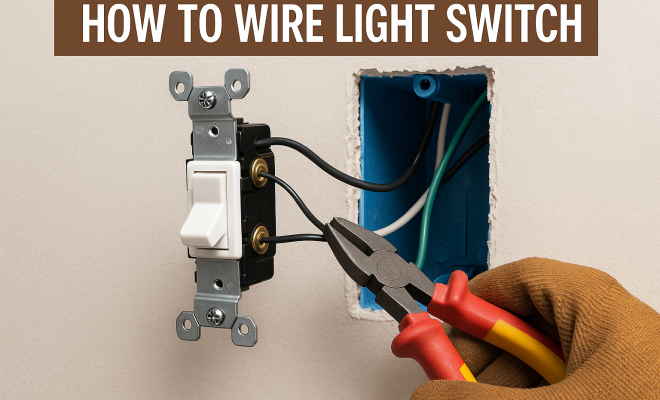
Now that you have a good grasp of the basics, let’s get into the nitty-gritty of how to wire a light switch, starting with a simple single-pole switch. Follow these steps:
- Remove the Old Switch: Unscrew the cover plate and the switch itself from the electrical box. Carefully pull the switch out without damaging the wires.
- Disconnect the Wires: Take note of where each wire is connected. Label them if necessary. Disconnect the wires from the old switch.
- Connect the New Switch: Attach the hot wire (black or red) to one of the brass screws on the new switch. Connect the other wire to the remaining brass screw. Use wire connectors to secure any loose wires.
- Secure Everything: Push the switch back into the electrical box, ensuring no wires are pinched. Screw the switch and cover plate back on.
- Turn the Power Back On: Finally, turn the breaker back on and test your new switch.
That’s it! You’ve successfully wired a single-pole switch. If you want to add more functionality, consider installing a dimmer switch instead of a standard one.
6. Step-by-Step: Wiring a Three-Way Switch
Wiring a three-way switch can be a bit more complex but is entirely manageable with the right guidance. Here’s how to do it:
- Remove the Existing Switch: Just like with the single-pole switch, you’ll begin by removing the cover plate and unscrewing the old switch.
- Identify the Wires: You will typically see three wires connected to a three-way switch: one common terminal and two traveler terminals. Make a note of how these wires are connected.
- Connect the New Switch: Attach the common wire to the common terminal on the new switch. Connect the traveler wires to the corresponding traveler terminals. Again, use wire connectors for any additional wires.
- Secure and Test: Push the switch back into the box and screw everything into place. Restore power and test your new setup.
Congratulations! You’re now equipped with the knowledge of how to wire a three-way switch. If you’re planning on adding more three-way switches to the circuit, you’ll need to connect them in a similar manner to allow control from multiple locations.
7. Common Wiring Mistakes to Avoid
Even seasoned DIYers can make mistakes when wiring a light switch. Understanding common missteps can help you avoid unnecessary headaches. Here are a few pitfalls:
- Assuming Wire Colors Indicate Function: While black wires are typically hot and white wires are neutral, there are exceptions. Always verify with a voltage tester.
- Not Labeling Wires: Especially in three-way switches, failing to label wires can create confusion during reassembly. Always label wires when disconnecting them.
- Overtightening Connections: While you want a solid connection, overtightening can damage wires and lead to short circuits. Use only moderate pressure.
- Neglecting Ground Wires: Always ensure that ground wires are securely attached to the switch to avoid electrical shock.
- Forgetting to Test: After completing your work, always make it a point to test the switch before you replace the cover plate to ensure everything is functioning properly.
By being aware of these common mistakes, you can ensure a smoother, more successful wiring experience. Learning from others’ errors can save you time and effort.
8. When to Call a Professional
While many homeowners are perfectly capable of wiring their light switches, there are certain situations where it’s wiser to call in a professional. If you encounter any of the following scenarios, it might be time to consult with an electrician:
- If you find wiring that appears burnt or damaged
- If you’re unsure about the voltage or amperage of your circuit
- If you need to install additional outlets or make significant changes to your home’s electrical system
- If your home has outdated wiring methods that don’t conform to modern standards
- If you’re working in a wet area like a bathroom or kitchen and need GFCI protection
In these cases, hiring a licensed electrician can save you time and ensure safety, as they possess the expertise needed to handle complex electrical issues. It’s better to err on the side of caution when it comes to electricity. (See: Electrical safety guidelines.)
9. The Importance of Local Codes and Regulations
Before you start any electrical project, it’s essential to be aware of local building codes and regulations. Electrical codes can vary significantly depending on your location, and adhering to these codes is critical for safety and compliance.
For example, some jurisdictions require specific wire gauges for certain circuits or mandate the use of GFCI (Ground Fault Circuit Interrupter) outlets in wet areas. Ignoring these regulations can lead to not only safety hazards but also legal ramifications, especially if you plan to sell your home. Always check with your local building department or a qualified electrician to ensure your project meets all necessary codes.
Being informed about local codes can also influence your choice of materials and methods, so it’s worth doing thorough research before you begin your project.
10. Advanced Wiring Techniques and Options
Once you’ve mastered the basics of how to wire a light switch, you might want to explore advanced wiring techniques. For instance, installing smart switches can add convenience to your home. These switches can be controlled remotely via your smartphone or voice commands, allowing you to operate your lights from anywhere.
Additionally, consider learning how to wire multiple lights to a single switch. This can be a great way to create more dramatic lighting effects or to control lighting in larger rooms with a single switch. You can connect multiple fixtures in parallel to ensure that they all light up simultaneously.
Another advanced project could involve adding motion sensors to your light switches. This can enhance energy efficiency and convenience, especially in places like hallways or bathrooms where lights are often left on unnecessarily.
11. Helpful Resources and Further Learning
If you’re keen on developing your skills further, there are plenty of resources available. Online platforms like YouTube offer a wealth of video tutorials that demonstrate the wiring process visually, which can be particularly helpful. You might also consider books on home wiring that cover electrical principles and safety protocols comprehensively.
Community colleges often offer courses on basic wiring and home improvement, which can provide you with hands-on experience under the guidance of an instructor. Engaging in these classes not only builds confidence but also connects you with local DIY enthusiasts.
12. Frequently Asked Questions (FAQs)
Here are some common questions people have when learning how to wire a light switch: (See: Installing a light switch guide.)
- Can I wire a light switch if I have no prior experience? Yes, with proper research and adherence to safety guidelines, you can successfully wire a light switch, but always prioritize safety and consult a professional if unsure.
- What should I do if I’m unsure which wire is which? If you’re uncertain, it’s critical to use a voltage tester to identify hot and neutral wires accurately.
- Is it safe to work on electrical systems during rainy weather? It’s not advisable to work on electrical systems in wet conditions, as this increases the risk of electric shock.
- How can I tell if my switch is malfunctioning? Signs of a malfunctioning switch include flickering lights, a buzzing sound, or difficulty in turning the switch on or off.
- What type of light switch should I use for LED lights? Make sure to use LED-compatible dimmer switches if you plan on using dimmers with LED lighting; standard dimmers may not work effectively.
13. Understanding Different Power Sources
When wiring light switches, it helps to comprehend the various power sources that may be involved. Residential electrical systems typically use alternating current (AC), which is what powers most of your household fixtures. It’s also essential to recognize that circuits may be powered from different sources, such as a dedicated line from the breaker box or a branch circuit from another line.
In some cases, you might have a switch that operates in a loopback setup, which can be a bit tricky for beginners. This involves wiring the switch in such a way that it sends power back to another point in the circuit rather than directly to a fixture. Understanding these intricacies can help you diagnose issues that may arise during installation.
14. Switching to Smart Technology
The rise of smart technology has transformed how we think about controlling our home’s lighting. Smart switches often integrate with home automation systems, enabling you to control lights not only from a physical switch but also through mobile apps and smart assistants like Amazon Alexa or Google Assistant. This adds a layer of convenience, allowing you to control lighting from anywhere.
When considering smart switches, ensure they are compatible with your existing wiring and that you understand any additional requirements they may entail, such as wiring them to a neutral wire if required. These switches also often come with features like scheduling and energy usage reports, making them an appealing option for modern homes.
15. Considerations for Outdoor Lighting
If you’re planning to wire outdoor lighting, additional considerations come into play. Outdoor switches should be weatherproof and comply with local electrical codes for exterior installations. You’ll likely need GFCI protection for outdoor circuits to protect against moisture and prevent electrical shock.
Outdoor lighting setups can also include timers and photocells to automate lighting based on time or daylight. For example, landscape lighting can be set to automatically turn on at dusk and off at dawn, enhancing both the safety and aesthetics of your outdoor spaces.
16. Final Thoughts on Wiring a Light Switch
By equipping yourself with the knowledge of how to wire a light switch, you’re not just learning a valuable skill — you’re taking charge of your home’s lighting and electrical system. Whether you’re changing out an old fixture or expanding your lighting options, this guide has provided the foundational steps you need. Remember to prioritize safety, know your limits, and don’t hesitate to call in a professional when necessary. Happy wiring!
“`
Trending Now
Frequently Asked Questions
What tools do I need to wire a light switch?
To wire a light switch, you'll need a wire stripper, screwdrivers (both flathead and Phillips), a voltage tester, electrical tape, wire connectors, and safety gear like goggles and gloves. Additionally, ensure you have the correct type of light switch, whether it's a single-pole or three-way switch.
How do I know which type of light switch to use?
The type of light switch you choose depends on your needs. A single-pole switch controls one light from one location, while a three-way switch allows control from two locations. Consider how you want to manage your lighting to select the appropriate switch type.
What safety precautions should I take when wiring a light switch?
Before wiring a light switch, always turn off the power at the circuit breaker to prevent electrical shock. Use a voltage tester to ensure that the wires are not live, and wear safety goggles and gloves to protect yourself during the installation process.
Can I install a dimmer switch instead of a regular switch?
Yes, you can install a dimmer switch instead of a regular switch. Dimmer switches allow you to adjust the brightness of your lights, adding flexibility to your lighting setup. Ensure that the dimmer is compatible with your light fixtures and wattage requirements.
What is the difference between a single-pole and a three-way switch?
A single-pole switch controls one light from a single location, while a three-way switch allows you to control the same light from two different locations. This is useful for larger spaces or hallways where multiple access points to the light are desired.
What did we miss? Let us know in the comments and join the conversation.