How to use Adobe Premiere Pro
“`html
Adobe Premiere Pro stands as a leading choice for video editing among professionals and enthusiasts alike. Whether you’re crafting a short video for social media or editing a full-length film, this software offers the tools and capabilities to bring your vision to life. In this Adobe Premiere Pro tutorial, we’ll explore the most important aspects of this powerful program, providing insights and practical advice to streamline your editing process.
1. Getting Started with Adobe Premiere Pro
Before diving into the intricacies of video editing, it’s crucial to understand how to set up a project in Adobe Premiere Pro. After launching the application, you’ll be greeted with a welcome screen that allows you to create a new project or open an existing one. Select ‘New Project’ to begin.
During this step, you’ll be prompted to name your project and choose a location on your computer to save it. It’s beneficial to select a drive with ample storage space, especially if you’re working with high-resolution footage. Additionally, familiarize yourself with the project settings, including the sequence settings that determine the resolution and frame rate of your final edit.
2. Understanding the Interface
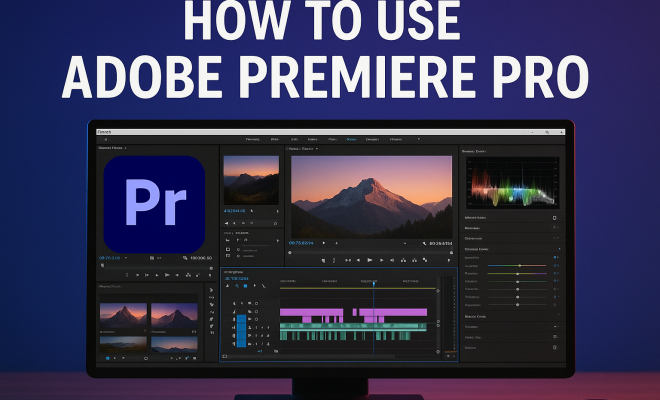
The layout of Adobe Premiere Pro may seem daunting at first, but breaking it down can help you navigate more efficiently. The workspace is divided into several panels: the Project panel for your media files, the Timeline for arranging clips, and the Program Monitor for previewing your edits.
Utilizing the Workspace menu, you can customize your panels according to your editing needs. For instance, if you’re working on audio, switching to the ‘Audio’ workspace will bring relevant tools and features to the forefront, enhancing your editing experience.
3. Importing Media
Once you have your project set up, it’s time to import media files. You can do this by selecting ‘File’ > ‘Import’ or simply dragging files directly into the Project panel. Adobe Premiere Pro supports a wide variety of formats, making it flexible for different projects. To keep your project organized, consider creating bins within the Project panel to categorize clips, audio, images, and other assets.
Understanding the importance of media management cannot be overstated. As your project evolves, keeping track of your assets will save you time and frustration. You might also want to take advantage of Premiere Pro’s proxy workflow, particularly if you’re editing high-resolution files that may slow down your workflow.
4. Editing Basics: Cutting and Arranging Clips
With your media imported, the next step is editing your clips. The Razor Tool is a fundamental feature for cutting clips on the Timeline. By selecting the Razor Tool (or pressing ‘C’), you can slice clips into manageable segments. This is particularly useful for removing unwanted sections or isolating the best takes.
Arranging clips on the Timeline is where your storytelling begins. Dragging and dropping clips allows you to build your narrative structure. Adobe Premiere Pro’s snapping feature ensures that clips align seamlessly on the timeline, facilitating a smoother editing process. Remember to utilize keyboard shortcuts to speed up your workflow, as they can significantly enhance your efficiency.
5. Adding Transitions and Effects
Transitions and effects can elevate your video, adding polish and professionalism. Adobe Premiere Pro offers a plethora of options, from simple cross dissolves to more elaborate effects. To add a transition, navigate to the Effects panel, find your desired transition, and drag it between two clips on the Timeline.
Additionally, the Effects Control panel allows for fine-tuning of applied effects. Here, you can adjust parameters such as duration, opacity, and scale. Experimenting with effects not only enhances your video but also gives it a unique identity. However, moderation is key; overuse of effects can distract from your core message. (See: Adobe Premiere Pro overview.)
6. Audio Editing and Mixing
Often an overlooked aspect of video editing, audio can make or break your project. Adobe Premiere Pro has robust audio editing features that allow you to adjust levels, add effects, and even mix multiple audio tracks. Start by ensuring that your audio levels are balanced. Use the Audio Meter to monitor levels and avoid peaking, which can lead to distortion.
For more advanced audio control, explore the Essential Sound panel. This panel simplifies audio editing, providing presets for dialogue, music, sound effects, and ambiance. By tagging your audio clips correctly, Premiere Pro automates many processes, making your audio editing more efficient.
7. Color Correction and Grading
Color correction and grading are vital for establishing the mood and tone of your video. Adobe Premiere Pro offers powerful tools within the Lumetri Color panel that allow for precise color adjustments. Start with basic corrections like exposure, contrast, and white balance to ensure that your footage looks natural.
Once base corrections are made, delve into creative grading to give your video a unique look. Using the Color Wheels and the Curves panel, you can manipulate shadows, midtones, and highlights effectively. Color grading can also evoke emotional responses from viewers, enhancing the storytelling aspect of your project.
8. Exporting Your Project
With your edit complete, it’s time to export your project. Choose ‘File’ > ‘Export’ > ‘Media’ to open the export settings. Here, you can select the desired format and codec for your final output. Common formats include H.264 for web use and QuickTime for high-quality projects.
Additionally, consider the resolution and frame rate that aligns with your distribution platform. For instance, social media often favors 1080p resolutions, whereas cinema may require 4K. Adobe Media Encoder can also be utilized for batch processing, allowing you to export multiple projects simultaneously, saving you valuable time.
9. Advanced Techniques and Tips
As you become more comfortable with Adobe Premiere Pro, it’s beneficial to explore advanced techniques. For instance, using nested sequences allows for organizing complex edits within one sequence, making adjustments easier without cluttering the timeline. Keyframing enables dynamic animations, adding movement to still images or text.
Moreover, integrating Adobe Premiere Pro with other Adobe Creative Cloud applications can enhance your workflow. For instance, you can utilize After Effects for motion graphics and animated titles, importing them directly into your Premiere Pro project. This synergy between programs can lead to stunning visual results and streamline your production process.
10. Staying Current and Learning More
The world of video editing and software is constantly evolving, and so is Adobe Premiere Pro. Staying informed about the latest updates and features will keep your skills sharp and your edits fresh. Adobe frequently releases new tools and improvements, so consider following Adobe’s official blog or forums to stay connected with the community.
Furthermore, there are countless resources available, from online tutorials to community forums, where you can exchange tips and techniques with fellow users. Engaging with other creators not only enhances your skill set but can also inspire you to experiment and push the boundaries of your editing projects.
11. Common Challenges and Solutions
Video editing can sometimes be challenging, especially when you’re new to Adobe Premiere Pro. Here are a few common problems users face along with effective solutions.
11.1 Performance Issues
One of the frequent issues users encounter is performance lag, especially when working with high-definition footage. To address this, try the following: (See: Using Adobe software for health communication.)
- Use Proxies: If you’re editing 4K footage, consider using proxy files. Proxies are lower-resolution versions of your clips that enable smoother playback during editing.
- Clear Cache: Regularly clearing your media cache can help improve performance. Go to ‘Preferences’ > ‘Media Cache’ to manage your cache settings.
- Optimize Your Hardware: Ensure your computer meets Adobe Premiere Pro’s recommended specifications, and consider upgrading your RAM or GPU for a better experience.
11.2 Exporting Issues
Sometimes users encounter problems during the export process. Here are quick fixes:
- Check Sequence Settings: Make sure your sequence settings match your export settings to avoid any discrepancies.
- Update Your Software: Ensure you’re using the latest version of Adobe Premiere Pro and Adobe Media Encoder to avoid bugs.
- Use Queue for Long Exports: If your export is taking too long, use Adobe Media Encoder to queue your exports. This allows you to continue working while your video renders in the background.
12. Frequently Asked Questions (FAQ)
Here are some of the most frequently asked questions about using Adobe Premiere Pro.
12.1 What are the system requirements for Adobe Premiere Pro?
Adobe Premiere Pro requires a multi-core processor with 64-bit support, a minimum of 8GB of RAM (16GB or more is recommended), and a GPU with DirectX 12 support. Additionally, having a solid-state drive is beneficial for speed.
12.2 Can I use Adobe Premiere Pro for free?
Adobe offers a free trial for Adobe Premiere Pro, allowing you to explore its capabilities for a limited time. However, after the trial, you’ll need to subscribe to continue using the software.
12.3 How can I learn Adobe Premiere Pro quickly?
The best way to learn Adobe Premiere Pro is through practice, as well as utilizing online resources like YouTube tutorials, Adobe’s official tutorials, and community forums. Engaging with practical projects will help solidify your understanding of the software.
12.4 Can Adobe Premiere Pro handle 4K editing?
Yes, Adobe Premiere Pro is fully capable of handling 4K video editing. However, ensure your hardware is powerful enough to support such high-resolution editing, or consider using proxies for smoother performance.
12.5 Is Adobe Premiere Pro suitable for beginners?
Absolutely! While Adobe Premiere Pro has a steep learning curve, it offers many resources to help beginners get started. Following step-by-step tutorials, like this Adobe Premiere Pro tutorial, can make the learning process easier.
13. Advanced Workflow Tips
As you gain more experience with Adobe Premiere Pro, optimizing your workflow can significantly boost your efficiency. Here are some advanced tips to consider:
13.1 Keyboard Shortcuts
Mastering keyboard shortcuts is one of the best ways to speed up your editing process. Adobe Premiere Pro allows you to customize shortcuts according to your preferences. For instance, you can assign quick keys for frequently used tools or commands, enabling you to stay focused on your editing without unnecessary mouse movement. The default shortcuts can also be found in the menu, allowing you to familiarize yourself with the most essential commands.
13.2 Using Markers
Markers are incredibly useful for organizing your timeline. You can use markers to denote important points in your video, such as where a significant cut occurs or where specific effects should start and stop. To add a marker, simply navigate to the desired point in the timeline and press the ‘M’ key. You can also add comments to your markers for further clarification, making it easier to communicate with collaborators or remember your vision when returning to the project later. (See: New York Times article on video editing.)
13.3 Collaboration Tools
If you’re working in a team, Premiere Pro offers collaboration features that make it easier to share projects and assets. Adobe’s Team Projects allows multiple users to work on the same project simultaneously, ensuring everyone is updated and connected in real time. This can be a game-changer for larger productions where input from various team members is vital.
14. Learning Resources and Communities
Finding the right resources is key to mastering Adobe Premiere Pro. Luckily, there’s a wealth of information available for learning. Here are some recommended platforms:
14.1 Online Courses
Platforms like Udemy, Coursera, and LinkedIn Learning offer comprehensive courses tailored for all skill levels. Many of these courses include practical projects that can help solidify your knowledge. Look for courses that provide downloadable resources and assignments for hands-on practice.
14.2 YouTube Channels
YouTube is an incredible resource filled with free tutorials. Channels like Film Riot, Peter McKinnon, and Adobe Creative Cloud regularly post engaging and informative content. Watching these tutorials can provide insights into advanced techniques and creative tips that might not be covered in traditional courses.
14.3 Forums and Community Groups
Joining forums like Adobe’s official community or subreddits such as r/premiere can provide you with answers to your specific questions. Engaging in these communities will also expose you to different editing styles and techniques others are using, which can inspire you to try new approaches in your projects.
15. Future Updates and Features
Adobe Premiere Pro is continually evolving, with updates that introduce new features and enhancements. Keeping track of these updates can provide you with new tools that could streamline your editing process. Adobe’s Creative Cloud updates often include features based on user feedback, so it’s worth taking the time to familiarize yourself with the release notes and tutorials that accompany each update.
For instance, the introduction of AI tools like Adobe Sensei has made content-aware editing possibilities a reality, allowing editors to automate certain tasks and focus more on creative aspects. Watch for future updates that might include even more automation and intelligent editing features.
16. Conclusion
Mastering Adobe Premiere Pro is not just about understanding the features, but also about honing your creativity and storytelling abilities. This Adobe Premiere Pro tutorial is your roadmap to success, guiding you through the essential aspects of video editing. Whether you’re a novice or a seasoned editor, there’s always something new to learn in this dynamic environment.
“`
Trending Now
Frequently Asked Questions
What is Adobe Premiere Pro used for?
Adobe Premiere Pro is a powerful video editing software used by professionals and enthusiasts to create and edit videos. It provides tools for crafting everything from short social media clips to full-length films, allowing users to bring their creative visions to life.
How do I set up a project in Adobe Premiere Pro?
To set up a project in Adobe Premiere Pro, launch the application and select 'New Project' from the welcome screen. Name your project and choose a save location on your computer, ensuring you have enough storage space for your media files.
What are the main features of Adobe Premiere Pro?
Adobe Premiere Pro features a comprehensive user interface with panels like the Project panel for media files, the Timeline for arranging clips, and the Program Monitor for previewing edits. Users can customize their workspace to suit specific editing needs, enhancing workflow efficiency.
How do you import media into Adobe Premiere Pro?
To import media into Adobe Premiere Pro, you can either select 'File' > 'Import' from the menu or simply drag and drop your media files directly into the Project panel. This allows you to easily access and organize your footage for editing.
Can I customize the workspace in Adobe Premiere Pro?
Yes, you can customize the workspace in Adobe Premiere Pro using the Workspace menu. This allows you to arrange panels based on your editing needs, such as switching to an 'Audio' workspace when focusing on sound editing, to enhance your overall editing experience.
Have you experienced this yourself? We’d love to hear your story in the comments.