The Tech Edvocate

Top Menu

  • Advertisement
  • Apps
  • Home Page
  • Home Page Five (No Sidebar)
  • Home Page Four
  • Home Page Three
  • Home Page Two
  • Home Tech2
  • Icons [No Sidebar]
  • Left Sidbear Page
  • Lynch Educational Consulting
  • My Account
  • My Speaking Page
  • Newsletter Sign Up Confirmation
  • Newsletter Unsubscription
  • Our Brands
  • Page Example
  • Privacy Policy
  • Protected Content
  • Register
  • Request a Product Review
  • Shop
  • Shortcodes Examples
  • Signup
  • Start Here
    • Governance
    • Careers
    • Contact Us
  • Terms and Conditions
  • The Edvocate
  • The Tech Edvocate Product Guide
  • Topics
  • Write For Us
  • Advertise

Main Menu

  • Start Here
    • Our Brands
    • Governance
      • Lynch Educational Consulting, LLC.
      • Dr. Lynch’s Personal Website
      • Careers
    • Write For Us
    • The Tech Edvocate Product Guide
    • Contact Us
    • Books
    • Edupedia
    • Post a Job
    • The Edvocate Podcast
    • Terms and Conditions
    • Privacy Policy
  • Topics
    • Assistive Technology
    • Child Development Tech
    • Early Childhood & K-12 EdTech
    • EdTech Futures
    • EdTech News
    • EdTech Policy & Reform
    • EdTech Startups & Businesses
    • Higher Education EdTech
    • Online Learning & eLearning
    • Parent & Family Tech
    • Personalized Learning
    • Product Reviews
  • Advertise
  • Tech Edvocate Awards
  • The Edvocate
  • Pedagogue
  • School Ratings

logo

The Tech Edvocate

  • Start Here
    • Our Brands
    • Governance
      • Lynch Educational Consulting, LLC.
      • Dr. Lynch’s Personal Website
        • My Speaking Page
      • Careers
    • Write For Us
    • The Tech Edvocate Product Guide
    • Contact Us
    • Books
    • Edupedia
    • Post a Job
    • The Edvocate Podcast
    • Terms and Conditions
    • Privacy Policy
  • Topics
    • Assistive Technology
    • Child Development Tech
    • Early Childhood & K-12 EdTech
    • EdTech Futures
    • EdTech News
    • EdTech Policy & Reform
    • EdTech Startups & Businesses
    • Higher Education EdTech
    • Online Learning & eLearning
    • Parent & Family Tech
    • Personalized Learning
    • Product Reviews
  • Advertise
  • Tech Edvocate Awards
  • The Edvocate
  • Pedagogue
  • School Ratings
  • A Visitors Guide to Colorado Springs (CO), United States

  • 5 Pairs of Shoes That Will Instantly Step Your Shoe Game Up

  • Radiant Youthful Skin is the Perfect Christmas Gift

  • Give Your Loved One the Gift of Youthful, Radiant Skin this Christmas

  • Give Your Loved One the Gift of a Restful Night Sleep this Christmas

  • Nex Playground’s Holiday Sales Bring Active Play Indoors This Seaso

  • A Visitors Guide to Louisville (KY), United States

  • A Visitor’s Guide to Nashville-Davidson (TN), United States

  • A Visitors Guide to Portland (OR), United States

  • 7 Men’s Bruno Marc Shoes That Are the Perfect Christmas Gift

How To
Home›How To›How to Repair Grout: 9 Steps

How to Repair Grout: 9 Steps

By Matthew Lynch
March 6, 2024
0
Spread the love

Grout is an essential component of tiled surfaces, as it holds tiles in place and fills the gaps between them to prevent water and dirt from seeping in. However, over time, grout can crack, discolor, or become damaged due to various reasons. In this article, we will guide you through nine simple steps to repair your grout and restore the beauty of your tiled surfaces.

1. Gather the necessary tools and materials:

To repair grout, you will need a grout saw or utility knife, grout remover, vacuum or brush, sponge, gloves, safety goggles, pre-mixed grout or grout powder with water, and a rubber grout float or applicator.

2. Identify the areas that need repair:

Inspect your tiled surface carefully and identify the areas with damaged or cracked grout. Pay attention to the corners and edges where damage is more likely.

3. Remove the damaged grout:

Put on safety goggles and gloves before starting this process. Use a grout saw or a utility knife to gently scrape away the damaged grout from the joints. Be cautious not to damage the tiles during this process.

4. Clean the joints:

Once you have removed all damaged grout, use a vacuum cleaner or brush to remove any debris from the joints thoroughly. This step is crucial to ensure proper adhesion of the new grout.

5. Mix the new grout (if needed):

If you bought pre-mixed grout, you can skip this step. If you have powdered grout, follow the manufacturer’s instructions on mixing with water until it reaches a smooth consistency.

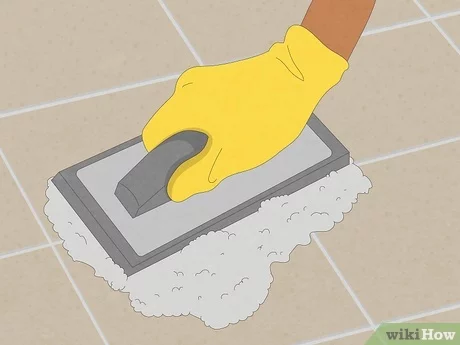
6. Apply the new grout:

Wearing gloves for protection against skin irritation caused by cement-based products, use a rubber float or applicator to apply your new grout into the cleaned joints. Compress as much as possible into each joint for proper adhesion.

7. Remove excess grout:

As you apply the new grout, you’ll likely see excess forming on the tiles’ surface. With your rubber float or applicator, carefully remove the excess grout by holding it at a 45-degree angle and sweeping diagonally across the tiles.

8. Finishing and cleaning:

Wait for the new grout to set, according to manufacturer recommendations (typically 15-30 minutes). Then, dampen a sponge and gently wipe away any grout haze from the surface of your tiles. Rinse your sponge often in clean water during this process to avoid spreading more residue onto other areas.

9. Allow the grout to cure:

Before using your newly repaired tiled surface (e.g., taking a shower or walking on a newly-grouted floor), follow the manufacturer’s curing time guidelines (usually 24-48 hours) to ensure proper adhesion and strength.

By following these nine steps, you can easily repair grout, restoring your tiled surfaces to their original beauty and ensuring they remain functional for years to come. Regular maintenance and proper cleaning will also help extend the life of your grout and keep your surfaces looking great.

Previous Article

How to Use AutoHotkey: 15 Steps

Next Article

How to Drive to the Basket: 14 ...

Matthew Lynch

Related articles More from author

  • How To

    6 Ways to File Taxes

    January 24, 2024
    By Matthew Lynch
  • How To

    Best No-Fee Chequing Accounts in Canada

    October 20, 2023
    By Matthew Lynch
  • How To

    How to Drill Plexiglass: 10 Steps

    October 10, 2023
    By Matthew Lynch
  • How To

    3 Ways to Pack Your Pods for an Efficient and Organized Move

    October 18, 2023
    By Matthew Lynch
  • How To

    3 Ways to Decorate a Diya

    April 9, 2024
    By Matthew Lynch
  • How To

    How to Create Barcodes in Word: 10 Steps

    January 23, 2024
    By Matthew Lynch

Search

Login & Registration

  • Register
  • Log in
  • Entries feed
  • Comments feed
  • WordPress.org

Newsletter

Signup for The Tech Edvocate Newsletter and have the latest in EdTech news and opinion delivered to your email address!

About Us

Since technology is not going anywhere and does more good than harm, adapting is the best course of action. That is where The Tech Edvocate comes in. We plan to cover the PreK-12 and Higher Education EdTech sectors and provide our readers with the latest news and opinion on the subject. From time to time, I will invite other voices to weigh in on important issues in EdTech. We hope to provide a well-rounded, multi-faceted look at the past, present, the future of EdTech in the US and internationally.

We started this journey back in June 2016, and we plan to continue it for many more years to come. I hope that you will join us in this discussion of the past, present and future of EdTech and lend your own insight to the issues that are discussed.

Newsletter

Signup for The Tech Edvocate Newsletter and have the latest in EdTech news and opinion delivered to your email address!

Contact Us

The Tech Edvocate
910 Goddin Street
Richmond, VA 23231
(601) 630-5238
[email protected]

Copyright © 2025 Matthew Lynch. All rights reserved.