How to Paint Ceramic Pots
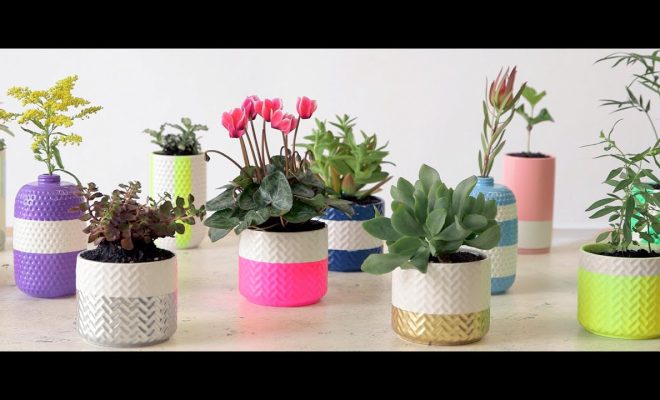
If you’re looking to add some personality and flair to your garden or indoor space, painting ceramic pots is a fantastic DIY project. With some creativity and a little effort, you can transform a plain ceramic pot into a one-of-a-kind piece of art. In this article, we’ll walk you through the process of painting ceramic pots step by step.
Materials Needed:
– Ceramic pots
– Acrylic paint
– Brushes of various sizes
– Water
– Paint palette or simple plate
– Sealant (optional)
– Painter’s tape (optional)
Step 1: Choose Your Pot and Prepare the Surface
Select a ceramic pot that suits your needs and creative vision. Make sure the pot is clean and dry before beginning. If there’s any dirt or debris on the surface, wipe it away with a damp cloth and let it dry completely.
Step 2: Choose Your Design and Colors
Decide on the design you’d like to paint on your ceramic pot. You can get inspiration from nature, geometric patterns, or abstract art – the possibilities are endless! Once you have an idea in mind, choose your acrylic paint colors accordingly.
Step 3: Set Up Your Workspace
Find a comfortable area with good lighting for painting. Cover your workspace with newspapers or an old cloth to protect surfaces from paint spills. Pour water into a container for brush cleaning, and squeeze your acrylic paints onto a palette or plate.
Step 4: Apply Painter’s Tape (optional)
If you’d like to create crisp lines in your design or need help with symmetry, use painter’s tape to mark out specific areas on your pot before you begin painting.
Step 5: Start Painting Your Design
Take a brush that suits the size and detail of the area you want to paint. Dip it into the desired color and begin applying it onto the ceramic pot. Use gentle strokes and a steady hand for an even application. If needed, apply multiple coats of paint, letting each layer dry before applying the next one.
Step 6: Add Details and Finishing Touches
Once you’ve completed the base of your design, use smaller brushes and contrasting colors to add details and finishing touches. This is your chance to let your creativity shine – feel free to experiment with different techniques, such as stippling or dry brushing.
Step 7: Let Your Pot Dry
Allow your painted ceramic pot ample time to dry, preferably overnight. This will ensure that the paint has set and won’t smudge or chip easily.
Step 8: Apply a Sealant (optional)
To protect your painted pot from moisture and wear, consider applying a sealant. Choose a sealant suitable for acrylic paint and follow the manufacturer’s instructions for application.
Step 9: Enjoy Your Painted Ceramic Pot
Now that your ceramic pot is painted and sealed (if applicable), it’s ready to be filled with your favorite plant or used as a decorative piece in your space.
By following these steps, you can create unique painted ceramic pots that add color and character to your home or garden. Happy painting!