How to make floating shelves
“`html
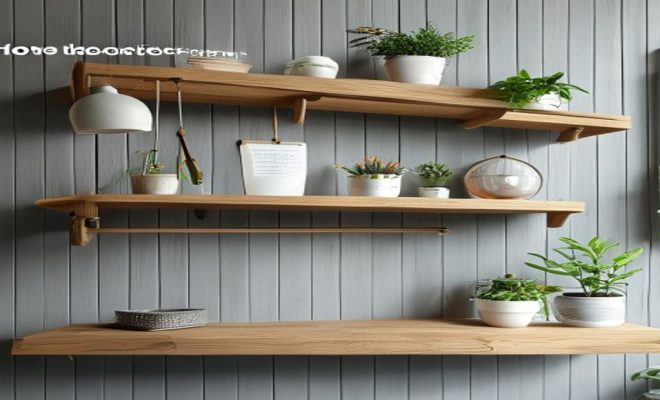
Floating shelves have taken the interior design world by storm. They offer a unique blend of style and functionality, allowing you to showcase your favorite items while saving valuable floor space. If you’ve ever wondered how to make floating shelves, you’re in the right place. This comprehensive guide will walk you through everything from design inspiration to detailed installation steps, ensuring that your floating shelves are both beautiful and sturdy.
1. Understanding Floating Shelves
Before jumping into how to create and install floating shelves, it’s important to understand what they are. Floating shelves are wall-mounted shelves that appear to ‘float’ without visible support. This aesthetic is achieved through various brackets or systems that secure the shelf to the wall while concealing the hardware. These shelves come in various materials, including wood, metal, and even glass, offering versatility for different decor styles.
The appeal of floating shelves lies in their minimalist design. They can make a room feel more open and airy while providing practical storage solutions. Whether you’re looking to display books, plants, or decorative items, floating shelves can adapt to different needs and aesthetics.
2. Designing Your Floating Shelves
The first step in the floating shelves installation process is planning and designing your shelves. Consider the following factors:
- Purpose: What will you use the shelves for? Displaying books, picture frames, plants, or kitchenware?
- Location: Choose a spot that is visible and accessible but does not obstruct traffic flow.
- Size: Determine the appropriate dimensions based on the items you plan to display and the space available.
- Style: Decide on the material and finish. Will they match your existing furniture, or are you going for a contrast?
Once you’ve established these key points, sketch your design. This doesn’t need to be an architectural masterpiece—just a simple outline that gives you an idea of how the shelves will look in your space.
3. Materials Needed for Floating Shelves Installation
After planning your design, gather the materials for your floating shelves. Here’s a basic list:
- Wood or your chosen shelving material (plywood, solid wood)
- Floating shelf brackets or mounting hardware
- Wood screws and wall anchors (if necessary)
- Wood glue (optional for added strength)
- Sandpaper or a sander
- Paint or wood stain (if finishing your shelves)
- Level
- Drill
- Stud finder
- Measuring tape
- Pencil for marking
Choosing the right materials is crucial for both aesthetics and durability. If you opt for wood, consider the weight of the items you plan to place on the shelves to ensure the material can handle it.
4. Measuring and Marking
Now that you have your materials, it’s time for precise measurements. Start by marking the desired height for your shelves on the wall. Use a level to ensure that your marks are straight. This step is vital: uneven shelves can look unprofessional and are more likely to be unstable.
Once you’ve determined the height, measure the length of the shelves and mark the spots where the brackets will go. If you’re using multiple shelves, ensure the spacing between them is consistent. A common practice is to place shelves about 12 to 18 inches apart to allow for easy access and visual appeal.
5. Installing the Brackets
The installation of brackets is a crucial step in floating shelves installation. Depending on the type of brackets you’ve chosen, the method may vary slightly. For instance, if you’re using hidden brackets, you’ll want to follow these steps: (See: Learn more about shelves.)
- Attach the brackets to the wall at the marked locations using a drill. Make sure to locate the studs behind the drywall for maximum support.
- If you’re unable to hit studs, use wall anchors to secure the brackets. Be sure to choose anchors that can handle the weight of your shelves and items.
- Double-check that the brackets are level before securing them fully.
Once the brackets are installed, it’s time to prepare your shelves for mounting. If you’re using wood shelves, sand the edges and surface to ensure a smooth finish, and then paint or stain as desired.
6. Mounting the Shelves
With your brackets securely in place, it’s time to mount the shelves. This process can vary based on the type of brackets used:
- For hidden brackets, slide the shelf onto the brackets until it’s securely in place. Ensure that the shelf is flush against the wall.
- If you’re using L-brackets or other visible brackets, place the shelf on top of the brackets and secure it using screws.
As you mount the shelves, constantly check with a level to ensure everything remains straight. If your shelves aren’t level, it can lead to an uneven look and potential instability.
7. Common Mistakes to Avoid
Even seasoned DIYers can make mistakes when it comes to floating shelves installation. Here are some common pitfalls to watch out for:
- Ignoring weight limits: Be mindful of the weight capacity of your materials and hardware. Overloading shelves can lead to failure.
- Not using a level: Always ensure that your shelves are level during installation. Small deviations can become more noticeable over time.
- Skipping the studs: Whenever possible, secure your brackets to wall studs for maximum support. Relying solely on drywall anchors can compromise stability.
- Neglecting finishes: A well-finished shelf looks more professional and will last longer. Don’t skip the sanding and staining or painting process.
By being aware of these common mistakes, you can streamline your floating shelves installation process and ensure a successful outcome.
8. Styling Your Floating Shelves
Once your floating shelves are up, it’s time to style them! This is arguably the fun part. Here are some tips to make the most of your new display space:
- Create balance: Mix different heights, shapes, and textures. Use taller items like vases alongside shorter items like books to create visual interest.
- Group items: Arrange items in groups of odd numbers for a more natural look. For example, pairing three decorative boxes with a plant can create harmony.
- Personal touch: Incorporate personal items like family photos or souvenirs from your travels to make the space uniquely yours.
Remember, styling is subjective, and there are no hard rules. This is your space, so feel free to experiment until you find a look you love.
9. Maintenance and Care
Floating shelves can be a long-lasting addition to your home if cared for properly. Here are a few maintenance tips:
- Regular cleaning: Dust your shelves regularly to prevent buildup. A microfiber cloth is great for avoiding scratches.
- Avoid overloading: Periodically check the weight of items on your shelves and adjust as necessary to prevent strain on the brackets.
- Check for stability: Occasionally test the sturdiness of the shelves, especially if you have kids or pets. If you notice any wobbling or loosening, tighten the screws or re-evaluate the installation.
Simple upkeep will help maintain the aesthetic and functionality of your floating shelves for years to come.
10. Current Trends in Floating Shelves
Floating shelves have evolved beyond basic designs. Here are some of the current trends making waves in the design world: (See: Indoor air quality considerations.)
- Mixed materials: Combining wood with metal or glass can create a modern, industrial look that appeals to many homeowners.
- Geometric shapes: Unique shapes and configurations are becoming popular. Asymmetrical designs can add a fun and artistic touch to any room.
- Integrated lighting: Incorporating LED lights into floating shelves can highlight your display and create ambiance in the room.
Trends come and go, but practical, stylish floating shelves will remain a staple in home decor. With this guide, you now have the tools and knowledge to embark on your floating shelves installation project. Whether you’re a DIY novice or a seasoned pro, the right preparation and approach can lead to stunning results that enhance your living space.
11. Safety Considerations for Floating Shelves Installation
When it comes to floating shelves installation, safety should always be a priority. Here are some considerations to keep in mind:
- Choose the right wall: Ensure the wall you’re installing the shelves on is strong enough to support the weight. Avoid drywall-only installations unless you are using heavy-duty wall anchors and know the weight limits.
- Weight distribution: Distribute weight evenly across the shelf to prevent tipping or sagging. Heavy items should be placed on the lower shelves to maintain stability.
- Check for electrical wires and plumbing: Use a stud finder that also detects wires and pipes to avoid accidents during drilling. Always ensure you’re not drilling through any hidden utilities.
- Securely fasten brackets: Make sure all screws and anchors are secured tightly. Loose brackets can become dangerous over time, especially with the shifting weight of items.
12. Floating Shelves Installation for Different Rooms
Floating shelves can be installed in virtually any room of the house, each serving a different purpose. Here’s a breakdown of how to adapt floating shelves installation to various spaces:
Living Room
In the living room, floating shelves can be used to display books, decorative items, or family photos. Consider creating a gallery wall effect by varying the size and spacing of the shelves. Installing them above a console table or fireplace can also draw the eye and create a focal point.
Kitchen
In the kitchen, floating shelves are perfect for displaying cookbooks, plants, or beautiful dinnerware. Open shelving can make the space feel more inviting and accessible. Ensure that you install them near prep areas for convenience but high enough to avoid cluttering counter space.
Bathroom
Floating shelves in the bathroom can hold toiletries, towels, or decorative items. Opt for moisture-resistant materials to ensure longevity in a humid environment. A single shelf above the toilet can provide both function and style.
Bedroom
In your bedroom, floating shelves can serve as nightstands or display areas for books, lamps, and personal items. Installing shelves above the bed can also create additional storage without taking up floor space. Just make sure they’re securely mounted to avoid accidents during the night.
13. Tools and Techniques for DIY Enthusiasts
If you’re keen on DIY, you might want to explore advanced techniques for customizing your floating shelves. Here are a few tips to elevate your project:
- Use a Kreg Jig: This tool allows you to create pocket holes for hidden fastening, giving your shelves a clean look without visible screws.
- Add decorative end caps: If you’re using wood, consider adding decorative end caps for a more finished look. This can be done easily with wood glue and clamps.
- Experiment with shapes: Instead of traditional rectangular shelves, try circular or triangular designs for a unique touch that stands out.
- Decorative brackets: If you prefer visible support, consider using decorative brackets that match your decor style. These can add personality while maintaining functionality.
14. Common Questions About Floating Shelves Installation
Here are some frequently asked questions that may help clarify any lingering doubts about floating shelves installation: (See: Floating shelves in interior design.)
How much weight can floating shelves hold?
The weight capacity of floating shelves largely depends on the materials used and how they are installed. Generally, a well-installed floating shelf can hold between 20 to 50 pounds. Always consult the manufacturer’s guidelines for specific weight limits.
Can floating shelves be installed on drywall?
Yes, floating shelves can be installed on drywall, but it’s crucial to use wall anchors if you cannot secure the brackets to a stud. Heavy items should always be placed on shelves secured to studs to ensure safety.
What materials are best for floating shelves?
Wood is the most common material due to its versatility and aesthetic appeal. However, metal and glass can also be great choices, especially for modern aesthetics. Choose materials that can support the intended weight and fit your overall decor.
How do I clean my floating shelves?
Cleaning floating shelves is straightforward. Use a soft, damp cloth to wipe them down, and for tougher stains, a gentle cleaner can be applied. Avoid abrasive materials that could scratch the surface.
Can I install floating shelves without brackets?
While traditional floating shelves typically use brackets, some systems are designed to be bracket-free. These use a cleat system that securely attaches to the wall, allowing the shelf to sit flush against the cleat.
15. Additional Floating Shelves Installation Tips
To ensure your floating shelves stand the test of time and look great in your space, consider these additional tips:
- Consider shelf depth: Standard shelf depth ranges from 10 to 12 inches, but you can customize based on your needs. Deeper shelves offer more space for larger items but can crowd a small area.
- Think about color and finish: The finish of your shelves can greatly affect the overall look of the room. Lighter colors can make a space feel larger, while darker woods add warmth and richness.
- Plan for future adjustments: If you think you might change the decor or need more space later, consider leaving space between shelves or selecting adjustable shelving that can be moved as needed.
- Use the right tools: Investing in quality tools can make your installation easier and more successful. A good power drill, level, and stud finder are indispensable.
16. Conclusion
With all this knowledge, you’re now equipped to tackle your floating shelves installation project confidently. From design to execution, each step can be an opportunity to showcase your style and ingenuity. Remember to consider your space, the items you want to display, and the overall aesthetic you wish to create. With the right approach, floating shelves can transform your home into a stylish and organized haven. Happy decorating!
“`
Trending Now
Frequently Asked Questions
What materials do I need to make floating shelves?
To make floating shelves, you will typically need wood, metal brackets or a floating shelf bracket system, screws, a drill, and a level. Depending on your design, additional materials like paint or stain for finishing may also be required.
How do I install floating shelves?
To install floating shelves, first measure and mark the desired location on the wall. Use a level to ensure accuracy, then attach the brackets or mounting system to the wall. Finally, place the shelf on the brackets and secure it according to the manufacturer’s instructions.
What are the benefits of floating shelves?
Floating shelves provide a stylish and minimalist storage solution that saves floor space. They can enhance the aesthetic of a room, allow for versatile display options, and can be customized in size, material, and finish to fit various decor styles.
Can floating shelves hold heavy items?
Yes, floating shelves can hold heavy items if installed correctly. It's essential to use sturdy brackets and ensure they are anchored securely to the wall studs. Always check the weight capacity of your chosen materials to prevent sagging or accidents.
What should I consider when designing floating shelves?
When designing floating shelves, consider their purpose, location, size, and style. Think about what items you will display, how the shelves will fit into your space, and how they will complement your existing decor for a cohesive look.
Have you experienced this yourself? We’d love to hear your story in the comments.