
The Tech Edvocate

Top Menu

  • Advertisement
  • Apps
  • Home Page
  • Home Page Five (No Sidebar)
  • Home Page Four
  • Home Page Three
  • Home Page Two
  • Home Tech2
  • Icons [No Sidebar]
  • Left Sidbear Page
  • Lynch Educational Consulting
  • My Account
  • My Speaking Page
  • Newsletter Sign Up Confirmation
  • Newsletter Unsubscription
  • Our Brands
  • Page Example
  • Privacy Policy
  • Protected Content
  • Register
  • Request a Product Review
  • Shop
  • Shortcodes Examples
  • Signup
  • Start Here
    • Governance
    • Careers
    • Contact Us
  • Terms and Conditions
  • The Edvocate
  • The Tech Edvocate Product Guide
  • Topics
  • Write For Us
  • Advertise

Main Menu

  • Start Here
    • Our Brands
    • Governance
      • Lynch Educational Consulting, LLC.
      • Dr. Lynch’s Personal Website
      • Careers
    • Write For Us
    • The Tech Edvocate Product Guide
    • Contact Us
    • Books
    • Edupedia
    • Post a Job
    • The Edvocate Podcast
    • Terms and Conditions
    • Privacy Policy
  • Topics
    • Assistive Technology
    • Child Development Tech
    • Early Childhood & K-12 EdTech
    • EdTech Futures
    • EdTech News
    • EdTech Policy & Reform
    • EdTech Startups & Businesses
    • Higher Education EdTech
    • Online Learning & eLearning
    • Parent & Family Tech
    • Personalized Learning
    • Product Reviews
  • Advertise
  • Tech Edvocate Awards
  • The Edvocate
  • Pedagogue
  • School Ratings

logo

The Tech Edvocate

  • Start Here
    • Our Brands
    • Governance
      • Lynch Educational Consulting, LLC.
      • Dr. Lynch’s Personal Website
        • My Speaking Page
      • Careers
    • Write For Us
    • The Tech Edvocate Product Guide
    • Contact Us
    • Books
    • Edupedia
    • Post a Job
    • The Edvocate Podcast
    • Terms and Conditions
    • Privacy Policy
  • Topics
    • Assistive Technology
    • Child Development Tech
    • Early Childhood & K-12 EdTech
    • EdTech Futures
    • EdTech News
    • EdTech Policy & Reform
    • EdTech Startups & Businesses
    • Higher Education EdTech
    • Online Learning & eLearning
    • Parent & Family Tech
    • Personalized Learning
    • Product Reviews
  • Advertise
  • Tech Edvocate Awards
  • The Edvocate
  • Pedagogue
  • School Ratings
  • This SmartHome Guardian 3.0 Feature Is Sparking Outcry — Here’s Why

  • This One Startup Just Secured Half a Billion to Revolutionize Home Buying

  • Elon Musk’s xAI Just Scored a Major Victory Against Minnesota’s ‘Nudification’ Law – Here’s Why It Matters

  • Wild: This Viral Game’s Website Was Caught Pimping Sex Workers to Teenagers

  • Unbelievable: Xbox Deals Collapse, Leading to Ninja Theory Layoffs – What This Means for Gaming

  • Urgent: 95% of Leaders Fear AI-Powered Attacks on Critical Infrastructure by 2026

  • Global Warning: AI’s Bubble and Existential Threats Could Unleash Chaos

  • Explosive: Student Loan Crisis Hits $234 Billion as Millions Face Brutal Collections

  • Jamie Dimon’s Unsettling AI Cybersecurity Warning: What You Haven’t Been Told

  • California’s Wild Robotaxi Rules: Are They Enough to Tame the AI Beast?

How To
Home›How To›How to Install Hurricane Clips: 9 Steps

How to Install Hurricane Clips: 9 Steps
By Matthew Lynch
March 6, 2024
0
Spread the love

Installing hurricane clips is an essential process for homeowners living in areas prone to hurricanes or other powerful storms. These metal connectors can provide significant protection to your home by strengthening the connection between your roof and walls. Here’s a step-by-step guide on how to install hurricane clips.

1. Assess Your Home’s Needs: Before you start, it’s crucial to evaluate your home’s structure and determine the type of hurricane clip that best suits its needs. Consult a local building code or a structural engineer if necessary.

2. Gather Materials and Tools: You’ll need hurricane clips (also known as rafter ties or truss bracing), a hammer, nails, a drill with appropriate bits, a ladder, safety goggles, gloves, and a measuring tape.

3. Plan the Clip Placement: Carefully plan where to install the clips, ensuring they’ll be evenly spaced throughout your roof framing. Also, follow the manufacturer’s recommendations and local building codes for optimal spacing and clip placement guidelines.

4. Access the Roof Framing: You’ll likely need to access your attic to install the hurricane clips properly. Make sure you’re using a sturdy ladder while working in tight spaces and have someone available to spot you for safety purposes.

5. Position the Clips: Position each hurricane clip along the rafter or truss where it connects with the top plate of the wall. Ensure that you align each clip with its corresponding location correctly.

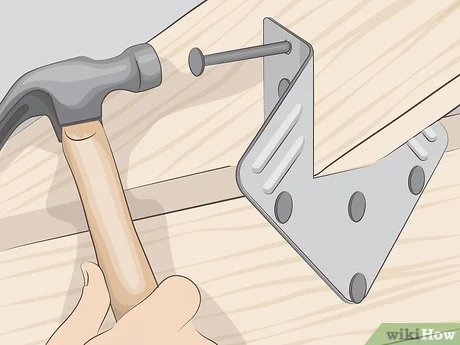
6. Attach Clips Temporarily: Use a hammer or drill to drive nails into one side of each clip, attaching it temporarily to either the rafter or top plate of your wall framing. It will make the final installation process easier and more accurate.

7. Secure Permanent Fastening: After having each hurricane clip temporarily placed, follow manufacturer guidelines for securing them permanently using nails or screws. Be sure to insert fasteners thoroughly into both rafters and top plates for optimal strength.

8. Check and Reassure: After installing all the clips, double-check your work, making sure every hurricane clip is securely fastened and in alignment with your initial plan.

9. Clean Up and Inspect: Safely exit your attic, clean up any debris, and inspect the exterior of your home for any visible signs of incorrect installation or damage. This process ensures you’re ready for the next hurricane season.

By following these nine steps, you’ll have successfully installed the hurricane clips to reinforce your roof’s structure, providing crucial protection for your home in case of a hurricane or other strong winds. Always consult local building codes and professionals when in doubt to ensure you’re taking all necessary precautions to protect your home and family.

Previous Article

How to Think on Your Feet: 13 ...

Next Article

How to Cook Arepas: 11 Steps

Matthew Lynch

Related articles More from author

  • How To

    How to Fade and Prevent Facial Hyperpigmentation?

    May 30, 2024
    By Matthew Lynch
  • How To

    4 Ways to Roast Pine Nuts

    October 9, 2023
    By Matthew Lynch
  • How To

    6 Ways to Treat Neck Pain in Dogs

    November 7, 2023
    By Matthew Lynch
  • How To

    How to Shrink Leather: 8 Steps

    December 19, 2023
    By Matthew Lynch
  • How To

    How to Read a Chest X-Ray

    February 27, 2024
    By Matthew Lynch
  • How To

    Sample Eulogy for Grandma

    October 19, 2023
    By Matthew Lynch

Search

Login & Registration

  • Log in
  • Entries feed
  • Comments feed
  • WordPress.org

Newsletter

Signup for The Tech Edvocate Newsletter and have the latest in EdTech news and opinion delivered to your email address!

About Us

Since technology is not going anywhere and does more good than harm, adapting is the best course of action. That is where The Tech Edvocate comes in. We plan to cover the PreK-12 and Higher Education EdTech sectors and provide our readers with the latest news and opinion on the subject. From time to time, I will invite other voices to weigh in on important issues in EdTech. We hope to provide a well-rounded, multi-faceted look at the past, present, the future of EdTech in the US and internationally.

We started this journey back in June 2016, and we plan to continue it for many more years to come. I hope that you will join us in this discussion of the past, present and future of EdTech and lend your own insight to the issues that are discussed.

Newsletter

Signup for The Tech Edvocate Newsletter and have the latest in EdTech news and opinion delivered to your email address!

Contact Us

The Tech Edvocate
910 Goddin Street
Richmond, VA 23231
(601) 630-5238
[email protected]

Copyright © 2026 Matthew Lynch. All rights reserved.
