How to Install a Windshield
A properly installed windshield is not only essential for optimal visibility, but it also plays a crucial role in the structural integrity of your vehicle. If you find yourself needing to install a new windshield, follow this step-by-step guide to ensure a successful and secure installation.
1. Gather Your Supplies
Before starting, make sure you have the following tools and materials on hand:
– A new windshield that is compatible with your vehicle make and model
– Urethane adhesive
– Primer
– Automotive glass cleaner
– Razor blade or scraper
– Suction cup grips
– Windshield molding (if necessary)
– Protective gloves and safety goggles
2. Remove the Old Windshield (If Applicable)
First, carefully remove any existing windshield molding using a razor blade or scraper. Next, cut the urethane adhesive that holds the old windshield in place. You may need a special cutting tool for this step, as traditional knives and blades might not suffice. Work your way around the entire perimeter of the windshield until it’s free from the frame.
3. Prepare the New Windshield
Thoroughly clean the new windshield using an automotive glass cleaner and lint-free cloth. Pay special attention to the edges where the urethane will adhere.
4. Prime the Windshield
Apply a layer of urethane primer around the new windshield’s perimeter, focusing on areas that will come into contact with adhesive. Allow it to dry for the recommended time provided by the manufacturer.
5. Apply Urethane Adhesive
Carefully apply a uniform layer of urethane adhesive around the edges of your new windshield where it will adhere to your vehicle’s frame. Be sure not to miss any sections, as this can compromise its seal and integrity.
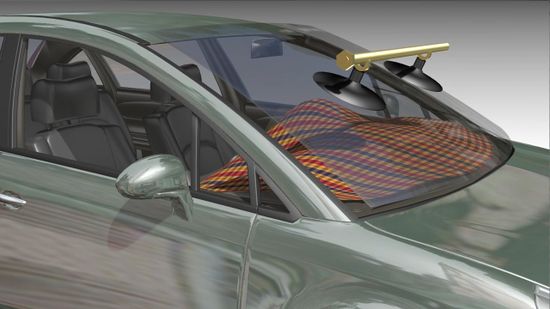
6. Position and Settle the Windshield
Using suction cup grips for assistance, carefully lift and position your new windshield onto your vehicle. Align it properly with the existing frame, so it sits correctly in place. Press the windshield firmly into the adhesive, ensuring that it makes full contact in every corner and along all its edges.
7. Reinstall Windshield Molding (If Applicable)
If your vehicle requires windshield molding, reinstall it after the urethane adhesive has cured for the recommended duration.
8. Assess and Clean Up
Perform a thorough inspection to ensure that your windshield is properly installed without any gaps or imperfections in its seal. Clean up any excess adhesive or debris and give your vehicle a final check before hitting the road.
Installing a new windshield may seem daunting, but with proper preparation, tools, and patience, you can tackle this project with confidence. Always prioritize safety throughout the process and consult professionals if you have any doubts or concerns.