How to frost cupcakes
“`html
Ah, the humble cupcake. It’s a canvas for creativity, a miniature celebration in itself, and let’s be honest, often just an excuse to eat more frosting. But if you’ve ever found yourself staring down a batch of freshly baked cupcakes, wondering exactly how to frost cupcakes like a pro, you’re alone. It’s a skill that seems simple on the surface but holds a surprising depth of technique and artistry. The right frosting job doesn’t just make your cupcakes look appealing; it enhances the entire eating experience, balancing texture and flavor in every bite.
For years, I struggled with runny frosting, uneven swirls, and general frosting frustration. My early attempts often looked less like bakery-worthy treats and more like something a toddler had enthusiastically, if messily, decorated. But through trial and error, a lot of butter, and a few invaluable tips from professional bakers, I’ve come to appreciate the nuances of a beautifully frosted cupcake. What I’ve learned is that it’s not about magic; it’s about understanding your tools, your medium, and a few fundamental techniques. Whether you’re aiming for a classic swirl, a delicate rose, or a smooth, elegant dome, mastering the art of frosting is incredibly rewarding. Let’s dig into some of the most popular and effective methods to help you achieve cupcake perfection.
1. The Classic Swirl: The Go-To for Bakery-Style Charm
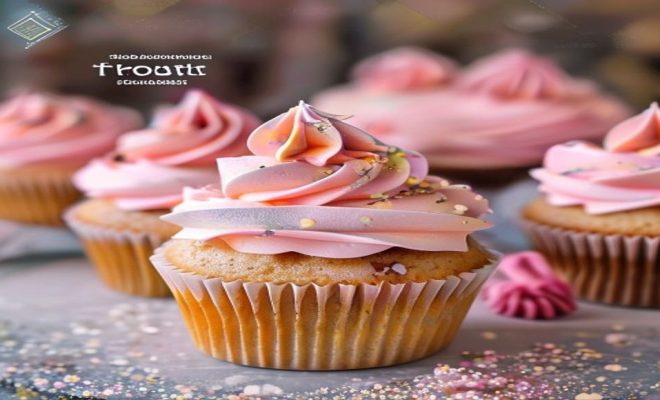
When you picture a quintessential frosted cupcake, chances are you’re imagining the classic swirl. This technique is a staple for a reason: it’s relatively easy to master, looks incredibly professional, and provides a generous, satisfying amount of frosting with every bite. To achieve this iconic look, you’ll definitely need a piping bag and a large star tip – the Wilton 1M or Ateco 826 are fantastic choices, offering those beautiful, defined ridges that make the swirl so appealing. The key to a good swirl lies in consistency and control. Your frosting needs to be firm enough to hold its shape but soft enough to pipe smoothly. If it’s too warm or soft, it’ll collapse; too cold, and it’ll be a struggle to pipe.
Start by holding your piping bag perpendicular to the cupcake, about a quarter-inch above the surface. Apply steady, even pressure and begin piping a spiral from the outer edge of the cupcake, working your way inward. As you reach the center, gently lift the bag while releasing pressure, creating that lovely peak. Don’t rush it. A slow, consistent motion is your friend here. Practice on a plate first if you’re nervous; you’ll quickly get a feel for the pressure needed. This method is incredibly versatile, working wonderfully for everything from vanilla bean cupcakes to rich chocolate creations, offering a classic elegance that never goes out of style.
2. The Smooth Dome: Elegance in Simplicity
Sometimes, less is more, and the smooth dome is the epitome of understated elegance. This technique doesn’t rely on intricate piping but rather on achieving a perfectly uniform, glossy cap of frosting. It’s fantastic for showcasing the frosting itself, especially if you have a particularly vibrant color or a super creamy texture you want to highlight. Think lemon curd buttercream or a rich cream cheese frosting – the smooth dome lets these flavors take center stage without any distracting visual flourishes. For this method, you’ll want an offset spatula or a small palette knife. These tools are designed to glide over surfaces, making it easier to achieve that seamless finish.
To start, apply a generous dollop of frosting to the center of your cooled cupcake. Now, here’s where the magic happens: using your offset spatula, gently spread the frosting outwards from the center, covering the entire top of the cupcake. The trick is to rotate the cupcake as you spread, creating a perfectly round dome. Don’t press down too hard; let the frosting do the work. Once you have an even layer, clean your spatula and use it to smooth out any imperfections, rotating the cupcake again until you have a pristine, polished surface. This method is particularly effective when you plan to add toppers like sprinkles, edible glitter, or a single berry, as it provides a perfect, unblemished base.
3. The Rosette: A Floral Flourish for Special Occasions
If you’re looking to impress, the rosette technique is your secret weapon. It transforms a simple cupcake into a miniature bouquet, perfect for weddings, baby showers, or any event where you want to add a touch of sophisticated charm. This method requires a piping bag and a star tip, similar to the classic swirl, but a slightly smaller one, like a Wilton 21 or 32, can give you more delicate petals. The key here is creating layers that mimic the overlapping petals of a rose. Your frosting consistency is paramount – it needs to be firm enough to hold its shape beautifully without slumping, but still soft enough to pipe without tearing.
Begin by piping a small dot of frosting in the very center of the cupcake. This will be the heart of your rose. Then, starting from that central dot, pipe a continuous spiral around it, working outwards. Overlap your frosting slightly as you go, building up the “petals” of the rose. The pressure you apply will determine the size and definition of your petals. A steady hand and consistent pressure are crucial here. You want to create a natural-looking flower, so don’t be afraid to let the edges be a little imperfect – that’s part of their charm. With a little practice, you’ll be cranking out dozens of these floral beauties in no time, making your cupcakes truly stand out. (See: Learn more about cupcakes.)
4. The Two-Tone Swirl: Adding Depth and Visual Interest
Why settle for one color when you can have two? The two-tone swirl is a fantastic way to add visual depth and excitement to your cupcakes. It’s surprisingly simple to achieve and instantly elevates your baking from homemade to professional-looking. This technique is particularly effective for themed events, like holiday celebrations where you might use red and green, or for gender reveals with pink and blue. You’ll need a piping bag and a large open star tip, like the Wilton 1M, just like for the classic swirl. The magic happens inside the bag itself.
There are a couple of ways to load your piping bag for a two-tone effect. The simplest is to take two separate batches of frosting, each a different color, and spoon them side-by-side into the piping bag. Don’t mix them! Just gently layer them against each other. As you pipe, the two colors will emerge simultaneously, creating a beautiful striped effect in your swirl. Another method involves spreading one color of frosting thinly along one side of the piping bag, then filling the rest of the bag with the second color. Whichever method you choose, the result is a striking, colorful swirl that adds an extra layer of visual appeal and makes your cupcakes pop on any dessert table.
5. The Rustic Swirl/Dollop: Embracing Imperfection
Sometimes, the most charming things are a little imperfect. The rustic swirl or dollop technique embraces a more relaxed, natural look, moving away from the perfectly uniform bakery style. This method is incredibly forgiving and perfect for when you want your cupcakes to feel homemade and comforting. It’s also a great option if you’re short on time or just don’t have the patience for intricate piping. You can achieve this look with an offset spatula, a spoon, or even just by cutting the tip off a Ziploc bag for a simple, un-tipped pipe.
For a rustic dollop, simply spoon a generous amount of frosting onto the center of your cupcake. Then, using the back of the spoon or your offset spatula, gently spread and swirl the frosting outward, creating a textured, organic shape. Don’t worry about making it perfectly smooth or symmetrical; the beauty is in its casualness. For a rustic swirl using a piping bag, you can use a wider, round tip or even just a snipped corner of a bag. Pipe a loose, less structured swirl, perhaps starting in the middle and spiraling out, or even just doing a messy mound. The idea is to create texture and volume without striving for precision. This style often pairs wonderfully with more natural, earthy flavors like carrot cake or spiced apple cupcakes, giving them a wholesome, inviting appearance.
6. The Ice Cream Scoop Method: Fast, Easy, and Uniform
If you’re frosting a large batch of cupcakes and speed is of the essence, or if you just want a consistently neat, rounded top without any piping, the ice cream scoop method is a revelation. It’s incredibly straightforward and delivers a clean, classic look that’s perfect for any occasion. This technique essentially gives you a uniform dome of frosting without the need for an offset spatula and all the smoothing. The only tool you really need is a standard ice cream scoop, ideally one with a spring-release mechanism for easy frosting transfer.
Simply fill your ice cream scoop with frosting, leveling it off against the side of your bowl to ensure an even amount each time. Then, center the scoop over your cooled cupcake and, using the spring release, gently deposit the ball of frosting directly onto the cupcake. The frosting will naturally settle into a neat, rounded mound. You can leave it as is for a simple, elegant finish, or if you want a slightly more polished look, you can very gently tap the cupcake on your counter a couple of times to help the frosting settle even more smoothly. This method is a fantastic time-saver and guarantees that every cupcake gets a fair and equal share of delicious frosting, making it perfect for bake sales or large gatherings.
7. The Leaf Tip/Petal Tip: Crafting Delicate Designs
Once you’ve mastered the basics, you might want to venture into more intricate designs. Leaf tips (like Wilton 352) and petal tips (like Wilton 104) open up a whole new world of decorative possibilities, allowing you to create stunning floral arrangements directly on your cupcakes. These tips are designed with a narrow opening on one side and a wider opening on the other, which is what allows you to create delicate, tapered shapes. While they take a little more practice, the results are truly breathtaking and can make your cupcakes look like edible works of art.
With a leaf tip, you hold the wider end against the cupcake and pipe short, controlled bursts of frosting, pulling away gently to create the pointed tip of a leaf. You can use green frosting to complement your rosette designs, or even pipe small, delicate leaves around a central swirl. Petal tips are used for creating realistic flower petals, ruffles, or even intricate borders. The key is to understand how the tip’s orientation affects the shape of the frosting. For a petal, you typically hold the wider end down and pipe with a slight undulating motion, slowly building up layers. Experimenting with different angles and pressures will allow you to create a variety of beautiful effects, from ruffled edges to full-blown floral cascades, making your cupcakes genuinely unique and visually captivating.
8. Dipping for a Glazed Finish: Quick, Even, and Glossy
For a super quick, incredibly even, and glossy finish, dipping your cupcakes is an unbeatable method, especially when working with glazes or thin ganaches. This technique is perfect for when you want a sleek, modern look, or when you’re dealing with a large quantity of cupcakes and need to frost them efficiently. It’s less about intricate decoration and more about achieving a uniform, polished surface that locks in moisture and adds a subtle sweetness. While not a traditional buttercream application, it’s an excellent way to frost cupcakes with certain types of toppings.
To dip, you’ll need a glaze or ganache that’s warm enough to be liquid but not hot enough to melt your cupcake. A simple ganache (chocolate and cream), a powdered sugar glaze (powdered sugar, milk, and flavoring), or even a fruit glaze works beautifully. Hold your cooled cupcake by the base, invert it, and gently dip the top into your prepared glaze. Don’t submerge it too deeply; just enough to coat the top. Lift the cupcake, let any excess drip off, and then turn it right side up. You can then let the glaze set, or while it’s still wet, quickly add sprinkles, chopped nuts, or other decorative elements. The result is a smooth, professional-looking finish that adds a lovely shine and a delicate layer of flavor to your treats, making this a fantastic option for a minimalist yet elegant approach to how to frost cupcakes. (See: Nutrition information from the CDC.)
The Science of Frosting Consistency: Why It Matters So Much
We’ve touched on frosting consistency quite a bit throughout these techniques, and for good reason! It’s arguably the most critical factor in achieving a beautifully frosted cupcake, regardless of the method you choose. Think of it like a sculptor working with clay – the clay needs to be just right. Too wet, and it won’t hold its form; too dry, and it’ll crack and be impossible to shape. Frosting is much the same.
For piping techniques like the classic swirl, rosette, or two-tone swirl, you need a medium-firm consistency. This means it should hold a stiff peak when you lift your spatula, but still be pliable enough to flow smoothly through a piping bag without requiring Herculean strength. If your frosting is too soft, it’ll melt and lose its shape almost immediately, especially in warmer kitchens. If it’s too stiff, you’ll struggle to pipe, it might tear, and you’ll end up with tired hands and possibly a burst piping bag. The ideal temperature for most buttercreams is around 68-72°F (20-22°C). If your kitchen is warm, you might need to chill your frosting for 10-15 minutes, then re-whip it to restore its creaminess. If it’s too cold and stiff, let it sit at room temperature for a bit, or microwave a small portion for 5-10 seconds and then mix it back into the main batch to soften it up. Don’t add liquid directly to a cold, stiff frosting as it can break. A good rule of thumb: if it looks like soft-serve ice cream, you’re probably in the right ballpark for piping.
For methods like the smooth dome or rustic dollop, you can get away with a slightly softer consistency, as you’re spreading rather than creating defined shapes. However, it still needs enough body to cling to the cupcake and not just run off the sides. For dipping glazes, of course, the goal is a much thinner, pourable consistency, achieved by adjusting the liquid content.
Essential Tools for Every Cupcake Froster
While some techniques are tool-agnostic (a spoon for a rustic dollop works fine!), having a few key pieces of equipment can seriously elevate your frosting game. Investing in these basics will make your life easier and your cupcakes prettier.
- Piping Bags: Reusable silicone bags are eco-friendly and durable, while disposable plastic bags are convenient for quick cleanup, especially with multiple colors. Make sure you get strong ones that won’t burst under pressure.
- Piping Tips: As mentioned, a Wilton 1M or Ateco 826 large open star tip is your best friend for classic swirls. A smaller star tip (Wilton 21/32) is great for rosettes. Round tips (Wilton 1A) create smooth, thick lines or dollops. A leaf tip (Wilton 352) and petal tip (Wilton 104) are fantastic for more advanced floral work. Consider a starter set with various tips.
- Couplers: These ingenious little tools allow you to change piping tips on the same bag without emptying the frosting. Super handy when you want to use different tips with one color.
- Offset Spatulas: A small offset spatula (3-inch or 5-inch blade) is indispensable for spreading frosting smoothly, creating domes, or just leveling off batter. Its offset design keeps your knuckles out of the frosting.
- Turntable (Optional but Recommended): A rotating cake turntable makes frosting cupcakes (and cakes!) so much easier, especially for achieving smooth domes or consistent swirls. You can rotate the cupcake with one hand while piping/spreading with the other.
- Cupcake Corer (Optional): If you like to fill your cupcakes with ganache, jam, or curd before frosting, a cupcake corer makes a neat hole quickly and efficiently.
- Food Coloring: Gels or pastes are far superior to liquid food coloring for frosting. They provide vibrant colors without thinning out your frosting consistency.
Beyond Basic Frosting: Flavor Pairings and Decorations
Once you’ve mastered the techniques, think about how to make your frosted cupcakes truly sing with flavor and visual appeal. The frosting isn’t just a pretty hat; it’s an integral part of the taste experience.
Thoughtful Flavor Pairings:
- Chocolate Cupcakes: Pair with classic vanilla buttercream, rich chocolate ganache, tangy cream cheese frosting, or even a mint chocolate chip frosting for a refreshing twist.
- Vanilla Cupcakes: A blank slate! Lemon buttercream, raspberry swirl, espresso frosting, or a simple Swiss meringue buttercream infused with almond extract.
- Red Velvet Cupcakes: The iconic pairing is a tangy cream cheese frosting. Don’t mess with perfection!
- Carrot Cake Cupcakes: Another classic with cream cheese frosting, perhaps with a touch of orange zest.
- Lemon Cupcakes: Lemon buttercream (double lemon!), raspberry frosting, or a light meringue frosting.
Elevating with Decorations:
Once the frosting is on, the fun doesn’t have to stop! Small additions can make a huge impact.
- Sprinkles: The easiest way to add color and texture. From classic jimmies to elaborate sprinkle mixes for every holiday.
- Edible Glitter/Dust: A light dusting can add shimmer and sophistication.
- Fresh Fruit: A single raspberry, a slice of strawberry, or a few blueberries can add freshness, color, and a burst of flavor.
- Chocolate Shavings/Curls: Grate a chocolate bar over chocolate frosting for extra decadence.
- Nuts: Chopped pecans, walnuts, or pistachios can add crunch and complement nutty cake flavors.
- Candy: Mini chocolate chips, crushed candy bars, or small candies like M&Ms can be pressed into the frosting.
- Edible Flowers: For a truly elegant touch, a small, food-safe flower can transform a cupcake.
Frequently Asked Questions About How to Frost Cupcakes
You’ve got questions, we’ve got answers! Let’s clear up some common cupcake frosting dilemmas. (See: Cupcake recipes from The New York Times.)
Q1: How do I prevent my frosting from melting, especially in warm weather?
A: Frosting stability is key! For buttercreams, make sure your butter isn’t too soft to begin with. If your kitchen is warm, chill your mixing bowl and beaters for 10-15 minutes before making the frosting. After making, if it feels too soft, pop the entire bowl of frosting (covered!) into the fridge for 15-30 minutes, then re-whip it. This re-chilling and re-whipping process can stiffen it up nicely. For outdoor events, consider using a meringue-based buttercream (like Swiss or Italian meringue buttercream) which is generally more stable than American buttercream. Alternatively, use a cream cheese frosting with a higher ratio of powdered sugar to cream cheese.
Q2: My piping bag burst! What went wrong?
A: This happens to the best of us! Most often, it’s due to one of three reasons: 1) Your frosting is too stiff. It’s too cold and hard to pipe, putting excessive pressure on the bag. Let it warm up slightly or try re-whipping. 2) You’re overfilling the bag. Don’t fill it more than two-thirds full; otherwise, you have less control and more pressure builds up. 3) The bag quality is poor. Invest in good quality disposable or reusable piping bags. Cheap bags just can’t handle the pressure.
Q3: How far in advance can I frost cupcakes?
A: Most frosted cupcakes are best enjoyed within 1-2 days. If your frosting contains dairy (like cream cheese frosting), they absolutely need to be refrigerated. Buttercream-frosted cupcakes can often sit at cool room temperature (below 70°F/21°C) for a day, but for optimal freshness and appearance, storing them in an airtight container in the fridge is usually best. Just remember to let them come to room temperature for about 30 minutes before serving for the best flavor and texture.
Q4: My frosting has air bubbles. How do I get a smooth finish?
A: Air bubbles are common, especially with American buttercream. After mixing your frosting, switch to a paddle attachment (if using a stand mixer) and beat on the lowest speed for 5-10 minutes. This slowly works out the air. You can also press the frosting against the sides of your bowl with a spatula to release bubbles. For a truly smooth look, you might want to try Swiss or Italian meringue buttercreams, which are inherently smoother due to their preparation method.
Q5: Can I freeze frosted cupcakes?
A: Yes, you absolutely can! Most frosted cupcakes freeze beautifully. Place the frosted cupcakes on a baking sheet and freeze them uncovered for about an hour, or until the frosting is firm. This prevents them from sticking. Then, individually wrap each cupcake tightly in plastic wrap, and place them in an airtight container or freezer bag. They can last in the freezer for up to 2-3 months. To thaw, unwrap them and let them come to room temperature on the counter for a few hours. This is a lifesaver for making ahead!
Mastering these various techniques for how to frost cupcakes is truly a journey of practice and discovery. Don’t get discouraged if your first few attempts aren’t perfect. Every baker, from novice to professional, has had their share of frosting mishaps. The real joy comes from experimenting, finding what works for you, and ultimately, creating something delicious and beautiful. So grab your piping bag, whip up a batch of your favorite frosting, and get ready to transform your cupcakes into edible masterpieces. Your taste buds, and your guests, will thank you.
“`
Trending Now
Frequently Asked Questions
What is the best way to frost cupcakes?
The best way to frost cupcakes is to use a piping bag fitted with a large star tip, such as Wilton 1M or Ateco 826. This allows for a classic swirl that looks professional and provides a generous amount of frosting. Ensure your frosting is firm enough to maintain shape while piping.
How can I make my frosting look professional?
To achieve a professional look, practice the classic swirl technique with a piping bag. Focus on consistency and control of your frosting, ensuring it's firm enough to hold its shape. Experimenting with different tips can also enhance the visual appeal of your cupcakes.
Why does my frosting run off my cupcakes?
Runny frosting typically results from using frosting that is too warm or not thick enough. To fix this, ensure your frosting is well-chilled and has the right consistency before applying it to the cupcakes. A good buttercream should hold its shape without sliding off.
What tools do I need to frost cupcakes?
Essential tools for frosting cupcakes include a piping bag and various piping tips, especially a large star tip for classic swirls. A spatula can also help with smoothing out frosting if you prefer a more elegant dome shape.
How do I get a smooth finish on my cupcake frosting?
For a smooth finish, use a spatula to spread the frosting evenly on top of the cupcake. Alternatively, you can use a piping bag with a round tip to create a dome shape. Ensure your frosting is at the right temperature and consistency for the best results.
Agree or disagree? Drop a comment and tell us what you think.