How to Factory Reset Your Roku Device
Roku devices are an excellent way to stream your favorite movies, TV shows, and other multimedia content. However, sometimes your Roku device may encounter an issue that can only be resolved with a factory reset. In this article, we will explore how to factory reset your Roku device.
Step 1: Navigate to the Settings Menu
First, turn on your Roku device and navigate to the settings menu. You can do this by using your Roku remote and press the Home button. From there, select “Settings” from the menu.
Step 2: Select “System.”
Under the Settings menu, scroll down and select “System.”
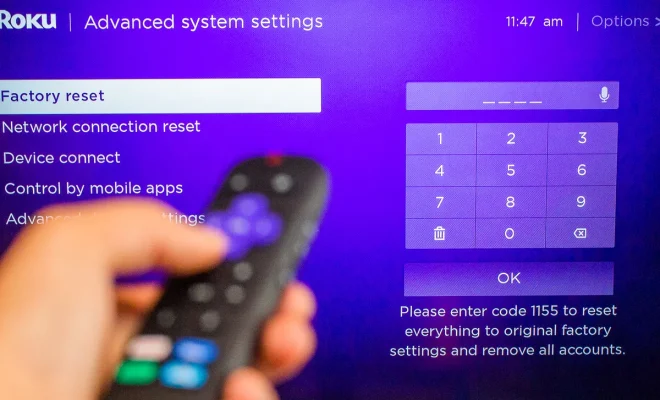
Step 3: Choose “Advanced System Settings.”
Now, select “Advanced System Settings.” This is where you’ll find the option to reset your Roku device.
Step 4: Choose “Factory Reset.”
Scroll down and select the “Factory Reset” option. A message will appear, stating that you’ll be resetting your device to its original factory settings.
Step 5: Confirm the Reset.
The last step is to confirm that you want to reset your Roku device by selecting “Factory Reset.” Your Roku device will now reset to its original factory settings.
After the reset, your Roku device will act like it’s brand new. You’ll be prompted to reconnect to your Wi-Fi network, sign in to your Roku account, and reinstall any channels that you previously had installed.
It’s important to note that when you do a factory reset, you’ll lose any settings, logins, passwords, and preferences that you have set up on your Roku device. It is important to backup your important data before resetting your Roku device.
Once you’ve done a factory reset, you should have a fully functioning Roku device. If you continue to have issues, you should contact Roku support for additional help.