The Tech Edvocate

Top Menu

  • Advertisement
  • Apps
  • Home Page
  • Home Page Five (No Sidebar)
  • Home Page Four
  • Home Page Three
  • Home Page Two
  • Home Tech2
  • Icons [No Sidebar]
  • Left Sidbear Page
  • Lynch Educational Consulting
  • My Account
  • My Speaking Page
  • Newsletter Sign Up Confirmation
  • Newsletter Unsubscription
  • Our Brands
  • Page Example
  • Privacy Policy
  • Protected Content
  • Register
  • Request a Product Review
  • Shop
  • Shortcodes Examples
  • Signup
  • Start Here
    • Governance
    • Careers
    • Contact Us
  • Terms and Conditions
  • The Edvocate
  • The Tech Edvocate Product Guide
  • Topics
  • Write For Us
  • Advertise

Main Menu

  • Start Here
    • Our Brands
    • Governance
      • Lynch Educational Consulting, LLC.
      • Dr. Lynch’s Personal Website
      • Careers
    • Write For Us
    • The Tech Edvocate Product Guide
    • Contact Us
    • Books
    • Edupedia
    • Post a Job
    • The Edvocate Podcast
    • Terms and Conditions
    • Privacy Policy
  • Topics
    • Assistive Technology
    • Child Development Tech
    • Early Childhood & K-12 EdTech
    • EdTech Futures
    • EdTech News
    • EdTech Policy & Reform
    • EdTech Startups & Businesses
    • Higher Education EdTech
    • Online Learning & eLearning
    • Parent & Family Tech
    • Personalized Learning
    • Product Reviews
  • Advertise
  • Tech Edvocate Awards
  • The Edvocate
  • Pedagogue
  • School Ratings

logo

The Tech Edvocate

  • Start Here
    • Our Brands
    • Governance
      • Lynch Educational Consulting, LLC.
      • Dr. Lynch’s Personal Website
        • My Speaking Page
      • Careers
    • Write For Us
    • The Tech Edvocate Product Guide
    • Contact Us
    • Books
    • Edupedia
    • Post a Job
    • The Edvocate Podcast
    • Terms and Conditions
    • Privacy Policy
  • Topics
    • Assistive Technology
    • Child Development Tech
    • Early Childhood & K-12 EdTech
    • EdTech Futures
    • EdTech News
    • EdTech Policy & Reform
    • EdTech Startups & Businesses
    • Higher Education EdTech
    • Online Learning & eLearning
    • Parent & Family Tech
    • Personalized Learning
    • Product Reviews
  • Advertise
  • Tech Edvocate Awards
  • The Edvocate
  • Pedagogue
  • School Ratings
  • iClever Q950 Kids Headphones Review: Premium Sound and Safety for Young Listeners

  • The Reckless Ben Controversy: An Outrageous Fight for Justice

  • Outrageous: The Sydney Sweeney Ad Controversy You Didn’t See Coming — And Why It’s Working

  • The AI CRM War: Why Salesforce Just Made a $2 Billion Bid for a Startup

  • OpenAI’s Navier-Stokes ‘Solution’ Ignites Firestorm: Did They Steal It?

  • Blizzard’s Boldest Bet: Why a StarCraft Shooter in 2030 Could Redefine Gaming

  • Volatile: Why Top AI Bosses Just Triggered a Massive AI Stocks Decline

  • ‘Godfather of AI’ backs Anthropic chief’s call to slow down development

  • Why Millions Are Flocking to Trade Schools as AI Reshapes the Job Market

  • Unmasking the Bizarre ‘Cat in the Hat’ Trend: Why Schools Are Sounding the Alarm

Digital & Mobile Technology
Home›Digital & Mobile Technology›How to Create a 3D Bump Map Using Photoshop

How to Create a 3D Bump Map Using Photoshop
By Matthew Lynch
July 30, 2023
0
Spread the love

Creating a 3D bump map using Photoshop may seem like a daunting task for beginners, but it is actually quite simple and easy to follow. With this bump map, you can add depth and texture to your 3D models, making them more realistic and visually appealing. In this article, we’ll guide you through the basic steps of creating a 3D bump map using Photoshop.

Step 1: Select an Image

The first step is to select an image that you want to use as your bump map. This image will serve as the source of your texture. You can choose from any image you like, but make sure you select one with enough contrast to create a good bump map. The best images are those with a clear pattern or texture that can be replicated in 3D.

Step 2: Convert the Image to Gray Scale

To create a bump map, you need to convert the image to grayscale. This is because the bump map only works with grayscale images. To do this, go to ‘Image’ > ‘Mode’ > ‘Grayscale.’ A dialog box will appear asking if you want to flatten the image. Click ‘OK’ to confirm.

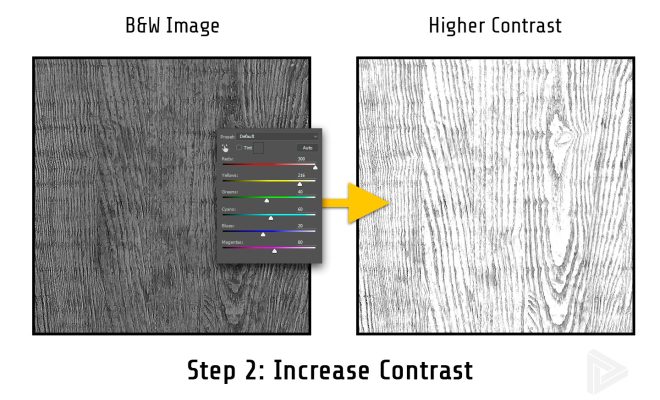
Step 3: Adjust the Contrast and Levels

Once your image is in grayscale mode, the next step is to adjust the contrast and levels. Go to ‘Image’ > ‘Adjustments’ > ‘Levels.’ This will open the Levels dialog box where you can adjust the contrast and levels of the image to create a more defined pattern.

Step 4: Apply the Bump Map

Now that your image is ready, you can apply it to your 3D model in Photoshop. To do this, first, create a new layer and fill it with black. Then, go to ‘Filter’ > ‘3D’ > ‘Generate Bump Map.’ This will open the Generate Bump Map dialog box where you can adjust the settings according to your preferences.

Step 5: Save and Use Your Bump Map

After adjusting the settings, click ‘OK’ to apply the bump map to your model. You can now save the bump map as a separate file by going to ‘File’ > ‘Save As’ and selecting ‘Photoshop’ from the drop-down menu. This will save the file with a .psd extension.

Lastly, you can use the bump map in your 3D software by applying it to your model’s material or texture. In most 3D software, you will find options to add bump maps or displacement maps to your materials.

In conclusion, creating a 3D bump map using Photoshop is a simple and effective way of adding depth and texture to your 3D models. By following these basic steps, you can create a bump map from any image and apply it to your models in no time. Experiment with different images and settings to create custom bump maps that make your 3D models look more realistic and visually appealing.


Previous Article

10 Things You Didn’t Know You Could ...

Next Article

What Is a Speaker Efficiency or Sensitivity ...

Matthew Lynch

Related articles More from author

  • Digital & Mobile Technology

    How to Block Text Messages on an iPhone

    May 19, 2023
    By Matthew Lynch
  • Digital & Mobile Technology

    What Is an MHT File?

    June 6, 2023
    By Matthew Lynch
  • Digital & Mobile Technology

    Google Docs vs Word: Which Option Is Best for You?

    June 10, 2023
    By Matthew Lynch
  • Digital & Mobile Technology

    Function Keys Not Working in Windows 10? Here’s What to Do

    June 8, 2023
    By Matthew Lynch
  • Digital & Mobile Technology

    How to Download Facebook Videos to Your iPhone

    May 28, 2023
    By Matthew Lynch
  • Digital & Mobile Technology

    How to Change Your Name On Zoom

    June 10, 2023
    By Matthew Lynch

Search

Login & Registration

  • Log in
  • Entries feed
  • Comments feed
  • WordPress.org

Newsletter

Signup for The Tech Edvocate Newsletter and have the latest in EdTech news and opinion delivered to your email address!

About Us

Since technology is not going anywhere and does more good than harm, adapting is the best course of action. That is where The Tech Edvocate comes in. We plan to cover the PreK-12 and Higher Education EdTech sectors and provide our readers with the latest news and opinion on the subject. From time to time, I will invite other voices to weigh in on important issues in EdTech. We hope to provide a well-rounded, multi-faceted look at the past, present, the future of EdTech in the US and internationally.

We started this journey back in June 2016, and we plan to continue it for many more years to come. I hope that you will join us in this discussion of the past, present and future of EdTech and lend your own insight to the issues that are discussed.

Newsletter

Signup for The Tech Edvocate Newsletter and have the latest in EdTech news and opinion delivered to your email address!

Contact Us

The Tech Edvocate
910 Goddin Street
Richmond, VA 23231
(601) 630-5238
[email protected]

Copyright © 2026 Matthew Lynch. All rights reserved.