How to Add Google Photos to Photos App in Windows 11
If you are a Windows 11 user who also happens to use Google Photos, you might be wondering how to bring your photos from Google Photos to the Photos app in Windows 11. By default, Google Photos doesn’t have a direct option to export your photos to the Photos app. However, there are ways in which you can add Google Photos to the Photos app on your Windows 11 PC. In this article, we will guide you through those methods.
Method 1: Use the Google Drive Desktop App
Google Drive is a cloud storage service that allows you to store and synchronize files and folders across devices. Since Google Drive has a desktop app for Windows, you can use it to access your Google Photos and download them to your computer. Once you have downloaded your photos, you can use the Photos app to add them to your Windows 11 library.
Here are the steps to add Google Photos to Photos App in Windows 11 using Google Drive:
Step 1: Install and Log In to Google Drive
Firstly, download and install the Google Drive app on your Windows 11 PC. Launch the app and sign in to your Google account.
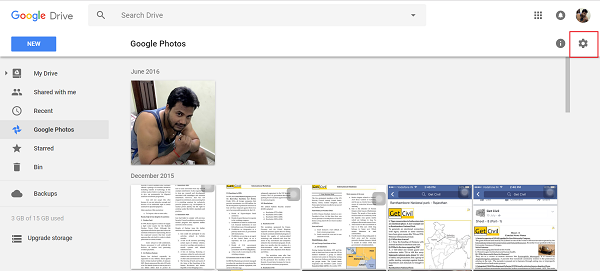
Step 2: Enable Google Photos Integration
Go to the Settings section of the Google Drive app and select “Integrations.” Enable the “Google Photos” integration option.
Step 3: Sync Google Photos to Google Drive
Now, select the “Google Photos” folder in the Google Drive app’s left sidebar. If you don’t see it, click on the “Add” button and then select “Google Photos.” Once you have selected the folder, click on the “Sync” button to start syncing your Google Photos to your computer.
Step 4: Add Google Photos to Photos App
Open the Photos app on your Windows 11 PC and click on the “Import” button. Select the folder that you synced with Google Drive, and your Google Photos will be added to your Photos app library.
Method 2: Use the Microsoft Photos Companion App
Microsoft has designed the Photos Companion app that enables users to transfer photos from their mobile devices to their Windows 11 PC wirelessly. You can use the app to transfer your Google Photos to the Photos app on your Windows 11 PC.
Here are the steps to add Google Photos to Photos App in Windows 11 using the Photos Companion app:
Step 1: Install and Launch Photos Companion
First, download and install the Photos Companion app on your Windows 11 PC. Then, open the app and sign in to your Microsoft account.
Step 2: Scan the QR Code
Now, open the Google Photos app on your phone, select the photos you want to transfer, and tap on the “Share” button. Select the “Photos Companion” app from the list of sharing options, and a QR code will appear on your Windows 11 PC screen.
Step 3: Transfer Photos to PC
Scan the QR code with your phone’s camera to establish a wireless connection between your phone and PC. Then, tap on the “Send” button on your phone to start transferring the selected photos to your Windows 11 PC.
Step 4: Add Photos to Photos App
Once the transfer is complete, open the Photos app on your Windows 11 PC, and you should see the transferred photos in the app’s library.
Conclusion
Adding Google Photos to Photos App in Windows 11 brings all your favorite memories into one picture library. By following the methods mentioned above, you can easily transfer your photos from Google Photos to your Photos app library on your Windows 11 PC. Whether you choose the Google Drive desktop app or Microsoft Photos Companion app, the process is simple and hassle-free. Now enjoy your memories with Photos app on Windows 11.