
Boot from USB in Windows 7
If you’re trying to troubleshoot your Windows 7 computer, install a new operating system, or simply update your existing system, you’ll likely need to know how to boot from a USB drive. In this article, we’ll guide you through the process of booting from USB in Windows 7.
Step 1: Prepare Your USB Drive
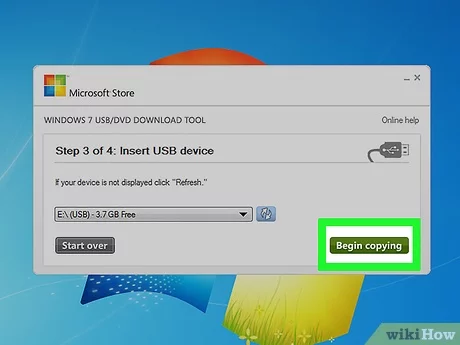
First of all, make sure you have a USB drive with the required files for booting. You can create a bootable USB drive using tools like Rufus or the Windows USB/DVD Download Tool. Ensure that your USB drive has at least 8GB of storage and is formatted as FAT32 or NTFS.
Step 2: Plug in the USB Drive
Insert the prepared USB drive into an available USB port on your computer. Make sure that your computer is turned off before plugging in the drive.
Step 3: Enter BIOS/UEFI Settings
To change the boot order and set your computer to boot from the USB drive instead of its internal storage, you’ll need to access the BIOS or UEFI settings. The method for doing this varies between computers – refer to your system’s documentation if you’re unsure how to do this.
For most systems, turn on your computer and repeatedly press the appropriate key (usually F2, F10, F12, DEL, or ESC) until the BIOS/UEFI settings screen appears.
Step 4: Change Boot Order
Once you’re in the BIOS/UEFI settings, look for a menu or tab related to boot options (commonly labeled as “Boot,” “Boot Order,” or “Boot Priority”). Select it and find an option that allows you to choose the boot device/order.
Choose your connected USB drive by using arrow keys and set it as the first priority in the list of available boot devices. You might need to use the “+” and “-” keys or the “Page Up” and “Page Down” keys to move the USB drive up or down in the list.
Step 5: Save and Exit BIOS/UEFI
After setting the USB drive as the first boot device, save your changes and exit the BIOS/UEFI settings. Typically, this can be done by pressing the F10 key, but it may differ for your computer. Look for an on-screen prompt that indicates which key to press to save and exit.
Step 6: Boot from USB Drive
Once you exit the BIOS/UEFI settings, your computer will restart automatically. It should now boot from your USB drive instead of its internal storage. Follow any on-screen instructions to proceed with your specific task, whether it’s installing a new operating system or repairing your current one.
And that’s it! You’ve successfully booted your Windows 7 computer from a USB drive. Remember that depending on what you’re
