Backup Verification in the VMWare ESXi Backup Software
Perhaps one of the most overlooked areas when it comes to backup processes in general that most organizations fail to execute in their backup plans is backup verification. Often, many administrators may simply assume backups to be good and the topic goes no further than that. However, this is a dangerous routine to become accustomed to as those who do may find they have corrupted backups in a real disaster scenario. That is the worst to find out that something is wrong with your backups! Let’s see how to set up screenshot verification to ensure your VMware backups are in a good state before you find yourself in the disaster recovery scenario.
Backup Screenshot Verification Overview in VMWare Virtual Machine
Screenshot verification is a fantasy technology found that verifies the integrity of the backed up VMWare virtual machine by (near) instantly booting the virtual machine from the backup, then taking a screenshot of the booted VM, and finally emailing a report with the screenshot to the administrator. What better way to know that your VMware VMs will be usable than actually booting and verifying them? Great technology!
The way that most backup software for VMWare virtual machines, like NAKIVO Backup for VMWare does this is by using the already built-in Flash VM Boot technology. Flash VM Boot presents backup disks as RDM disks that are in virtual compatibility mode and mounts those disks to a newly created VM.
Requirements for Screenshot Verification in VMWare Workstation Backup Software
There are a few considerations when setting up screenshot verification in VMware workstation backup software with ESXi configuration, such as NAKIVO. Since this feature utilizes the Flash VM Boot technology, it depends on the requirements therein. VMware Tools are used as a Guest OS Agent and must be installed on the backed-up VM for screenshot verification to work. The firewall must have exceptions for port TCP 3260.
Creating iSCSI VMkernel port bindings is not necessary on the iSCSI Storage adapter of an ESXi host by default. You can check this on your ESXi hosts by navigating in the vSphere Web Client to your Host >> Configure >> Storage Adapters >> Your Adapter >> Network Port Binding. iSCSI Software Adapter is created automatically (if it doesn’t exist) by the backup software on an ESXi host that is defined in the screenshot verification options of a job.

iSCSI port bindings are usually used for multipathing (when there are multiple VMkernel adapters on an ESXi host but iSCSI target portal is only one; all interfaces are in the same subnet). If port bindings are already configured on an ESXi host, the Transporter (which is a component of a backup software for vmware workstation) and an ESXi host may not be able to establish a network connection with each other at the iSCSI layer. If you have iSCSI connection issues in this case, you should configure a new port binding for the ESXi host that would be used for Flash VM Boot and Screenshot Verification.
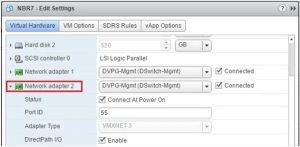
Once you have verified that your VMware ESXi host is configured correctly, you can turn your attention to the VMWare ESXi backup software appliance. You need to make sure that the software environment, specifically the Transporter component, has network connectivity to the iSCSI network of the VMware vSphere host that you are targeting. If an iSCSI network is not routed in your environment, make sure you have a connection configured on the same VLAN ID and network IP space as the iSCSI VMkernel port. In this case, you need to add a new network adapter to your virtual machine backup software Transporter appliance and assign an IP address for connectivity to your VMware iSCSI network.
Another consideration if you are using VMWare vSphere backup software with ESXi configuration on a Windows computer is to make sure the Windows firewall has exceptions for port TCP 3260 as this is not allowed by default.
- netsh advfirewall firewall add rule name=”iSCSI In” dir=in action=allow protocol=TCP localport=3260
- netsh advfirewall firewall add rule name=”iSCSI Out” dir=out action=allow protocol=TCP localport=3260
Verify network connectivity in your VMWare ESXi backup software
After we have added our network adapter and configured the addressing for the additional network adapter in VMWare workstation backup software with ESXi configuration to be on the same IP space as our VMware iSCSI network, we can test connectivity to one of the iSCSI VMkernel port IP addresses.
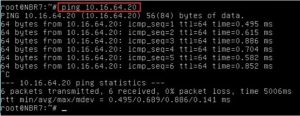
As seen above, we are pinging a VMKernel port IP address on one of our VMware ESXi hosts. We should see ping responses back from the test, which we do. So we know from that result, traffic is both getting to our host and returning back to us.However, pinging is not enough, because an ICMP protocol is used for pinging a host. You should make sure that you can access the IP address of VMkernel via TCP protocol on the port 3260. If you use a virtual appliance or a standalone instance of VMWare backup software Transporter on a Linux machine, run the following command on the machine with the Transporter used for a backup job with screenshot verification to check the network connection:
nmap -p3260 10.16.64.20
If nmap is not installed, install it by running a command such as apt install nmap.
Configuring Backup Verification for VMWare Virtual Machine
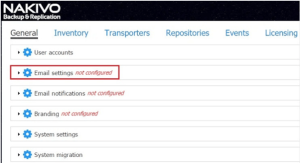
Now that we have all the prerequisites met and we have tested our connectivity to the server, we are ready to start configuring the backup verification functionality for VMWare virtual machine. To have the backup verification delivered to our email, we need to first configure our Email settings in the VMWare workstation backup software appliance. To get to the email settings, simply click on the settings “cog” in the upper right-hand corner of the interface.
Once there, we see the Email settings menu that can be expanded. Also, all the way to the right of the column, there is an Edit link. Click the edit link.
When you click to edit the email settings, you will see the normal email configuration settings that need to be configured – SMTP server, SMTP username, SMTP password, SMTP port, From address and To address. Below you see the configuration as it might look in configuring a GMAIL address for our configuration. Notice, we can specify an Encrypted connection which allows us to configure encryption options that allow connectivity to GMAIL and others.
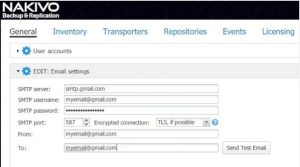
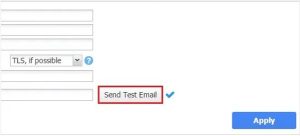
Before we can actually apply our email settings, we must click Send Test Email which tests the settings. I think this workflow is prudent as how many other email configurations will simply let you apply a configuration without testing, or not have a means to test. After we send the test email and it is successful, we can apply the configuration.
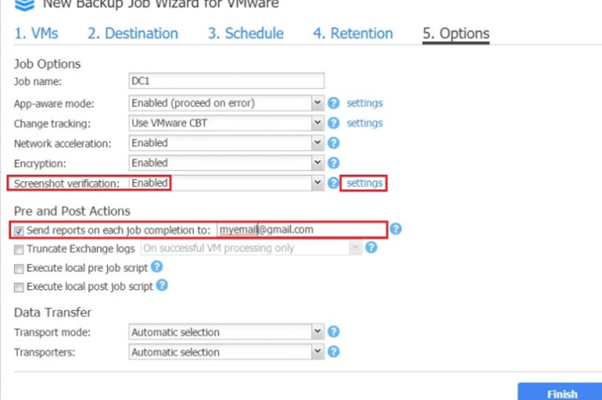
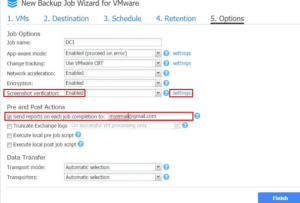
To actually turn on the screenshot verification feature on our backup jobs, we need to look at the Options of the job. Note below we have Screenshot verification to Enabled. Also, we see the settings link to the right of our Enabled box.
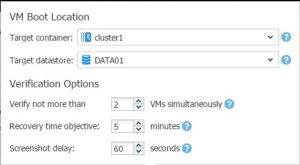
When we click the Settings link we can configure the Target container or vSphere resource, Target datastore or our storage for the resulting recovered VM, and other verification options including how many VMs we want to verify simultaneously, RTO on the recovered VM, and the delay after the guest OS is started until we grab a screenshot.
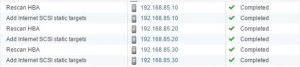
Once the job runs successfully, the screenshot verification process will begin by using the Flash VM Boot technology. If you are watching in vCenter web client, you will see iSCSI targets being provisioned as the Flash VM Boot mechanism configures the storage for the RDM mapping.
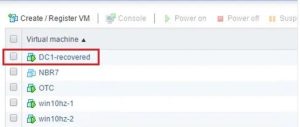
The VM is restored with the “-recovered” appended. It is also powered on as the process powers the virtual machine on in preparation for the screenshot verification.
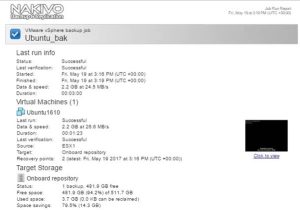
Once the virtual machine is booted and the screenshot has taken place, you will receive an email to the address that was configured earlier with the job details as well as a screenshot of the virtual machine in its booted state!
Thoughts
Verifying backups in VMWare workstation once they are taken should be an essential step in any VMWare backup routine to ensure VM security. Often, however, this step is neglected when it comes to backup processes. Failing to verify VMWare backups can produce nightmare scenarios where you have corrupted backups in an actual disaster recovery situation. VMware backup software, such as NAKIVO Backup & Replication makes verifying your backups seamless as the screenshot verification process automates the verification. Once the screenshot verification process is configured, the backed up virtual machine is booted from the actual backup files. This verifies the backup files are successfully able to boot the VM from the backups. After the VM boots, a screenshot is snapped and an email is sent with all the pertinent information.
About the Author:
Alex Tray has been working in IT for ten years as a system administrator and a cybersecurity consultant. His main area of specialization is Windows Server and Desktop Administration. He has extensive knowledge about Azure, Active Directory, Office 365, DNS, DHCP, Group Policy, Endpoint Manager (Intune), and Microsoft Endpoint Configuration Manager (SCCM).