How to connect front panel connectors
“`html
Building or upgrading a PC can be an exhilarating venture, but it can also be daunting, especially when navigating the complexities of front panel connectors. If you’ve ever been puzzled about how to connect those tiny cables from the case to the motherboard, you’re not alone. This front panel connectors guide breaks down everything you need to know — from the basics to practical insights that will ensure you have a seamless setup.
1. Understanding Front Panel Connectors
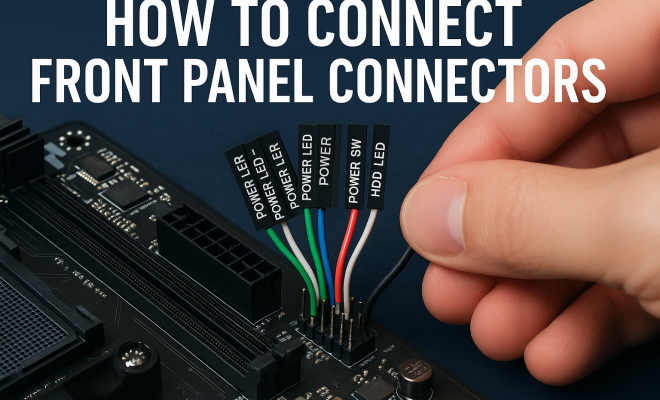
Front panel connectors are a series of wires that connect your PC case’s various features, such as power buttons, reset switches, USB ports, and audio jacks, to the motherboard. These components play a vital role in how you interact with your computer. They allow you to power the system on and off, reset it, and connect peripheral devices easily.
Typically, these connectors come bundled with your PC case. Each wire is usually labeled, making it easier to identify which one connects to the corresponding header on the motherboard. Understanding the layout and purpose of these connectors is essential for anyone looking to build or repair a computer.
2. Common Types of Front Panel Connectors
Most PC cases include several standard front panel connectors, each serving a specific function. Here are some of the most common types you’ll encounter:
- Power Switch: This connector turns the computer on and off.
- Reset Switch: Typically allows you to restart the system without powering it down.
- Power LED: This indicator shows whether your system is powered on.
- HDD LED: A light that blinks when your hard drive is active.
- USB Ports: Provides external access to USB devices.
- Audio Jacks: Connects the front panel audio ports for headphones and microphones.
Each type of connector plays an integral role in making your PC more user-friendly. Understanding these connectors can help you troubleshoot issues and enhance your overall experience.
3. Locating the Motherboard Headers
Before you can connect your front panel connectors, you need to find the corresponding headers on your motherboard. Generally, these headers are located near the bottom-right section of the motherboard, but this can vary depending on the model and manufacturer.
Referencing your motherboard manual is crucial at this stage. The manual will provide a diagram that clearly shows the layout of the headers, ensuring you know exactly where to plug each connector. If you’ve misplaced your manual, most manufacturers offer downloadable versions online.
4. Step-by-Step Connection Process
Now that you understand what you’re dealing with, let’s get into the nitty-gritty of connecting front panel connectors:
- Power Off: Always start with your PC powered off and unplugged to avoid any electrical shock.
- Identify Connectors: Organize the connectors based on their type and refer to your motherboard manual for their specific locations.
- Connect Power Switch: This is usually the most straightforward; align it with the correct header and push it down gently.
- Connect Reset Switch: Like the power switch, align and push down gently.
- Connect LEDs: The positive and negative sides are often marked, so pay close attention to the orientation.
- USB and Audio Connectors: These are typically keyed, meaning they can only fit into their specific headers one way, making it easier to connect.
- Final Checks: Once everything is connected, double-check all connections before closing your case.
This process may seem tedious, but it’s essential for ensuring that all components function correctly. Taking your time will save you headaches down the line.
5. Troubleshooting Common Issues
Even if you follow the connection process meticulously, you may still encounter some issues. Here are some common problems and their solutions:
- Power Button Not Working: Check if the connector is seated correctly on the motherboard header. If it still doesn’t work, consider trying a different header or the power button on the motherboard itself.
- LED Indicators Not Lighting Up: Ensure that the positive and negative pins are connected correctly. If they are, it may indicate a faulty LED.
- USB Ports Not Functioning: Verify that the USB connector is properly connected to the motherboard’s USB header. Consider testing the USB ports with different devices to rule out faulty hardware.
Knowing how to troubleshoot these issues can save you valuable time and frustration, enabling you to enjoy your new build without unnecessary delays. (See: Learn about PC case components.)
6. Best Practices for Connecting Front Panel Connectors
To ensure a hassle-free connection process, consider these best practices:
- Label Connectors: If your connectors are not labeled or difficult to read, consider using small labels to identify them. This will simplify the connection process.
- Use a Flashlight: If your case is dark or cramped, a flashlight can help you see what you’re doing.
- Stay Organized: Keep your workspace tidy. Having tools and parts organized can prevent mistakes and confusion.
- Be Gentle: When connecting cables, apply mild pressure to avoid damaging the connectors or headers.
These simple practices can make a world of difference, especially if you’re new to building PCs or reconnecting components.
7. Front Panel Connectors and Modern Technology
As technology evolves, so do front panel connectors. Many modern cases now feature connections for USB-C ports and upgraded audio jack configurations. These advancements reflect the increasing demand for better connectivity options.
Today, USB-C has become increasingly popular due to its versatility and faster data transfer rates. Many new motherboards are now equipped with USB-C headers, allowing you to take full advantage of this technology.
Similarly, audio standards have improved, with many cases offering high-definition audio connections. Ensuring compatibility with these modern technologies is essential for optimizing your PC’s performance and usability.
8. Future Trends in Front Panel Connectors
Looking ahead, the landscape of front panel connectors is poised for significant changes. As the demand for faster, more efficient connections grows, manufacturers are likely to innovate further. Here are some trends to watch:
- Increased Adoption of USB-C: Expect to see USB-C ports becoming standard on all new models, offering faster data transfer and charging.
- Enhanced Wireless Connections: As wireless technology advances, we may see a decline in physical connectors for certain functionalities, with Bluetooth and Wi-Fi taking precedence.
- Smart Features: Future cases may incorporate smart technology, such as temperature sensors or RGB lighting that interfaces directly with the motherboard.
By staying informed about these trends, you can future-proof your PC build and ensure it remains relevant for years to come.
9. Resources and Community Support
When it comes to building PCs and connecting front panel connectors, community support can be incredibly valuable. Online forums, video tutorials, and social media groups offer a wealth of information from other enthusiasts.
Websites like Tom’s Hardware, Reddit’s r/buildapc, and Linus Tech Tips provide tutorials, troubleshooting advice, and personal experiences that can help enhance your understanding. Don’t hesitate to ask questions or seek guidance — the community is there to help!
10. Final Thoughts on Your Front Panel Connectors Guide
Connecting front panel connectors might seem like a small part of building a PC, but it plays a significant role in how you interact with your system. With the right knowledge and tools, you can ensure everything is connected correctly, allowing for a smooth computing experience.
As technology continues to advance, staying updated on trends and best practices will only benefit you. Whether you’re a first-time builder or a seasoned pro, understanding front panel connectors is a crucial step in mastering your PC. So go ahead, plug in those connectors and enjoy the fruits of your labor!
11. Advanced Connector Types and Their Uses
While the basic connectors are essential, some advanced types are worth knowing about if you want to enhance your PC’s functionality. Here’s a look at a few specialized connectors that might come into play:
- Thunderbolt 3: This connector allows for high-speed data transfer and can connect multiple devices simultaneously. It’s particularly useful for high-performance peripherals like external GPUs or high-resolution monitors.
- RGB Headers: Many modern motherboards come equipped with RGB headers that let you control the lighting on your case fans, RAM, and other components. This adds a custom aesthetic to your build.
- Fan Connectors: Separate from the front panel connectors, these connectors allow you to connect additional case fans or cooling solutions. The ability to manage fan speeds can improve both cooling performance and noise levels.
Understanding these advanced connectors can help you make informed decisions about upgrades and how to best utilize your hardware for specific tasks. (See: Explore technology resources at MIT.)
12. How to Choose the Right Case for Your Build
Choosing the right case for your build is crucial, especially regarding front panel connectors. Factors to consider include:
- Connector Availability: Ensure the case has the types of front panel connectors compatible with your motherboard. Check for USB-C ports, audio jacks, and other necessary connections.
- Cooling Options: Look for cases that allow for sufficient airflow and have options for additional fans or liquid cooling systems. This is especially important if you’re planning on overclocking your CPU or GPU.
- Size and Compatibility: Ensure that the case size (ATX, microATX, mini-ITX) matches your motherboard and has enough room for your components. A cramped space can make connecting front panel connectors a nightmare.
Taking the time to choose the right case can enhance not only the assembly process but also the long-term usability of your PC.
13. Comparative Analysis of Motherboards
Different motherboards have varying features concerning front panel connectors. Here’s a quick comparison of a few popular brands:
- ASUS: Known for a user-friendly layout, ASUS motherboards often have color-coded pins and clear labeling, making it easier to connect front panel connectors. They also tend to include additional USB headers for more connectivity options.
- MSI: MSI motherboards often provide features like Mystic Light for RGB control, making them a great choice for gamers. Their header layouts are typically intuitive, though some models may have a less accessible placement for connectors.
- Gigabyte: With a focus on durability and performance, Gigabyte boards often feature reinforced PCIe slots and a straightforward header layout. They also integrate various advanced features like USB Type-C support on many models.
Understanding these differences can help you choose a motherboard that complements your needs and makes the connection process smoother.
14. Frequently Asked Questions about Front Panel Connectors
1. Can I connect multiple USB devices to a single USB header?
Yes, you can use a USB hub that connects to a single USB header on your motherboard. This allows you to expand the number of USB devices you can connect without needing more headers.
2. What if my case doesn’t have all the connectors I need?
If your case lacks certain connectors, you can often purchase adapters or extension cables that will allow you to connect additional devices. Check your motherboard specifications to ensure compatibility with these adapters.
3. Why is my reset button not functioning?
If your reset button isn’t working, first ensure that it’s connected to the correct header on the motherboard. If it is, then the button itself may be faulty, or there could be an issue with the motherboard.
4. Are front panel connectors universal?
Most front panel connectors are standardized, but there may be slight variations between manufacturers. Always consult your motherboard manual for the exact pin configuration to avoid mismatching.
5. How can I manage RGB lighting through front panel connectors?
Some motherboards have dedicated RGB headers that allow you to control lighting through software. Make sure to connect your RGB components to these headers and use the manufacturer’s software to manage the lighting effects.
6. Can I use adapters for different connector types?
Yes, adapters are widely available for various connector types. Make sure to choose high-quality adapters to avoid any connectivity issues or potential damage to your components.
7. Is it necessary to connect all front panel connectors?
While it’s not mandatory to connect every front panel connector, doing so can enhance your PC’s functionality and user experience. For example, connecting the power LED and HDD LED can provide helpful visual indicators of system status. (See: Access scientific articles on technology.)
15. Special Considerations for Gaming PCs
When building a gaming PC, front panel connectors take on even greater importance. Many gamers utilize specialized hardware that requires additional connectors or specific setups. For example, a gaming PC often necessitates more USB ports for peripherals like gaming mice, keyboards, and VR equipment. You might also want front panel connectors that support faster data rates.
Additionally, many gaming cases come with additional features like RGB lighting that enhances aesthetics. Proper management of these connectors is crucial for both functionality and visual appeal. If you’re planning on overclocking, consider cases designed for optimal airflow and cooling, as this can greatly affect performance during intensive gaming sessions.
16. Review of High-Performance Cases
For serious builds, you may want to consider high-performance cases that come with advanced front panel connectors and features. Some excellent options include:
- Cooler Master H500: Known for its excellent airflow, the H500 includes USB 3.0 and USB-C front panel connectors, making it a great choice for gamers.
- NZXT H510: This case offers a clean aesthetic with cable management features, along with USB 3.1 Gen 2 Type-C support for faster connections.
- Fractal Design Meshify C: This case combines a modern design with great cooling potential, featuring multiple USB connections that are easily accessible.
Choosing a case that caters to your specific needs can enhance not just the assembly process but improve your gaming experience as well.
17. Mastering Cable Management
Proper cable management is essential for both aesthetics and airflow. When connecting front panel connectors, take a moment to think about how cables will run through your case. Here are some tips:
- Plan Your Route: Before securing cables, visualize how they will run from the front panel to the motherboard. This will help you avoid clutter.
- Use Cable Ties: A few cable ties or Velcro straps can go a long way in keeping everything organized.
- Hide Cables Behind the Motherboard Tray: If your case allows it, route cables behind the motherboard for a cleaner look.
- Label Your Cables: Especially in complex builds, labeling can save you time when troubleshooting or upgrading in the future.
Mastering cable management will not only improve airflow but can also make it easier for you to make future upgrades. A well-organized case is also visually appealing and can help maintain the longevity of your components.
18. Conclusion: Mastering Your Front Panel Connectors
Having a firm grasp of front panel connectors is an essential skill for anyone looking to build or upgrade a PC. Whether you’re a novice or a seasoned builder, understanding how these connectors work will make a significant difference in your experience.
As technology progresses and new standards emerge, keeping abreast of these changes will help you maximize the potential of your setup. With the insights shared in this guide, you’re now better equipped to tackle your PC build with confidence. Enjoy the journey, and happy building!
“`
Trending Now
Frequently Asked Questions
What are front panel connectors on a PC?
Front panel connectors are wires that link your PC case's features, like power buttons, reset switches, USB ports, and audio jacks, to the motherboard. They play a crucial role in enabling user interaction with the computer, allowing functions like powering on and connecting peripherals.
How do I connect front panel connectors to the motherboard?
To connect front panel connectors to the motherboard, first identify each cable by the labels usually provided. Then, refer to the motherboard manual for the correct header locations. Firmly connect each cable to its corresponding header to ensure proper functionality.
What are the common types of front panel connectors?
Common types of front panel connectors include the Power Switch, Reset Switch, Power LED, HDD LED, USB Ports, and Audio Jacks. Each serves a specific purpose, such as powering the system, indicating activity, and connecting external devices.
Why are front panel connectors important?
Front panel connectors are essential because they facilitate user interaction with the computer. They enable critical functions such as powering the system on and off, resetting it, and connecting peripherals, enhancing the overall user experience.
Can I troubleshoot front panel connector issues?
Yes, troubleshooting front panel connector issues typically involves checking the connections to ensure they are secure and correctly placed on the motherboard. Referencing the motherboard manual can help identify the correct headers, and ensuring the cables are not damaged is also important.
What did we miss? Let us know in the comments and join the conversation.