The Tech Edvocate

Top Menu

  • Advertisement
  • Apps
  • Home Page
  • Home Page Five (No Sidebar)
  • Home Page Four
  • Home Page Three
  • Home Page Two
  • Home Tech2
  • Icons [No Sidebar]
  • Left Sidbear Page
  • Lynch Educational Consulting
  • My Account
  • My Speaking Page
  • Newsletter Sign Up Confirmation
  • Newsletter Unsubscription
  • Our Brands
  • Page Example
  • Privacy Policy
  • Protected Content
  • Register
  • Request a Product Review
  • Shop
  • Shortcodes Examples
  • Signup
  • Start Here
    • Governance
    • Careers
    • Contact Us
  • Terms and Conditions
  • The Edvocate
  • The Tech Edvocate Product Guide
  • Topics
  • Write For Us
  • Advertise

Main Menu

  • Start Here
    • Our Brands
    • Governance
      • Lynch Educational Consulting, LLC.
      • Dr. Lynch’s Personal Website
      • Careers
    • Write For Us
    • The Tech Edvocate Product Guide
    • Contact Us
    • Books
    • Edupedia
    • Post a Job
    • The Edvocate Podcast
    • Terms and Conditions
    • Privacy Policy
  • Topics
    • Assistive Technology
    • Child Development Tech
    • Early Childhood & K-12 EdTech
    • EdTech Futures
    • EdTech News
    • EdTech Policy & Reform
    • EdTech Startups & Businesses
    • Higher Education EdTech
    • Online Learning & eLearning
    • Parent & Family Tech
    • Personalized Learning
    • Product Reviews
  • Advertise
  • Tech Edvocate Awards
  • The Edvocate
  • Pedagogue
  • School Ratings

logo

The Tech Edvocate

  • Start Here
    • Our Brands
    • Governance
      • Lynch Educational Consulting, LLC.
      • Dr. Lynch’s Personal Website
        • My Speaking Page
      • Careers
    • Write For Us
    • The Tech Edvocate Product Guide
    • Contact Us
    • Books
    • Edupedia
    • Post a Job
    • The Edvocate Podcast
    • Terms and Conditions
    • Privacy Policy
  • Topics
    • Assistive Technology
    • Child Development Tech
    • Early Childhood & K-12 EdTech
    • EdTech Futures
    • EdTech News
    • EdTech Policy & Reform
    • EdTech Startups & Businesses
    • Higher Education EdTech
    • Online Learning & eLearning
    • Parent & Family Tech
    • Personalized Learning
    • Product Reviews
  • Advertise
  • Tech Edvocate Awards
  • The Edvocate
  • Pedagogue
  • School Ratings
  • Medicube PDRN Pink Collagen Cream: Is It Safe to Use Now?

  • Tarte’s ‘Snatch Sticks’ Spark Unprecedented Backlash — Here’s Why Everyone’s Talking

  • This AI-Designed Drug Just Entered Phase III Trials — And It Might Reverse Your Biological Age

  • Unbelievable: Top AI Startups Caught Faking Revenue, Rocking Silicon Valley

  • Xbox Cloud Gaming’s Urgent Problem: Microsoft’s Brutal Truth Revealed

  • The Hypocrisy That’s Quietly Reshaping Gaming Journalism

  • Anthropic Insider: Why AI Could End Humanity by 2036

  • Unbelievable: OpenAI Claims AI Solved Million-Dollar Math Problem – But the Credit Battle Just Began

  • Heartbreaking: 93 Million Kids’ Futures Stolen by Surging Attacks on Education

  • Unsettling: The Cat in the Hat Trend That’s Causing Mass Panic in Schools

Digital & Mobile Technology
Home›Digital & Mobile Technology›How to Use Scene Cut Detection in DaVinci Resolve

How to Use Scene Cut Detection in DaVinci Resolve
By Matthew Lynch
July 31, 2023
0
Spread the love

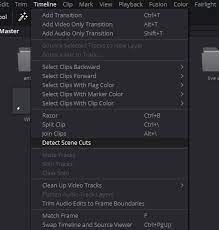
As a video editor, one of the most time-consuming tasks can be going through and manually cutting each scene of your footage. That’s where Scene Cut Detection in DaVinci Resolve comes in handy. This feature automatically detect cuts in your footage and adds markers for easy editing. In this article, we will go over how to use Scene Cut Detection in DaVinci Resolve.

Step 1: Import your footage

The first step is to import your footage into DaVinci Resolve. You can do this by clicking on the Media tab and then clicking Import. Navigate to the folder containing your footage and select all the clips you want to import.

Step 2: Create a Timeline

Once your footage is imported, you need to create a timeline to start editing. Click on the Edit tab and then click on the New Timeline button. Give your timeline a name and set the resolution and frame rate according to your footage.

Step 3: Enable Scene Cut Detection

With your timeline created, go to the toolbar at the bottom of the screen and click on the Cut Detection button, which looks like a scissors. This will open the Scene Cut Detection settings.

Step 4: Adjust the Detection Settings

In the Scene Cut Detection settings, adjust the detection settings to your preference. The default settings work well for most footage, but you can change the sensitivity, threshold, and minimum duration to fine-tune the detection.

Step 5: Analyze your Footage

Once you have adjusted the detection settings, click on the Analyze button to analyze your footage for cuts. This may take a few minutes depending on the amount of footage you have, but you can continue working on other parts of your project while it analyzes.

Step 6: Review and Adjust Markers

Once the analysis is complete, you will see markers on your timeline indicating the detected cuts. Go through your footage and review the markers to ensure they are accurate. You can adjust the markers by dragging them left or right to fine-tune the cut.

Step 7: Separate the Clips

Once you are satisfied with the cut markers, you can separate the clips by right-clicking on the markers and selecting “Create Timeline Clips”. This will create separate clips for each scene, making it easier to edit.

In conclusion, Scene Cut Detection in DaVinci Resolve is a powerful tool that can save a lot of time when editing your footage. By following these simple steps, you can quickly and accurately detect cuts in your footage and separate them into individual clips.


Previous Article

How to Install and Set Up Sublime ...

Next Article

The Best Smart Carbon Monoxide Detectors

Matthew Lynch

Related articles More from author

  • Digital & Mobile Technology

    How to Make a Shield in Minecraft

    May 30, 2023
    By Matthew Lynch
  • Digital & Mobile Technology

    How to Send a Google Calendar Invite

    May 7, 2023
    By Matthew Lynch
  • Digital & Mobile Technology

    How to Clear Queue on Spotify

    July 28, 2023
    By Matthew Lynch
  • Digital & Mobile Technology

    What is a Microsoft Technology Associate (MTA) Certification?

    April 18, 2023
    By Matthew Lynch
  • Digital & Mobile Technology

    What Does a Blue Light Ring on Alexa Mean?

    September 7, 2023
    By Matthew Lynch
  • Digital & Mobile Technology

    How to Install Microsoft 365 on Your PC

    June 1, 2023
    By Matthew Lynch

Search

Login & Registration

  • Log in
  • Entries feed
  • Comments feed
  • WordPress.org

Newsletter

Signup for The Tech Edvocate Newsletter and have the latest in EdTech news and opinion delivered to your email address!

About Us

Since technology is not going anywhere and does more good than harm, adapting is the best course of action. That is where The Tech Edvocate comes in. We plan to cover the PreK-12 and Higher Education EdTech sectors and provide our readers with the latest news and opinion on the subject. From time to time, I will invite other voices to weigh in on important issues in EdTech. We hope to provide a well-rounded, multi-faceted look at the past, present, the future of EdTech in the US and internationally.

We started this journey back in June 2016, and we plan to continue it for many more years to come. I hope that you will join us in this discussion of the past, present and future of EdTech and lend your own insight to the issues that are discussed.

Newsletter

Signup for The Tech Edvocate Newsletter and have the latest in EdTech news and opinion delivered to your email address!

Contact Us

The Tech Edvocate
910 Goddin Street
Richmond, VA 23231
(601) 630-5238
[email protected]

Copyright © 2026 Matthew Lynch. All rights reserved.