How to Upgrade RAM on a Laptop
Upgrading the RAM on a laptop can significantly improve its performance, especially if you are running multiple programs or working with large files. Fortunately, upgrading RAM is a relatively simple process that can be done by anyone with a bit of technical knowledge.
Step 1: Check your Laptop’s RAM
Before you start upgrading your laptop’s RAM, you need to know how much RAM your laptop currently has. You can check this by going to the System Information tool on your laptop, which can be found in the Control Panel or by typing “system information” in the search bar.
Step 2: Determine the Type of RAM You Need
Once you know how much RAM your laptop has, you need to determine the type of RAM you need to upgrade it. There are several types of RAM available, including DDR3, DDR4, and DDR5. You can find out which type of RAM your laptop supports by checking the manufacturer’s website or consulting the laptop’s manual.
Step 3: Purchase the New RAM
After determining the type of RAM you need, you can purchase the new RAM from any computer hardware store or online retailer. Make sure that the RAM you purchase is compatible with your laptop’s motherboard and that it meets the required specifications.
Step 4: Turn off Your Laptop and Unplug It
Before you start the installation process, make sure to turn off your laptop and unplug it from the power source. This is an important safety measure that will protect you and your laptop from any electrical damage.
Step 5: Open the Laptop’s Cover
The RAM slots are usually located under the laptop’s cover. To access them, you need to remove the screws that secure the cover in place. Make sure to keep the screws in a safe place so that you can easily put them back later.
Step 6: Remove the Old RAM
Once you have removed the cover, you can easily access the RAM slots. To remove the old RAM, gently push the clips on either side of the RAM module. The module should pop up at an angle, and you can then remove it from the slot.
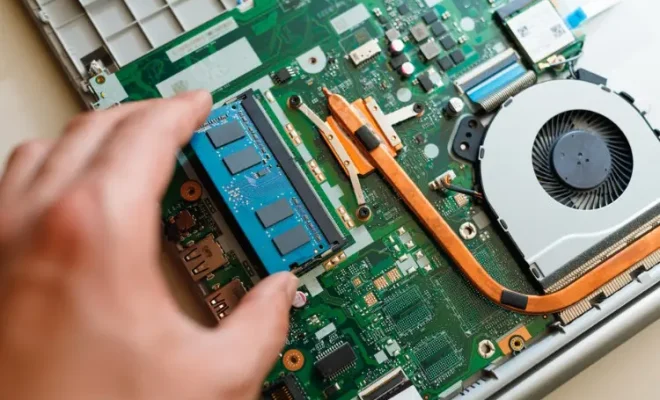
Step 7: Install the New RAM
To install the new RAM, simply align the notches on the module with the slot in the RAM socket. Gently push the module down until it clicks into place. Make sure that both clips on either side of the socket snap back into place.
Step 8: Replace the Cover
After installing the new RAM, replace the cover and secure it with the screws that you removed earlier. Make sure that all of the screws are tightened properly.
Step 9: Turn Your Laptop Back On
Now that you have upgraded your laptop’s RAM, you can turn it back on and enjoy the improved performance. You can check the new amount of RAM by going to the System Information tool again.
Upgrading the RAM on a laptop is a simple and cost-effective way to improve its performance. With a bit of technical knowledge and the right tools, anyone can upgrade their laptop’s RAM and enjoy a faster, more efficient machine.