How to Translate Webpages in Google Chrome

Google Chrome is one of the most popular web browsers in the world due to its speed, security, and user-friendly interface. One of its most impressive features is the ability to translate webpages instantly. This is particularly useful when browsing international websites, which may be in a language with which you are not familiar. In this article, we will provide you with a step-by-step guide on how to translate webpages in Google Chrome.
Step 1: Open Google Chrome
The first step is to open Google Chrome on your desktop or mobile device. Go to the menu button located at the top right corner of the screen and click on it. Then, choose “Settings” from the drop-down menu.
Step 2: Select “Languages”
Once you are in the settings menu, scroll down and click on “Advanced.” This will give you more options, including “Languages.” Click on this option.
Step 3: Add new languages
You will now see a list of languages that are available on your browser. Next, click on “Add languages.” Select the language you want to add from the list of available options. You can also search for languages using the search box.
Step 4: Enable translation
After adding the language, scroll down to the “Language” section and toggle the “Offer to translate pages that aren’t in a language you read” switch to the “On” position. This will enable automatic translation for all webpages that are not written in your default language.
Step 5: Use the auto-translate feature
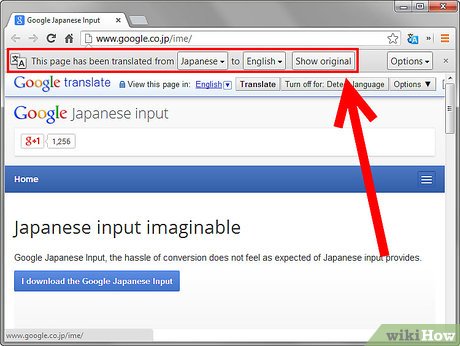
When you visit a webpage that is not in your default language, Google Chrome will automatically detect it and offer to translate it for you. A message will pop up at the top of the screen, asking if you would like to translate the page. Click on “Translate” and the webpage will be translated into your default language.
Step 6: Manually translate a webpage
If the auto-translate feature is not working for you, or you prefer to manually translate a webpage, you can do so by right-clicking anywhere on the webpage and selecting “Translate to [your default language].” This option is available in the context menu that appears when you right-click.
Step 7: Change the default translation language
If you want to change your default language, go back to the Language section of the Settings menu and scroll down to “Preferred languages.” Here, you can click and drag the languages to change the order they appear in, which will also change your default language. You can also remove languages that you no longer need.
In conclusion, translating webpages in Google Chrome is a straightforward process that can help you to read and understand international content. By following these steps, you can enable automatic translation or manually translate webpages, as well as change your default language. Happy browsing in any language you choose!


