How to Replace a Garage DoorIntroduction
Replacing a garage door may seem like a daunting task, but with the right tools, guidance, and preparation, it can be an achievable DIY project. This article will take you through the necessary steps, from removing the old garage door to installing and adjusting the new one.
Safety First
Before you begin, remember that safety should always come first. Make sure to wear proper protective gear, such as gloves, safety glasses, and sturdy shoes with good traction. Additionally, enlist the help of a friend or family member to assist with lifting and maneuvering heavy components.
Step 1: Gather Tools and Materials
To replace a garage door successfully, you will need the following tools and materials:
– New garage door
– Garage door opener (if not using existing one)
– Level
– C-clamps or locking pliers
– Cordless drill/driver
– Socket wrench set
– Ladder
– Measuring tape
– Hammer or mallet
– Sawhorses or workbench
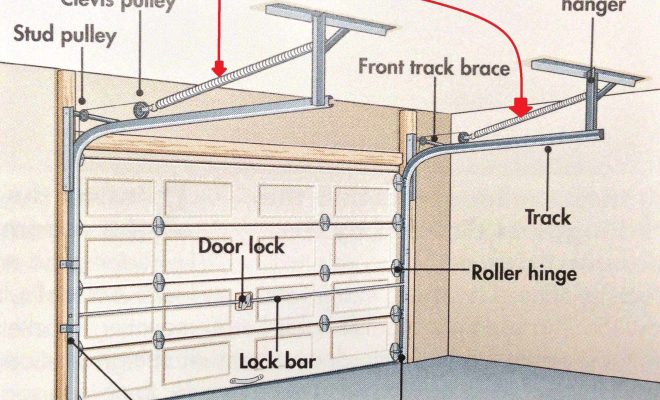
Step 2: Remove the Old Garage Door
1. Begin by disconnecting your existing garage door opener.
2. Unwind the torsion spring (if applicable) by securing the torsion bar with C-clamps or locking pliers, then loosening the set screws on the cable drum.
3. Carefully lower the old door to its lowest position before detaching it from its hinges, rollers, and tracks.
4. Remove panels one by one by pulling them out from their brackets. With help from your assistant, lift each panel out of place.
Step 3: Install New Tracks
1. Using your level and measuring tape, carefully measure and install the vertical tracks before bolting them in place.
2. Secure horizontal tracks to their respective support brackets using provided hardware.
Step 4: Assemble and Install New Garage Door Panels
1. Assemble the bottom panel by attaching brackets, hinges, and rollers to their assigned positions.
2. Place the first panel in the opening and secure it to vertical tracks using provided hardware.
3. Attach the next panel, ensuring all hinges are connected correctly. Repeat this process until all panels are installed.
4. Make certain the door operates smoothly by manually lifting and lowering it.
Step 5: Install and Secure New Torsion Spring (if applicable)
1. Position the spring onto the torsion bar with cable drums on each end.
2. Wind the spring tension as directed by the manufacturer’s instructions before securing it with set screws.
3. Align the cable drums with each vertical track and install cables onto their appointed slots.
Step 6: Install Garage Door Opener (if applicable)
Follow the manufacturer’s instructions for assembling and installing your chosen garage door opener.
Step 7: Final Adjustments and Testing
1. Inspect your installation to ensure all screws and bolts are tight.
2. Test the garage door by opening and closing it several times, making any needed adjustments in tension or alignment.
3. Reconnect your garage door opener if you have not already done so.
Conclusion
Replacing a garage door may appear challenging at first, but with careful planning, proper equipment, and a handy partner, it can be a fulfilling DIY project. Remember to prioritize safety while following these steps for a successful garage door replacement experience.