How to Print From Your iPad
Printing from your iPad has never been easier, thanks to Apple’s AirPrint technology and a variety of third-party apps. Whether you’re looking to print documents, photos, or emails, this step-by-step guide will walk you through the process of printing from your iPad with ease.
1. Check your printer compatibility:
Before you can start printing from your iPad, ensure that your printer is compatible with AirPrint. Most modern printers do support this feature, but to double-check, visit the Apple website for a list of supported printers.
2. Connect your iPad and printer to the same Wi-Fi network:
In order to print from your iPad, both devices must be connected to the same Wi-Fi network. Go to Settings > Wi-Fi on your iPad and connect it to the desired network. Similarly, make sure that your printer is also connected to the same network.
3. Access the content you wish to print:
Open the app or file containing the content you want to print. This could be a document in Pages, an email in Mail, or a photo in the Photos app.
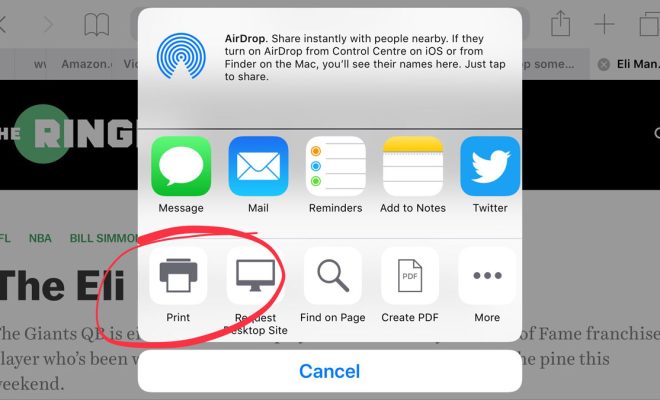
4. Locate and tap the Share icon:
The Share icon typically looks like a square with an upward-pointing arrow. You can find it in different locations depending on the app you’re using. In Photos, it’s located in the bottom left corner; while in Mail or Safari, it’s at the bottom center of the screen.
5. Tap ‘Print’ from the share menu:
After tapping the Share icon, a menu will appear with various options. Scroll through these options until you find ‘Print’ and then tap on it.
6. Choose your AirPrint-enabled printer:
Your iPad will now display a list of available printers on the same Wi-Fi network that supports AirPrint. Tap on your desired printer to select it.
7. Customize your print options:
Depending on the capabilities of your printer, you may be able to select options like paper size, color or black-and-white printing, and the number of copies to be printed. Adjust these settings according to your preference.
8. Tap ‘Print’ to begin the printing process:
With all settings adjusted, tap ‘Print’ at the top right corner of the screen to send your document, photo, or email to the printer.
9. Collect your printed content:
Wait for your printer to finish printing and collect your content from the output tray.
Conclusion:
Printing from your iPad is a convenient, time-saving feature that allows you to access important documents and images with ease. With a compatible AirPrint printer and these simple steps, you’ll be able to enjoy hassle-free printing directly from your iPad in no time.