How to Make a Soap Cake: 8 Steps

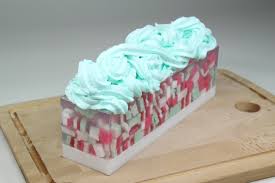
A soap cake makes a thoughtful and creative gift for family and friends. It’s an eye-catching, fragrant, and useful addition to any bathroom that adds a touch of charm. Making a soap cake is not only easy but also a fun activity. Here are eight steps to create your own soap cake masterpiece.
1.Gather materials: To make a soap cake, you’ll need melt-and-pour soap base, essential oils or fragrance oils, mica powder or food coloring, cake mold, rubbing alcohol in a spray bottle, a microwave-safe bowl or container, silicone spatula, knife, and decorations of your choice (such as glitter or soap embeds).
2.Chop the soap base: Begin by cutting the melt-and-pour soap base into small cubes, approximately 1 inch in size. This will make it easier to melt the base evenly.
3.Melt the soap base: Place the chopped soap base in a microwave-safe bowl or container and heat it in the microwave for about 30 seconds. Check on it and stir it gently with a silicone spatula. Repeat the process until the base is completely melted but be careful not to overheat it.
4.Add color: Pour a small amount of mica powder or food coloring into the melted soap base. Stir thoroughly with the spatula until you achieve your desired color.
5.Add fragrance: Add in several drops of your preferred essential oil or fragrance oil to give your soap cake an appealing aroma. Mix well to ensure even distribution throughout the entire mixture.
6.Pour mixture into mold: Slowly pour the liquid soap mixture into your chosen cake mold, ensuring that it is evenly distributed and filling up all contours of the design. Lightly spray rubbing alcohol on top of the poured mixture to remove air bubbles that may have formed.
7.Let it set: Place your filled mold on a flat surface and allow it to cool and set. This process might take between two hours to overnight, depending on the size of your soap cake. Once it has completely hardened, gently remove the soap cake from the mold by loosening its edges and pressing on the bottom of the mold.
8.Decorate: Finish your soap cake by adding personal touches such as embellishments, soap flowers, glitter, or any other creative decorations of your choice. Be mindful to use skin-safe and non-toxic materials.
Congratulations! You have now created a beautiful and functional soap cake that’s ready to be displayed or gifted. With this simple guide, you can continue experimenting with different colors, scents, and designs to create an endless array of lovely soap cakes for various occasions.


