The Tech Edvocate

Top Menu

  • Advertisement
  • Apps
  • Home Page
  • Home Page Five (No Sidebar)
  • Home Page Four
  • Home Page Three
  • Home Page Two
  • Home Tech2
  • Icons [No Sidebar]
  • Left Sidbear Page
  • Lynch Educational Consulting
  • My Account
  • My Speaking Page
  • Newsletter Sign Up Confirmation
  • Newsletter Unsubscription
  • Our Brands
  • Page Example
  • Privacy Policy
  • Protected Content
  • Register
  • Request a Product Review
  • Shop
  • Shortcodes Examples
  • Signup
  • Start Here
    • Governance
    • Careers
    • Contact Us
  • Terms and Conditions
  • The Edvocate
  • The Tech Edvocate Product Guide
  • Topics
  • Write For Us
  • Advertise

Main Menu

  • Start Here
    • Our Brands
    • Governance
      • Lynch Educational Consulting, LLC.
      • Dr. Lynch’s Personal Website
      • Careers
    • Write For Us
    • The Tech Edvocate Product Guide
    • Contact Us
    • Books
    • Edupedia
    • Post a Job
    • The Edvocate Podcast
    • Terms and Conditions
    • Privacy Policy
  • Topics
    • Assistive Technology
    • Child Development Tech
    • Early Childhood & K-12 EdTech
    • EdTech Futures
    • EdTech News
    • EdTech Policy & Reform
    • EdTech Startups & Businesses
    • Higher Education EdTech
    • Online Learning & eLearning
    • Parent & Family Tech
    • Personalized Learning
    • Product Reviews
  • Advertise
  • Tech Edvocate Awards
  • The Edvocate
  • Pedagogue
  • School Ratings

logo

The Tech Edvocate

  • Start Here
    • Our Brands
    • Governance
      • Lynch Educational Consulting, LLC.
      • Dr. Lynch’s Personal Website
        • My Speaking Page
      • Careers
    • Write For Us
    • The Tech Edvocate Product Guide
    • Contact Us
    • Books
    • Edupedia
    • Post a Job
    • The Edvocate Podcast
    • Terms and Conditions
    • Privacy Policy
  • Topics
    • Assistive Technology
    • Child Development Tech
    • Early Childhood & K-12 EdTech
    • EdTech Futures
    • EdTech News
    • EdTech Policy & Reform
    • EdTech Startups & Businesses
    • Higher Education EdTech
    • Online Learning & eLearning
    • Parent & Family Tech
    • Personalized Learning
    • Product Reviews
  • Advertise
  • Tech Edvocate Awards
  • The Edvocate
  • Pedagogue
  • School Ratings
  • A Visitors Guide to Oklahoma City (OK), United States

  • A Visitor’s Guide to Tucson, Arizona, United States

  • A Visitor’s Guide to Hamilton, Canada

  • Beware of Fiverr: You Might Get Scammed

  • The Future of Artificial Intelligence: Navigating the Next Frontier

  • Best Home Backup Generators for 2026

  • Online Learning Platforms: Transforming Education in the Digital Age

  • Fastest Growing Sectors of the EdTech Market: Exploring Emerging Trends

  • The Best Video Games of All Time

  • What is the Best Gaming Platform on the Market?

Assistive Technology
Home›Assistive Technology›How to Make a Photo Mosaic in Photoshop

How to Make a Photo Mosaic in Photoshop

By Matthew Lynch
June 10, 2023
0
Spread the love

Photography has become an integral part of our lives, and with the advent of digital cameras and image editing software, the possibilities of creating visually stunning and unique images have expanded tremendously. One such technique that has gained immense popularity in recent times is the Photo Mosaic. A photo mosaic is a computer-generated image that is made up of smaller, individual images arranged in a specific pattern to create a larger picture. These smaller images are a combination of different elements such as colors, shapes, and textures that combine to create a visually stunning and unique final image. In this article, we will show you how to make a photo mosaic in Photoshop.

Step 1: Choose your main image:

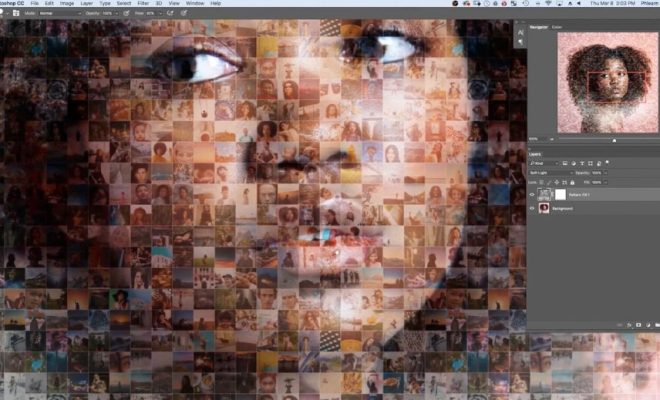
The first step in creating a photo mosaic is to choose your main image. This is the primary image that will form the base of your mosaic. It could be anything from a landscape to a person’s face or a simple object. The main image should be in high resolution and have a clear and defined subject matter. Once you have chosen the main image, import it into Photoshop.

Step 2: Choose the images for the tiles:

Next, you need to collect or select a set of images that will act as the tiles for the mosaic. You can use any images for this purpose, including photographs, illustrations, or even simple shapes or patterns. The images should be chosen based on their color and tone, which should complement the main image. You can use a filter to ensure that all the images have a consistent appearance.

Step 3: Create a new document:

Now, create a new document in Photoshop. The size of the document should match the size of the main image. For example, if the main image is to be printed in A4 size, then the document should also be set to A4 size.

Step 4: Create a grid:

Next, you need to create a grid on the new document. This will help you to arrange the tiles in a specific pattern. Go to the View menu, select the Show option, and then select Grid. Set the grid spacing to your desired size, and then click OK.

Step 5: Cut the main image into tiles:

Now, you need to cut the main image into equal-sized tiles using the rectangular marquee tool. Make sure the grid is visible and align the marquee tool with the grid lines. With the marquee tool in place, click and drag over the top left-hand corner of the main image, then repeat your actions until the entire main image is cut into tiles.

Step 6: Apply a Filter to the tiles:

Now it’s time to apply a filter to the tiles to give them a unique look. In the Filter menu, choose the Texture option and then select the Texturizer option. Here you will find numerous patterns and textures to choose from. If you don’t like the available textures, you can create your texture and select it for the tiles.

Step 7: Insert your tiles:

Now, arrange the tiles to form the new image using the grid as a guide. Place each tile into position on the new document as per your design. Continue placing tiles until the entire image has been filled.

Step 8: Merge the images:

Once all the tiles are in place, select all the layers and merge them into one layer. Go to the Layer menu, select the Merge Layers option, and then click OK.

Step 9: Finalize the image:

Once you’ve merged the layers, you can apply any final tweaks to the image. This may include adjusting the brightness, saturation, or sharpness of the image. Once you are satisfied with your final image, save it in your desired format.

Conclusion:

Creating a photo mosaic can be a fun and exciting project that can help you create unique and visually stunning images. With the help of Photoshop, creating a photo mosaic is relatively straightforward and can be achieved with just a few simple steps. Just choose a main image, gather images for the tiles, create a grid, cut and filter the main image into tiles, insert the tiles on the new document, merge layers and finalize the image, and you have yourself a photo mosaic! Start your photo mosaic project today and add a new dimension to your photos.

Previous Article

What’s the Difference Between Null and Undefined ...

Next Article

Forward Hotmail Email to a Different Account

Matthew Lynch

Related articles More from author

  • Assistive Technology

    Ways to Copy Files Faster in Windows 10 and 11

    June 11, 2023
    By Matthew Lynch
  • Assistive Technology

    How to Turn Off Autocorrect on Your iPhone

    June 14, 2023
    By Matthew Lynch
  • Assistive Technology

    How to Remove Bing From Chrome and Reset the Default Search Engine

    June 6, 2023
    By Matthew Lynch
  • Assistive Technology

    How to Delete Games on PS4

    June 8, 2023
    By Matthew Lynch
  • Assistive Technology

    How to Reset the Password on an HP Laptop

    June 8, 2023
    By Matthew Lynch
  • Assistive Technology

    How to See Who Has Access to Your Google Drive Files

    June 11, 2023
    By Matthew Lynch

Search

Login & Registration

  • Register
  • Log in
  • Entries feed
  • Comments feed
  • WordPress.org

Newsletter

Signup for The Tech Edvocate Newsletter and have the latest in EdTech news and opinion delivered to your email address!

About Us

Since technology is not going anywhere and does more good than harm, adapting is the best course of action. That is where The Tech Edvocate comes in. We plan to cover the PreK-12 and Higher Education EdTech sectors and provide our readers with the latest news and opinion on the subject. From time to time, I will invite other voices to weigh in on important issues in EdTech. We hope to provide a well-rounded, multi-faceted look at the past, present, the future of EdTech in the US and internationally.

We started this journey back in June 2016, and we plan to continue it for many more years to come. I hope that you will join us in this discussion of the past, present and future of EdTech and lend your own insight to the issues that are discussed.

Newsletter

Signup for The Tech Edvocate Newsletter and have the latest in EdTech news and opinion delivered to your email address!

Contact Us

The Tech Edvocate
910 Goddin Street
Richmond, VA 23231
(601) 630-5238
[email protected]

Copyright © 2025 Matthew Lynch. All rights reserved.