How to Make a LEGO Costume

Introduction
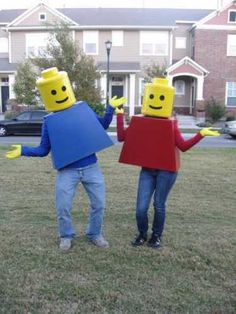
LEGO has been one of the most popular toys worldwide for decades, and it never seems to lose its charm. With their bright colors, endless building possibilities, and a passion for creativity, it’s no wonder that children and adults alike adore these tiny interlocking bricks. Imaginative play with LEGO often extends beyond the bricks themselves, with enthusiasts wanting to bring LEGO characters to life. In this article, we will guide you on how to make your very own LEGO costume.
Materials Needed:
1. Cardboard boxes (large enough to fit over your torso)
2. Paint in your chosen LEGO colors
3. Hot glue gun
4. Fabric straps (to hold the costume together)
5. Plastic cups or small round containers (for the iconic LEGO bumps)
6. Scissors or craft knife
7. Ruler or measuring tape
8. Pencil or marker for marking measurements
Step 1: Choose Your LEGO Block Size and Shape
Decide what size and shape you’d like your LEGO block to be. Standard blocks are rectangular, but you can choose any form that you prefer! Be sure that your cardboard box is large enough to accommodate your desired shape.
Step 2: Cut the Cardboard Box
Using a craft knife or scissors, cut out the sides of the cardboard box according to your chosen dimensions. Remember to keep one of the longer sides intact as it will serve as the top or bottom piece of your LEGO block.
Step 3: Attach the Sides Together
Using a hot glue gun, assemble the pieces back together by attaching them from the inside of each edge so that they’re secure. Ensure all corners are glued securely and allow it to dry completely.
Step 4: Paint Your Costume
Choose your favorite LEGO color(s) and start painting your assembled box! Be sure to apply even coats of paint on every side for a smooth and vibrant finish. Allow the paint to dry before proceeding to the next step.
Step 5: Create the LEGO Bumps
To create the iconic LEGO bumps, cut the circular tops off your plastic cups or small round containers. Paint these in the same color as your box and allow them to dry completely. Once dry, use the hot glue gun to attach each bump evenly spaced out on the top side of your LEGO block.
Step 6: Attach Fabric Straps
Measure and cut strips of fabric that are long enough to fit over your shoulders while keeping the costume comfortably resting around your waist. Attach them inside the LEGO block on opposite sides, using a hot glue gun or stitching them for extra security.
Step 7: Put Your Costume On
Now that everything is assembled, wear your homemade LEGO costume to show it off! To enhance your look, consider pairing it with matching colored clothing underneath, face paint, or even creating custom LEGO-themed accessories.
Conclusion
Creating a LEGO costume is an enjoyable and straightforward DIY project that allows you to express your love for this classic toy. With just a few supplies and some creativity, you’ll be ready for any costume party, Halloween celebration, or simply have a fun time dressing up as a massive LEGO brick. Embrace your inner child and have fun building memories with this unique outfit!


