How to Install and Use Neofetch on Windows

Have you ever wondered how you can get a quick look at your system’s information on Windows? Well, wonder no more because Neofetch is here to help!
Neofetch is a command-line utility that displays system information in a neat and customizable way. It supports various operating systems, including Windows. In this article, we’ll guide you through the steps on how to install and use Neofetch on Windows.
Installation
First, you need to install the Windows Package Manager and open a PowerShell terminal as an administrator. You can do this by pressing the Windows key and typing “PowerShell,” then right-clicking on it and selecting “Run as administrator.”
Once you’re in the PowerShell terminal, type the following command to install Neofetch:
“`winget install neofetch“`
After the installation is complete, you can verify if Neofetch is installed by typing the following command:
“`neofetch“`
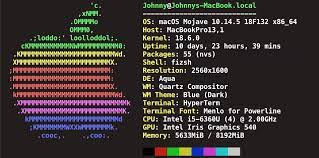
If everything went smoothly, you should see the Neofetch output on your terminal.
Customization
Now that you have Neofetch installed, you can customize its output to your liking. There are many options that you can use to change the way Neofetch displays your system information. For example, you can change the colors, the ASCII art, and the information that is displayed.
To customize Neofetch, create a configuration file in your home directory named “.config/neofetch/config.conf”. You can use any text editor to create this file. In this file, you can add various options to customize Neofetch.
Here’s an example configuration file:
“`
# Theme
colors=distro
# Information
info=”os,kernel,uptime,cpu,shell,memory,desktop”
# ASCII art
ascii_distro=windows
“`
This configuration file sets the theme to “distro”, which uses the system’s colors. It also sets the information to display the operating system, kernel version, uptime, CPU info, shell, memory usage, and desktop environment. Finally, it sets the distribution ASCII art to “windows”.
Using Neofetch
Using Neofetch is easy, as all you have to do is open a terminal and type “neofetch”. Neofetch will display the system information according to your configuration file. If you want to see the default configuration, you can create an empty configuration file.
In addition to displaying information, Neofetch can also be used as a screenshot tool. You can use the following command to save a screenshot of Neofetch’s output:
“`neofetch –stdout | Out-File -Encoding utf8 screenshot.txt“`
This will save a screenshot of your Neofetch output in a text file named “screenshot.txt”.
Conclusion
With Neofetch, you can quickly and easily get a glance at your system information on Windows. By customizing Neofetch, you can make the output more to your liking. With the ability to take screenshots, you can also use it to share your system information online. Happy customizing!


