How to EQ and Mix Your Microphone Without Any Hardware
For musicians and podcasters who are just starting out, it can be challenging to get the right sound for their microphone without any hardware. EQ and mixing are two essential processes that can help you perfect the sound of your microphone. In this article, we’re going to explore how you can EQ and mix your microphone without any hardware.
Choosing the Right Microphone
Before we dive into EQ and mixing, it’s essential to choose the right microphone for your needs. You can choose from a wide range of microphones based on your recording style or genre. Dynamic microphones are ideal for live performance or recording in noisy environments, while condenser microphones are perfect for capturing acoustic instruments or vocals.
Once you’ve selected the right microphone, it’s time to EQ and mix the sound to produce an excellent recording.
Setting Up Your Recording Environment
The recording environment plays a vital role in the quality of your recording. To get the best results, make sure to record in a quiet room. Place the microphone as close to the sound source as possible to minimize ambient noise or room reflection. You can also use sound-absorbing materials such as blankets, foam, or carpets to enhance the quality of your recording.
How to EQ Your Microphone
EQ or Equalization is a process that modifies the frequency balance of your microphone to eliminate unwanted sounds and enhance its overall sound quality. Here’s how to EQ your microphone without any hardware:
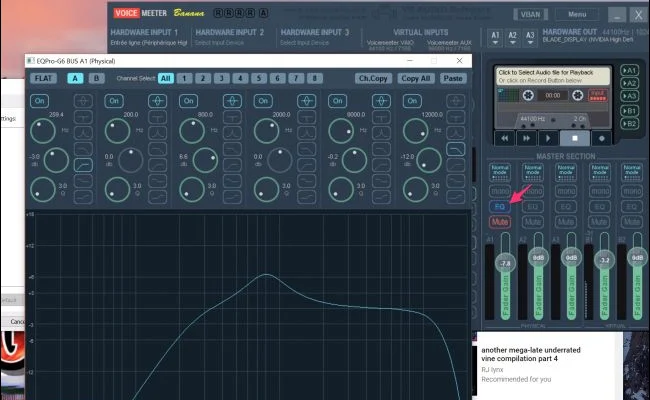
1. Access Your Microphone Settings
You can access your microphone settings through the recording software on your computer. Most apps have a range of equalizer presets that you can use as a baseline for your sound. Find the equalizer settings or EQ graph, and you’re ready to start.
2. Adjust Your EQ Levels
Now it’s time to adjust your EQ levels. To do this, listen to your recording as you make changes to your EQ levels. Start by cutting out frequencies from 200Hz to 500Hz to remove low-end rumble or boominess. If you’re running a vocal microphone, you may want to reduce the frequencies from 800Hz to 1kHz to soften the sound.
3. Enhance Your Highs and Mids
To enhance the highs and mid-range, you increase the frequencies from 2kHz to 5kHz. This process can add clarity and presence to your recording, making it sound more professional.
4. Fine-Tune Your EQ Settings
Once you’ve adjusted your equalizer settings, listen to your recording to see if there needs to be any further tweaking. With some fine-tuning, you can enhance the clarity and bring out the best sound of your microphone.
How to Mix Your Microphone
Mixing is a process that involves blending and balancing multiple audio tracks to produce a seamless sound. Here’s how to mix your microphone without any hardware:
1. Set Your Levels
Before mixing, make sure you’ve adjusted your levels. Ensure that your microphone level is not too loud or too soft, and it’s balanced with other audio tracks.
2. Add Reverb and Delay
Adding reverb and delay to your microphone can create a more natural and spacious sound. Try experimenting with different settings to find the sweet spot that works for you.
3. Use Equalization to Mix
Equalization can also be used to mix your microphone. You can use EQ to position your recording in the stereo field or to boost certain frequencies.
4. Use Panning to Mix
Panning involves placing audio tracks on different sides of the stereo field. You can pan your microphone audio to create a sense of space and to separate it from other audio tracks in your mix.
Conclusion
EQ and mixing are essential processes that can help you achieve a professional-quality sound for your microphone. By following the steps outlined above, you can EQ and mix your microphone without any hardware. Remember to select the right microphone, set up your recording environment, and fine-tune your settings to achieve the best sound. With some practice and experimentation, you can master the art of EQ and mixing your microphone without any hardware.