How to Cure Salmon: 12 Steps
Introduction:
Curing salmon is a popular technique used to enhance the flavor and prolong the shelf life of this delicious fish. In this article, we will provide you with a comprehensive guide on how to cure salmon in 12 easy steps.
Step 1: Choose Your Salmon
It all begins with the right fish. Choose a fresh, high-quality salmon fillet from a reputable source. It’s essential to ensure the fish is fresh because curing will not remove any bacteria or spoilage.
Step 2: Prepare Your Workspace
Before starting, clean your workspace and gather all needed utensils like a sharp knife, cutting board, gloves, two large bowls, and plastic wrap.
Step 3: Make the Curing Mix
Create your curing mix by combining equal parts salt and sugar in a bowl. You can also add other spices and herbs, such as dill or black pepper, for additional flavor.
Step 4: Rinse and Dry the Salmon Fillet
Rinse the salmon fillet under cold water to remove any scales or debris. Then, pat it dry with a paper towel.
Step 5: Debone the Fillet (Optional)
If your fillet still has pin bones, use tweezers or needle-nose pliers to remove them carefully.
Step 6: Coat the Fillet with Curing Mix
Place the salmon fillet skin-side down on a cutting board and spread your curing mix evenly across its surface. Ensure that you cover all exposed flesh with a generous layer of the cure.
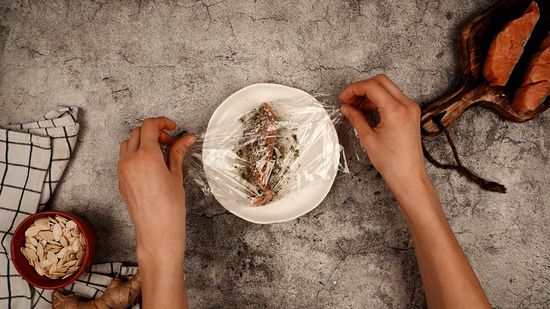
Step 7: Wrap and Cure
Wrap your coated salmon fillet tightly in plastic wrap, ensuring no air bubbles are trapped between the fillet and wrap. Then place it in one of your bowls, skin-side down.
Step 8: Add Weight
To help press out any excess moisture during curing, add some weight on top of the wrapped salmon fillet. This can be done by placing a heavy plate or another bowl on top.
Step 9: Refrigerate and Wait
Stow the curing salmon in the refrigerator for 24 to 72 hours, depending on your desired level of saltiness. The longer you cure, the saltier and more intense the flavor will be.
Step 10: Flip the Fillet
At least once during curing, remove the salmon from the refrigerator and carefully flip it. This ensures even curing. Then place it back in the fridge and add weight again.
Step 11: Rinse and Dry
Once your salmon has cured for the desired time, unwrap it, discard any liquid left in the bowl, and rinse off the curing mix under cold water. Pat dry with paper towels.
Step 12: Slice and Serve
Place your cured salmon fillet on a clean cutting board skin-side down. Using a sharp knife, slice thinly at a slight angle. Your cured salmon is now ready to serve and enjoy!
Conclusion:
With these simple steps, you can create deliciously cured salmon at home that will impress your family and friends. Don’t be afraid to experiment with different spices or herbs to put your unique spin on this classic dish. Enjoy!